Image Map

Wednesday, March 31, 2010

Liza's Mini Cherry Cheesecakes


I just LOVE anything miniature!!!  It makes my happy.  It makes me smile.  It gives me a warm feeling inside.  "Mini" anything is delightful to me....and these mini cheesecakes are soooo yummy.  You can simply pop them right in your mouth and instantly be over come with a big ole warm and happy smile. :-)

My dear friend Liza passed this recipe onto me just after Jolie was born.  She and my sister (yes, Colline actually baked!!!) made a whole bunch of these little cuties for my Baby Shower - a precious precious day that I will never forget (love you ALL who worked so hard and with so much love to put on that Shower for me).  That being said I pass this recipe onto all of you  in hopes that you can make and share this recipe with those that you care about and wish to give a happy (and yummy) memory to.  In other words I am "paying it forward" by passing on this recipe....may you do the same.


Liza's Mini Cheese Cakes
(a version of this recipe can also be found at allrecipes.com)

Ingredients:

1 box of vanilla wafers (warning...you won't need the whole box for this recipe to plan on indulging in a couple as you make this recipe)

2 (8oz.) packages of cream cheese, softened

3/4 cup sugar

2 eggs

1 tsp. vanilla extract

1 tsp. almond extract (I adore almond flavor paired with cherries....but feel free to omit this flavoring if you wish)

1 (21 oz.) can cherry pie filling


Directions:

1. Preheat oven to 350 degrees F. Line muffin tins with miniature paper liners (I used the regular size muffin tins for the mini liners didn't fit very well in my mini muffin pan for some reason....this worked out just fine).

2. Place a whole vanilla wafer inside each paper liner.  As you see in the picture below.


3. In a mixing bowl  beat together cream cheese and sugar until light and fluffy.  Add in eggs one at a time until they are well combined.  Add in extracts. 

4. Fill in each muffin liner almost to the top with the cream cheese mixture.  I used a medium size scoop (from Pampered Chef) that worked great for this purpose.  It took about 1 1/2 scoops to fill up each liner.

5. Bake for 15 minutes or until lightly browned. Cool completely.  Top with a 2-3 cherries of the cherry pie filling.


Enjoy!

Happy Mini Cherry Cheesecake Baking!
~avril :-)

**This post has been linked to Mommy's Kitchen for "Pot Luck Sunday"

Saturday, March 27, 2010

Jazzed Up PW's Pizza Dough


Pizza....pizza....pizza.  Who doesn't enjoy a good slice of pizza?!?!  To me a slice of pizza means happiness, simplicity and yumminess all wrapped up in one moment of life.  Like a good cup of coffee (or even tea) I often associate pizza shared with others.  Pizza is just so GOOD!!! 

In the past year or so I have discovered that making your own pizza dough is really NOT that hard.  Its quite easy in fact.  It does take a little patience (to let the dough rise and such) but otherwise it is really quite easy to create and master.

As many of you may know the Pioneer Woman (also known as Ree Dummond) is one of my idols/my Queens' in the cooking/baking/bloggin world.  I have been going through her lovely cook-book - The Pioneer Woman Cooks -  one recipe at a time making her delicious food.  One of her recipes that she offers in this book is none other than pizza dough.  I have taken this recipe and added a few extra ingredients of my own to "jazz" it up.


Jazzed Up PW's Pizza Dough
(adapted from the Pioneer Woman)

Ingredients:

1 tsp active dry yeast (make sure it is fresh and NOT outdated)

4 cups all purpose flour

1 tsp kosher salt

1 tsp garlic powder (more if you wish)

1 tbsp fresh or dry parsley

1/3 cup extra virgin olive oil, plus more for drizzling

Directions:

1. Pour 1 1/2  cups warm water into a bowl.  Sprinkle yeast over the water.  Set aside.

2. Combine flour, salt, garlic powder and parsley in a mixing bowl.  With electric mixer on low speed, drizzle in the olive oil until just incorporated.

4. Go back to your bowl of warm water and yeast....gently stir this mixture and then drizzle over the flour/oil mixture.  Mix until dough forms a ball (you can also mix by hand until dough comes together).

5. Drizzle a little olive oil into a clean bowl.  Roll the ball of dough in the bowl to coat with oil.  Cover bowl with a clean/moist kitchen towel.  Set in a warm place for 1-2 hours until doubled in size (You can also cover the dough with plastic wrap and store in a fridge for up to 2 days at).

6. Preheat oven to 500 degrees F.

7. Lightly drizzle olive oil on pizza pan or rimmed baking sheet. Depending on what size thickness and pizza you wish to make you can either divide the dough in 1/2 for two medium pies or use all the dough for 1 large pie.

8. Using your hands, stretch the dough to the desired shape, pressing dough into the pan with your fingers.  Making finger marks in the dough allows for a lovely surface for the toppings be received upon.

9.Top with your favorite toppings and bake for 8-10 minutes, until the edges of the crust are golden brown.


Yummy in my tum-tum-tummy!!!

Happy Jazzed Up PW's Pizza Dough Making!
~avril :-)

Wednesday, March 24, 2010

S'mores Brownies


Oh yes, it's that time of year again....BBQ time!!!  The weather is getting nicer, the sun is getting warmer and yes, the days are getting LONGER which all leads to cook-outs with friends and family! :-)

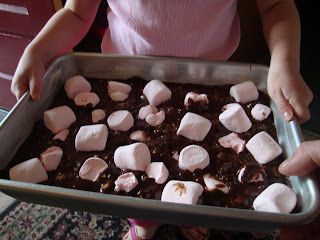
This past weekend we went to our first BBQ and I thought it would be appropriate to bring along a batch of  S'mores Brownies for this special event.  Boy, was I right!  These brownies were scummmmmmptiously delish...no doubt about it.  Easy, quick and fun to make with kiddos too.  Jolie almost feel over backwards with happiness as she helped me plop on the BIG puffy marshmallows on top of the brownie batter.  Crushed graham crackers are mixed into the batter to really make it a "S'more" kind of brownie. 


S'mores Brownies
(recipe has been adapted from one of my favs, Joy the Baker)

Ingredients:

1 1/2 cups flour

2 tsp baking powder

1 tsp salt

1 cup (2 sticks) butter

6 oz. unsweetened chocolate 

5 large eggs

1 1/4 cups brown sugar

1 cup granulated sugar

2 tsp vanilla

1 cup graham crackers, roughly crushed with your hands

12 (or so) BIG marshmallows (*I also cut up a few additional marshmallows and stirred them into the batter at the very end)


Directions:

1. Preheat oven to 350 degrees F.  Butter a 9x13 baking pan.  

2. Combine first 3 ingredients in a small bowl and set aside.

3. Place butter and chocolate in a bowl that can be set over simmering water in a heavy saucepan.  Stir chocolate and butter in this "double boiler" until melted and smooth. Remove from heat.

4. Beat eggs, sugars and vanilla in a large bowl to blend.  Stir in melted chocolate/butter mixture, then the dry ingredients. Gently fold in crushed graham crackers. *If you wish to add in extra cut up marshmallows now is the time.  Pour batter into prepared pan.  Dot batter with LARGE marshmallows (I kind of gently pushed the m's down into the batter so that they couldn't escape during baking - :-)

5. Bake for 30-40 minutes.  You do NOT want to over-bake these brownies.  Only bake until batter comes away from the sides of pan and a toothpick inserted into the center comes out with moist crumbs attached.

6. Cool at least 20 minutes before you cut into squares and serve.

Enjoy!


Look at the yumminess of these brownies just after they come out of the oven.....marshmallows will be browned and puffy. Unfortunately the marshmallows deflate as the brownies cool.

A scoop of good vanilla ice cream served on the side is just perfect with this sweet.

Store any left-over brownies in an air tight container.


Here is cutie-pie Liza taking a bite of the brownie....see how it just ooooozies with yumminess?!?!


Happy S'mores Brownies Baking!
~avril :-)

**This post has been linked to I Heart Naptime with Chocolate Sundaes blog - a super cute blog!!!

Monday, March 22, 2010

Spring Salsa


Happy Happy Spring!!!

I just love Spring-time!  It makes me so happy to see all the new little leaves on the trees and flowers on the ground starting to pop out!

This past Saturday was just gorgeous (sunny 70 degree weather here in NH) and we were invited to our first BBQ of the season at the Rice's house (love those guys!).  I offered to bring Spring Salsa and S'mores Brownies (no worries, this recipe will be posted soon).

Spring Salsa is super easy to make and VERY yummy yummy.

Spring Salsa

Ingredients:

1 large can of SWEET corn

2-3 plum tomatoes, chopped (or a couple handfuls of cherry tomatoes, chopped)

1 ripe avocado, peeled and chopped

1/4 cup red onion, finely chopped

juice of 1 lemon

salt and pepper to taste

1/4 cup cilantro, finely chopped

Directions:

Combine all ingredients except cilantro.  Refrigerate at least 1 hour before serving.  Sprinkle with cilantro just before serving.

Serve with yellow or blue corn chips.

Variations:  Black beans, chick peas,  chopped peppers (red, orange, green or yellow) or cucumbers are all great additions to this salsa.

Happy Spring Salsa Making!
~avril :-)


Friday, March 19, 2010

Coffee Cake (yes, literally the flavor of coffee!!!)


Oh yeah.....this is a goooooood cake. Yummy. In. My. Tummy!!!!!! (even for those that don't drink coffee on a daily basis will LOVE this cake).  I made this cake for my dear MIL's Birthday and we ALL thoroughly enjoyed it.  Even Jeff who doesn't even touch coffee to drink it.

COFFEE Cake
(adapted from the Pioneer Woman)

Cake Ingredients:

2 cups flour

2 cups sugar

1/4 tsp salt

2 sticks butter

3 tbsp instant coffee crystals

1/2 cup buttermilk

2 whole eggs

1 tsp baking soda

2 tsp vanilla extract


Icing Ingredients:

1 1/2 sticks butter, softened

1 pound powdered sugar

2 tbsp instant coffee crystals

1/4 tsp salt

4 tbsp heavy cream, light cream, half and half or milk (I used milk)


Directions:

1. Preheat oven to 350 degrees F.  Grease 2 round baking pans.

2. In a large bowl mix sugar, flour and 1/4 tsp salt.  Set aside.

3. Melt 2 sticks butter in a pot over medium heat.  While butter is melting add 3 tbsp of instant coffee to 1 cup boiling water. Once butter has melted, add coffee mixture to the pot. Let it come to a boil for about 10 seconds, then turn off the heat and set aside.

4. In a separate bowl combine buttermilk, eggs, baking soda and vanilla all together.  Mix until well combined.

5. Pour butter/coffe mixture into the flour mixture.  Stir all together gently.  The purpose here isn't to mix it together perfectly but rather to cool down the heat of the butter/coffee mixture before adding all of it to the egg mixture.

6. Add in the egg mixture now and gently stir untl well combined.  Pour into prepared pans.  Bake for 20-22 minutes or until set. Allow to cool completely (I cooled mine overnight before I frosted the cake).

7. Combine ALL icing ingredients and mix until smooth and creamy.  Ice cake.  Chill until served.

Enjoy!

Happy Coffee Cake (litterally!!) Baking!
~avril :-)

Wednesday, March 17, 2010

Warm Goat Cheese Salad


Happy St. Patrick's Day! 
Because it is St Patty's Day I thought I'd post something "green"....and can you believe it, it's NOT a dessert but rather a delicious salad.  Perfect to have on St. Pat's Day. This recipe makes a large serving for 1 person so do not hesitate to double it if you wish to serve more than one person.


Warm Goat Cheese Salad

Ingredients:

For the goat cheese toast:

1-2 pieces of good fresh bread (I choose a nice French Bread)

extra virgin olive oil

3 oz. of goat cheese


For the salad:

1/2 tsp red wine or sherry vinegar

2 tsp extra virgin olive oil

1/8 tsp Dijon mustard

a good pinch of coarse salt

2 cups of torn green lettuce leaves, washed and dried

FRESH ground pepper

1/4 cup walnut halves, toasted (optional)


Directions:

1. Preheat broiler and set oven rack in the middle of oven.

2. Brush bread with just enough olive oil to moisten it.  Gently spread goat cheese on bread (don't spread too thin).  Broil on a baking sheet in the oven until the cheese is soft, warmed through and lightly browned.  This doesn't take long (maybe 3-4 minutes) so don't walk too far away from the oven.

3. While the toasts are baking, make vinaigrette.  With a fork stir together vinegar, olive oil, mustard and salt all together.

4. Toss lettuce in with the vinaigrette and pile on a plate. Grind FRESH pepper over the top and then rest the warm goat cheese toast over salad.  Scatter walnuts on top, if using.

I discovered this fabulous little salad as I was reading David Lebovitz's book, The Sweet Life in Paris.  I suggest everyone who has gone to Paris, worships Paris, has family in Paris, dreams of going to Paris or has simply just flown over Paris to go out and treat themselves to this book.  It is full of wonderful humor, delicious recipes and a great out-look of what it means to live in Paris.  I am serious......go get this book!

Happy Warm Goat Cheese Salad making!
~avril :-)

Monday, March 15, 2010

Cinnamon Raisin Bread

Mmmmmmmmm so good.  This weekend was a rainy weekend - perfect for making bread.....Cinnamon Raisin Bread at that!  Jolie (my daughter) and I had so much fun making this recipe together.  Not only did she get to roll out the dough but as you can see above, she got to sprinkle the cinnamon/sugar mixture and then raisins ontop of the dough. Lots of fun....yummy fun.


Peek-a-boo! This is one of my favorite parts of making bread - discovering that it has risen.  It's a beautiful beautiful thing.  As you see from the picture above this recipe makes 3 loaves of bread which is great - 1 or 2 to keep and the 3rd to give away.  It's a lovely thing!


I discovered this recipe from one of my newest cook-books, Artisan Bread in Five Minutes a Day.  I can't say enough about this book.  Easy to follow recipes along with a wealth of information for baking bread.  I highly recommend it.


Cinnamon Raisin Bread

Ingredients:

2 cups lukewarm water

1 cup buttermilk

1 1/2 tbsp granulated yeast (2 packs)

1 1/2 tbsp Kosher salt

1 1/2 tbsp sugar

6 1/2 cups unbleached all-purpose flour

1 1/2 tsp ground cinnamon

1/3 cup sugar

1 cup raisins (more if needed)

Egg wash (1 egg beaten with 1 tbsp water)

Butter or neutral-tasting oil for greasing pans


Directions:

1. Mix the yeast, salt and sugar with the lukewarm water and buttermilk in a large bowl (I used my Kitchen Aid bowl and this worked fine)

2. Mix in the flour using either a spoon or the dough hook of your Kitchen Aid mixer.  If you are not using a mixer, you may need to use wet hands to incorporate the last bit of flour.

3. Cover with a clean dish towel and allow to rest at room temperature until the dough rises and collapses (or flattens on top) - this takes approximately 2 hours.

4. The dough can be used immediately after the initial rise or it can be refrigerated in a lidded (not airtight) container and used over the next 7 days. 

5. Grease your loaf pans and set aside.

6. Dust work surface with flour along with a 1 1/2 lb piece (cantelope size) of the dough and the rolling pin.

7.  Roll out into a 8x16-inch rectangle about 1/4-inch thick.

8. With a pastry brush cover surface of dough with egg wash.  Mix together the sugar and cinnamon and sprinkle 1/3 of the mixture over dough evenly.  Do the same with the raisins.

9. Starting from the short side, roll up dough "jelly-roll" style.  Pinch the edges and ends together, tucking the ends under.

10. Place loaf seam side down in prepared pan.  Allow to rest 40 minutes (if you are using refrigerated dough allow 1 hour and 40 minutes of rest time).

11.  Preheat oven to 375 degrees F.

12. Bake for 35-40 minutes

13. Remove from pan and cool completely before slicing.


**I know this is a ton of steps but they are so easy and well worth it in the end I promise you that!

Happy Raisin Cinnamon Bread baking!


I had to include one last picture for it includes my cat, Lucy in the background.  Love her! :-)

Saturday, March 13, 2010

Lemon Bars

I don't know about you but I LOVE anything with lemons.....especially when it is sweet.... (BIG surprise!).  These bars are very easy to make and taste even better as time goes on.  I recommend that you wait at least 12 hours/overnight before you cut into these little delites (take note there is nothing "light" about these bars as far as calories/fat is concerned - :-).

Lemon Bars

Ingredients:

1 cup flour

1/2 cup powdered sugar

1 tsp Kosher salt

1 stick butter (unsalted), melted

1 cup granulated sugar

2 tbsp flour

2 eggs

3 tbsp lemon juice (I used 2 Meyer lemons, regular lemons are fine too)

2 tsp lemon zest

powdered sugar, for dusting

Directions:

1. Preheat oven to 350 degrees F

2. In a medium bowl, whisk together 1 cup flour, powdered sugar and salt.  Stir in the melted butter and then press into a greased 8x8 pan.  Bake for 15-20 minutes (just until the crust becomes light brown).

3. Reduce oven temp. to 300 degrees F


4. In a medium bowl, mix together granulated sugar, 2 tbsp flour, eggs, lemon juice and zest.  Pour this lemon mixture over the crust and bake for 20-25 minutes (until set).

5. Lightly dust with powdered sugar and cool completely. Store in refrigerator.  Again, take note that these bars taste best after cooling overnight in the refrigerator.

Happy Lemon Bar baking!

Note: This recipe was discovered on Sugarcrafter's blog - don't you just love her name!?! Be sure to check out her blog. :-)

Wednesday, March 10, 2010

Strawberry Bread

What could be better than Strawberry Bread (well, maybe Cherry Bread....:-)!?!?

When I came upon this recipe from the Countrygirl Cooks! blog I knew I had to make it....and I was soooo glad I did! Not only does it make a super yummy quick bread but it makes 2 (possibly even 3) loaves of bread.  One to keep and one to give away.  I love those kind of recipes.

Strawberry Bread

4 eggs

2 cups sugar

1 1/2 cups canola oil

3 cups flour

3/4 tsp salt

1 tsp baking soda

1 tsp cinnamon

2  (16 oz) containers of sweetened, frozen sliced strawberries in juice (thawed)


Mix in a large mixing bowl eggs, sugar and oil.  Mix until thoroughly combined (it will be a beautiful yellow mixture).

Add to above mixture the flour, salt, baking soda and cinnamon.  Mix just until well combined.  The mixture will be nice and thick at this point.

Dump in both containers of strawberries (juice and all) into the mixing bowl.  Gently mix well until fully combined.

Pour into 2 (possibly 3 depending on size of pan) well greased pans. Bake at 350 degrees F for 50-60 minutes or until a toothpick inserted in to the middle comes out clean. 

Allow to cool for at least 1 hour (if not more) before you remove the bread from the pan.

Happy Baking! :-)


Sunday, March 7, 2010

Coffee Toffee Bars

A wonderful recipe for having something sweet with a nice cup of hot tea with a friend. Above you will see the cast of characters that make up this recipe. Aren't they sweet! :-)

Coffee Toffee Bars

1 cup butter or margarine, softened

1 cup brown sugar

1 tsp. almond extract (if you don't like almond you can easily subsitute vanilla or coffee extract in it's place)

 1 tbsp instant coffee (add up to 2 tbsp for more flavor)

1/2 tsp baking powder

1/4 tsp. salt

2 1/2 cups flour

1 cup chocolate chips (milk chocolate or semisweet)

Cream together butter and brown sugar.  Blend in the almond extract (or vanilla or coffee), baking powder and salt.  Add flour....this will make a stiff dough. Press mixture into a well-greased 9x13 pan and sprinkle with chocolate chips on top.  Gently push chocolate chips into dough.  Bake @ 350 degrees F for 20-25 minutes.

*I found this recipe on the Tasty Kitchen blog (guess what the name of the member's name was that posted this recipe? - "nhsweetcherry"!!! Can you believe it?!?....not only is she from NH like ME but she has "cherry" in her member name!!!!! :-)

**I thought that these bars tasted even better the next day...the flavors of the almond and the coffee were wonderful.


Thursday, March 4, 2010

Raspberry Meyer Lemon Pancakes

Over this past weekend I was able to shop at one of my very favorite stores....Trader Joe's.  I was in heaven - yes, I was in absolute heaven there.  They have such good/reasonably priced food.  One of my "treasures that I found at TJ's (not to be confused with TJ Maxx) was a delightful little bag of Meyer Lemons.  I knew exactly what I would do with them after bringing them home - I would make Raspberry Meyer Lemon pancakes from a recipe that I discovered on Joy the Baker's blog. This recipe for pancakes is melt- in- your- mouth -DEEEELICIOUS!!!! And Joy's blog is just adorable!  Definitely go check her out.

Raspberry Meyer Lemon Pancakes

8-10 pancakes (enough for 3 people)


zest of 1 Meyer Lemon (if you don't have a Meyer lemon...use a regular one -it will be ok)

1 tbsp sugar

1 egg

1 cup flour

1 tsp baking powder

1/2 tsp tsp baking soda

1/2 tsp salt

1 cup buttermilk (if you don't have buttermilk add just a little bit of vinegar or lemon juice to  the milk before it hits the 1 cup mark to make it = 1 cup)

2 tbsp butter, melted and cooled slightly

1 cup FRESH raspberries (or blueberries ) - in the past I have used frozen berries in this recipe....so if you don't have fresh, frozen are fine.

oil or butter for cooking

In a small bowl combine lemon zest and sugar.  Mix until pale yellow and fragrant.

In a large bowl, whisk together the egg, buttermilk and melted butter.  Add flour, lemon/sugar mixture, baking powder and soda and salt.  Stir JUST until combined.  The batter may be a little lumpy (you want it this way).  Gently fold in berries. Again, do NOT over stir.

Heat a griddle or pan over medium heat.  Add a tsp of oil or butter and heat through.  Add 2 tbsp's of batter to the pan.  Heat until bubbles form and start to pop.  Carefully flip over and cook through.  Place cooked pancakes on an oven proof plate and let rest in 200 degrees F oven while you fry the rest of the pancakes.

Top with (heated) maple syrup.

ENJOY!!!


Monday, March 1, 2010

The BEST Brownies (made by scratch)

I am serious....this is indeed hands down the BEST brownie recipe made from scratch! The brownies come out to be chewy, fudgy, moist and DELICIOUS. Do yourself a favor and make this recipe ASAP!!! - then eat one (ok maybe two) and freeze the rest or give them away for you will constantly be going back for more....trust me!

I discovered this recipe through Pamela Anderson's cookbook, "The Perfect Recipe".

The BEST Brownies
Ingredients:
2/3 cup all purpose flour
1/2 tsp. salt
1/2 tsp. baking powder
2 oz. unsweetened chocolate
4 oz. bittersweet or semisweet chocolate
10 Tbsp. unsalted butter (1 stick plus 2 Tbsp)
1 1/4 cups sugar
2 tsp vanilla extract
3 large eggs
3/4 cup toasted walnuts, pecans, macadamia nuts or peanuts (optional)


Preheat oven to 350*. Make sure your rack is in the middle of the oven to get optimum heat all around the baking brownies. Spray an 8 x 8 square baking pan with oil then layer with foil or parchment paper (I usued parchment paper) in such a way that you have 2 sides that are longer so that you can easily remove the brownies from the pan after they are baked.
Whisk flour, salt and baking powder all together in a small bowl; set aside.
Melt chocolates and butter in a medium bowl over a pan of simmering (NOT boiling) water. Remove the melted chocolate and butter mixture from the heat and gently whisk in sugar and vanilla. Now add the eggs, one at a time, fully incorporating each before adding the next. Continue to whisk until mixture is completely smooth and glossy (this will take a couple of minutes). At this point you can transfer this lovely mixture to a larger bowl for you will now add the dry ingredients so you want enough room for all of the batter. Whisk in the flour mixture until JUST incorporated ( you DO NOT want to over stir this batter). If using nuts, add now.
Pour batter into prepared pan; bake for 35-45 minutes. You can tell when the brownies are done by inserting a toothpick/cake tester in the middle of the pan and it comes out with wet crumbs. Do NOT over bake these brownies!!!! - if the toothpick comes out clean you have over baked them....and that will just be sad.
Cool brownies in pan on a wire rack for 5 minutes and then remove from pan with the "handles" of foil/parchment paper and cool completely for a good 2-3 hours. ONLY cut once ready to serve.
Sooooooooo YUMMY! - serve with some good vanilla ice cream and chocolate sauce (serious YUM) or just eat alone....with a nice cup of tea or a tall glass of milk.
Make 16 brownies.


Enjoy! <3

LinkWithin

Related Posts with Thumbnails

ShareThis