Image Map

Sunday, August 29, 2010

Bacon Tomato Pasta


WARNING!!!!! - This lovely pasta dish is FULL of flavor and.....it is NOT low-fat at that.  But man-o-man once you bite into this pasta dish you will not regret the fact that you have saved extra calories throughout the day (or week) to eat this dish.  I can seriously promise you that....you will not regret enjoying every bite of this pasta dish.

I was attracted to it not only because it was a pasta dish (love pasta!!!) but also because it uses lots of fresh ingredients....along with the yumminess of bacon grease.  Yes, bacon grease.  Bacon grease is ingredient that really does not help out with the fat content.  But anyway, let's stop worrying about the "fat" and get to recipe so that you can hurry up and make it for your family ASAP.

Bacon Tomato Pasta
(recipe discovered on Tasty Kitchen blog from the member, PlanoSheila)

Ingredients:


1 package (16 oz.) of bacon, naturally flavored

1/2 cup bacon grease - from the bacon you are cooking

2 cans (14.5 oz. each) diced tomatoes

1/2 cup chopped FRESH basil - extra for garnishing

2 cloves garlic, minced/crushed

1 bunch green onions, chopped

2 tsp salt - if needed

2 small tomatoes, chopped - for garnishing

Grated parm cheese - for garnishing

1 box (16 oz) Capellini or Angel Hair pasta

Directions:

1. Fry bacon in a large frying pan or dutch oven....


....making sure it is cooked thoroughly but not crispy.  Drain cooked bacon on paper towels....


....Do NOT throw away bacon grease!!!! You will need to reserve 1/2 cup of grease.....


....I know, I know...it is a little bit more than 1/2 cup in this picture. :-)  Dump any remaining grease out.  No need to clean pan after cooking all of the bacon for it only adds to the flavor of the dish further.

2. When the bacon is fully cooled break into small pieces with your fingers....


....and set aside.

3. Dump tomatoes from cans into a large bowl.  Throw in chopped fresh basil.....


 and stir.  If you feel like you don't have enough basil feel add more.  Set bowl aside allowing the flavors of the tomatoes and basil to blend together.

4. Crush or dice up your garlic and chop the green onions...


5. Pour your 1/2 cup of bacon grease back into your pan and heat at medium heat for 2 minutes.  Throw in garlic and green onions....


....Cook (stirring occasionally so that the garlic doesn't burn) until onions start to get a nice tan from the bacon grease and then add in bacon....


....Reduce heat to low and allow bacon, garlic and onions to saute for about 10 minutes.

6. Add in bowl of tomatoes and basil....


....Stir together really well.  Bring to a boil and then simmer for a good 20 minutes.  Taste and add salt if needed (I honestly, didn't need any extra salt at this point - the flavors were already perfect thanks to that lovely bacon grease!).

7. Meanwhile in a large pot cook your pasta according to package directions.  Drain and set aside.  Right before serving, in a VERY large bowl, add in bacon/tomato sauce to the pasta.  Many thanks to my strong Dad for doing the pouring of the sauce....


 ....Gently combine well....


8. Garnish with freshly chopped tomatoes, basil and some parm cheese.  Soooooo yummy!!!! And left-overs the next day are super yum too!


Happy Bacon Tomato Pasta Making!

***More yummy recipes can be found at Mommy's Kitchen - Pot Luck Sunday

Tuesday, August 24, 2010

Yummy Zucchini Cookies


Have you ever heard of Zucchini Cookies?  I've heard of Zucchini Cake, Zucchini Bread and Zucchini Muffins as baked goodies but cookies made with zucchini is something totally new to me.  I feel like I have just discovered America like Christopher Columbus....it's a whole new world to me now knowing that Zucchini Cookies exist! :-)  And man oh man are they gooooood!!! These cookies have yumminess and healthiness all wrapped up in one happy place.  The spices, raisins and nuts all go perfectly with the shredded zucchini that make up this cookie recipe. Of course if you don't like raisins or nuts (or even one of the spices) just omit them - you will still have a delightful cookie.

To make this cookie recipe even better I am honored to say that a friend of mine passed this recipe onto me which makes it a "Close to my Heart" recipe.  Thank you Stacey! Stacey's mommy made these cookies for her all throughout her childhood.....precious!!!

I decided to make these cookies for my parents as a "Welcome Home" gift this past weekend.  They had been off camping in their RV in Vermont so what better why to say "Welcome Home" than leave them a pretty jar wrapped with a ribbon filled with Yummy Zucchini Cookies!!!  To top off the surprise I used a zucchini from my mother's garden to make the cookies. Needless to say both my mom and dad were tickled pink with happiness to have these cookies waiting for them when they returned home. :-)

Yummy Zucchini Cookies

Ingredients:


I just looove the ground cloves in this recipe....


1 cup zucchini, grated

1 tsp baking soda

1 cup sugar

1/2 cup butter, at room temperature

1 egg, beaten

2 cups flour (I used whole wheat white flour just to get that extra kick of healthiness out of the recipe...white flour is fine too)

1 tsp cinnamon

1/2 tsp nutmeg

1/2  tsp ground cloves

1/2 tsp salt

1 cup nuts, chopped (I used walnuts...pecans would be yummy too)

1 cup raisins

Directions:

1. Preheat oven to 375 degrees F.  Then cream together butter and sugar in a large bowl until light and fluffy....


2. Add in beaten egg - mix well.

3. Add to butter mixture - flour, baking soda, all spices (you desire) and salt...


....mix well.

4. Grate zucchini....


....then add to batter along with raisins and chopped nuts....


....mix to combine.

6. Place tablespoonfuls (I used a medium Pampered Chef scoop) of cookie batter on greased, parchment paper lined or Silpat lined cookie sheets.....


....Bake for 12-15 minutes....and then magic!!!


Wait a minute or two and enjoy!

Happy Yummy Zucchini Cookies Baking!


This post has been linked to....

Saturday, August 21, 2010

Blueberry Sour Cream Pancakes


Once again I am honoring my good friends of the Summer.... Blueberries!!!


This time I will be sharing with you one of my all time favorite pancake recipes....Sour Cream Pancakes with Blueberries - deeeeeelish!  The pancakes are light and fluffy and FULL of flavor.  The sour cream really does wonders to the batter....it's like the secret ingredient to the batter. :-)

 The beauty of this recipe is that you can easy switch up the blueberries for other berries or fruit or just make the pancakes plain without any extra add-ins.

Blueberry Sour Cream Pancakes
(recipe from Ree Drummond's cookbook, The Pioneer Woman Cooks)
*makes twelve 4" pancakes*

Ingredients:


1 cup sour cream

7 Tbsp flour (yes, only 7 Tbsp's!!)

1 Tbsp sugar

1 tsp baking soda

1/2 tsp salt

2 large eggs

1/2 tsp vanilla extract

1 cup blueberries - fresh or frozen

Butter and Maple Syrup

Directions:

1. In a medium bowl scoop in sour cream then add in flour, sugar, baking soda and salt....


....Mix to combine - very gently.  Stop short of mixing the batter together completely....you want the pancakes to have some interesting texture.

2. Beat the eggs in a separate bowl...


....then add the vanilla extract...


...and stir to combine.

3. Pour egg/vanilla extract mixture into the sour cream/flour mixture...


...Once again gently mix just until combined.  A little white and yellow swirling is great!

4.  Fold in blueberries....


5. Heat up iron skillet or griddle over medium-low heat with a pat of butter or cooking spray (I prefer butter in this case for the yummy flavor).  You want the skillet to get nice and hot before you pour the batter into the pan....about a 1/4 cup at a time.   Cook for 1 - 1 1/2 minutes, then flip the pancakes over.  Cook for another 45 seconds....


.....then remove to plate and embellish with butter and warm maple syrup....


....Continue with remaining batter - adding butter to skillet when needed before adding in more pancake batter.  Be careful not to burn the butter!!


Happy Blueberry Sour Cream Pancakes Making!

This post has been linked to...

Mommy's Kitchen - Pot Luck Sunday


Wednesday, August 18, 2010

Crunchy Buttermilk Baked Chicken

It is always fun for me to discover a new chicken recipe.  Especially when the recipe is a success!!!  I've been eyeing Buttermilk Baked Chicken lately.  I finally found an easy/do-able recipe that is super yummy.  I discovered it in a lovely magazine called, Cook's Country.  What a gem of a magazine!  I'm splurging and subscribing to it ASAP. :-)

Crunchy Buttermilk Baked Chicken
(recipe from Cook's Country magazine)

Ingredients:


2 cups buttermilk - I used 2% milk with a Tbsp of lemon juice added to it (I didn't have any buttermilk on hand)

1/4 cup sour cream

1 (1oz.) envelope Ranch Dressing seasoning mix

1 Tbsp salt

2-3 lbs bone in chicken pieces, skin and excess fat removed

4-5 slices of hearty white sandwich bread

Directions:

1. Place oven racks to the lowest and middle positions. Heat oven to 450 degrees F.

2. Make the brine by whisking together buttermilk, sour cream and 2 Tbsp Ranch Dressing mix and salt in a large bowl....


3. Add in chicken and toss to coat....


.....refrigerate, covered for 30 minutes or up to 1 hour.

4. Make the coating for the chicken.  Place broken up bread slices and remaining Ranch Dressing mix in a bowl of a food processor....


....Pulse off and on until bread has been finely ground.

5. Bake bread crumb mixture on a rimmed baking sheet......


.....in the middle rack of the oven, stirring occasionally, until golden brown - about 5 minutes....be careful not to let the bread crumbs burn!


Place bread crumbs in a shallow bowl.

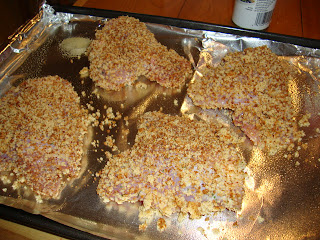
6. Line a rimmed baking sheet with tin foil and spray lightly with cooking spray.  Remove chicken in brine from refrigerator and dredge chicken pieces in bread crumbs...


...then place on prepared baking sheet...


....Spray chicken lightly with cooking spray - this holds the crumbs together and allows a yummy crunch-ness to the chicken.

7. Bake on lowest rack in oven until bottom of chicken is golden brown - about 10 minutes.  Then move chicken to middle baking rack and reduce oven temperature to 400 degrees F.   Bake until chicken is golden brown all over and "white meat" registers 160 degrees on a meat thermometer ("dark meat" at 175 degrees) - this takes about 20-25 minutes.

Serve with happiness!  I served mine with mashed mashed potatoes, gravy (sinful!) and green beans.


Happy Crunchy Buttermilk Baked Chicken Baking!


Monday, August 16, 2010

Cheesecake with Blueberry Topping


This is the beautiful view (@ Monadnock Berries in Troy, NH) that I had while picking blueberries.  It was in this very spot that I decided that I would make a cheesecake with blueberry topping from the blueberries that I so carefully picked from these bushes.  It was a happy moment! - not only because I finalized a special treat to make with the blueberries I was harvesting but also because picking blueberries is seriously one of my most favorite things in life to do....just after baking of course!  Blueberry picking is a peaceful and magical activity for me....it's calming and represents so many happy happy memories for me - I've picked by myself, I've picked with dear friends, I've picked with family (from far and near), I've even picked with a baby attached to my front sleeping soundly.  I LOVE BLUEBERRY PICKING!!!!

And I LOVE this simple and oh-so-yummy recipe I am about to share with you.  I found it from one of my favorites, The Pioneer Woman.  Ree made her cheesecake with a blackberry topping but because I blueberries are so close to my heart I decided to switch up the blackberries for blueberries as the topping.  It worked out beautifully!

Cheesecake with Blueberry Topping
(Recipe from The Pioneer Woman - LOVE her!!!)

First let's make the crust for this yummy cheesecake....and let me tell you this is one of the BEST cheesecake crusts I've come upon - delish!!!


Crust Ingredients:


1 (12oz.) box Vanilla Wafers

1/2 cup pecans

1 stick unsalted butter, melted

1 1/2 tsp vanilla


Cheesecake Filling Ingredients:


3 (8oz.) packages of cream cheese

1 1/2 cups sugar

4 eggs

1/2 cup sour cream

1 tsp vanilla extract


Blueberry Topping Ingredients:


2 cups blueberries (blackberries can be easily substituted)

1/2 cup sugar

2 Tbsp water

Directions for the Crust:

1. Get out your 10" spring-form pan....


....found this one at my lovely local TJ Maxx!  Isn't it cool?! - it even has a glass bottom!  Peek A Boo Jolie!....


2. Place vanilla wafers and pecans into the bowl of a food processor....


...pulse until mixture becomes crumbs...


....then add in melted butter....


 and vanilla....


 and pulse again until combined...


3. Pour into your spring-form pan...


 and press crumbs into the bottom and up sides of pan. I used a measuring cup to do the work of the "pressing" - this worked great!


Set pan aside as you make the cheesecake filling.

Directions for Filling:

1. Combine cream cheese and sugar...


....and beat until smooth. Beat on low for 1 minute and then increase speed to medium speed for 2-3 minutes - scraping down bowl occasionally.

2. Add eggs to the cream cheese/sugar mixture one at a time....


....beating very well after each addition.

3. Add in sour cream...


....and then vanilla....


...mix again until well combined.

4. Pour mixture into crust....


...and smooth the top....


5. Bake for 1 hour and 10 minutes then turn off oven and open door slightly.  Allow cheesecake to sit in the oven with the door open for 15-20 minutes.  Remove from oven and cool....


...unfortunately my cheesecake has plenty of cracks to give it character - next time I make this cheesecake I will bake it in a water bath to avoid getting so many cracks.  Please excuse all the cracks...I'm slightly embarrassed by them.

  Refrigerate once cooled down enough to handle pan.

Time to make the blueberry topping...

Directions for Blueberry Topping:

1. Place blueberries, sugar and water in a medium saucepan...


2. Bring to a boil over medium-high heat and cook for 4-5 minutes...


...stirring occasionally.  Berries will pop and bubble a little bit as the mixture boils.  Such yumminess!

3. Turn off heat and allow to cool slightly.

4. Pour berry topping over cheesecake...


 ...and refrigerate to cool for at least 2 hours - the longer the better.

5. When ready to serve remove rim around spring-form pan and slice into 16 pieces with a long serrated knife.  Enjoy!!!


Happy Cheesecake with Blueberry Topping Baking!

This post has been linked to...

Pot Luck Sunday @ Mommy's Kitchen

LinkWithin

Related Posts with Thumbnails

ShareThis