Image Map

Monday, October 31, 2011

It Is Secret Recipe Club Time!

Recently I joined a fun cooking group online called, The Secret Recipe Club.  Oh. My. Goodness what fun! I was assigned a LOVELY blog and from that blog I got to choose a recipe to make and then share with all of you.  But I couldn't reveal the blog or the recipe until today!  So without any further waiting my secret recipe for today is, Mini Pumpkin Muffins....


.... from the wonderful blog, Everyday Sisters. :-)

Not only did I enjoy this recipe (as I am sure you guys will too) but I fell head over heels in love with this blog!  Four (yes, FOUR...two of which are identical twins and all four of which are just lovely inside and out -  I can tell by their sweet smiles.) sisters have created and contribute to Everyday Sisters. All of them are just lovely - I feel like I know them personally now that I have been following them for the past month.  I felt honored to get to know them via their blog.  I love the variety of recipes that they offer such as Bistro Style Pasta Neapolitano (super yum looking and simple to throw together), White Zinfandel Sangria (one of my all time favorite kinds of drinks...the recipe lots so GOOD!) and Blueberry Cheesecake (which won an award!).  Yup, I did a lot of drooling as I looked through their blog. So many yummy recipes!! :-)

 
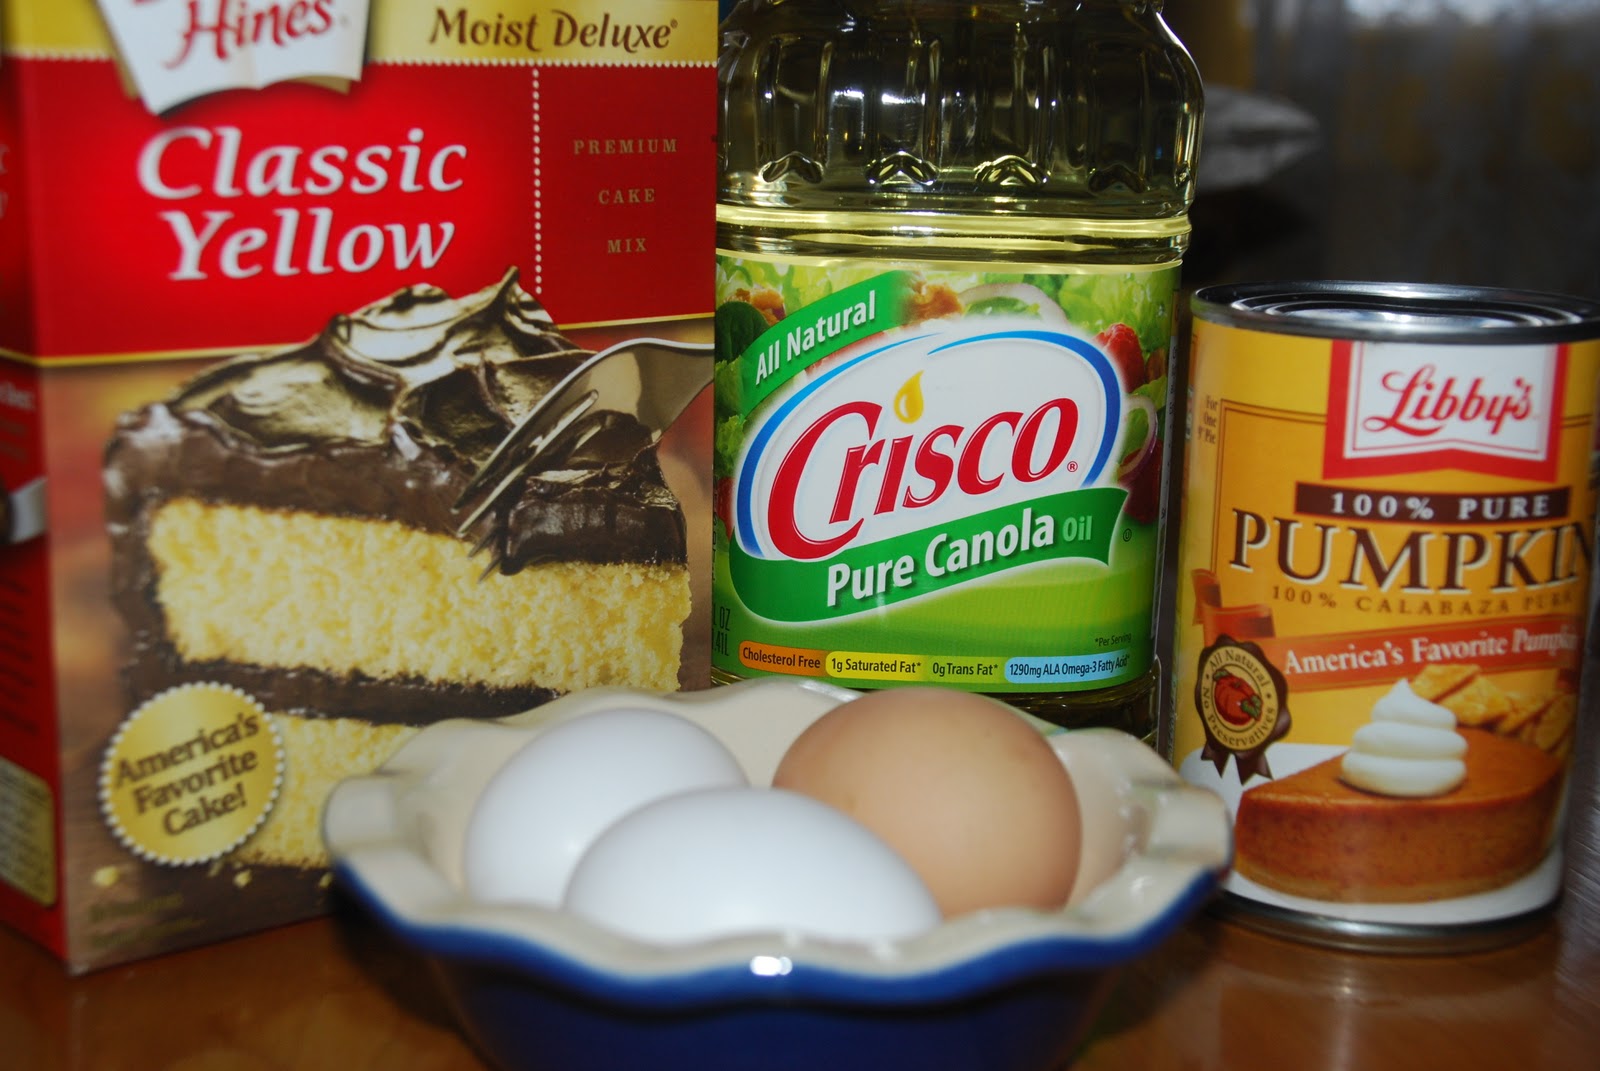
I loved these Mini Pumpkin Muffins! These little gems only required 5 ingredients - simple, yummy and fun.  Nothing better than that. Amen! And because they were so yummy and simple to make I made a batch to send to my oldest daughter's Halloween party at school today. I think all the kiddos will love them!

Mini Pumpkin Muffins
(recipe from Everyday Sisters)


Ingredients:
1 box yellow cake mix
1 can (15 oz.) pumpkin (NOT pie filling)
3 eggs
1/3 cup oil (I used canola)
sunflower seeds - optional - (I used chocolate covered sunflower seeds as that is what I had on hand... which worked out pretty well!)
Directions:
1. Preheat oven to 350 degrees F. Grease mini muffin tins or line with cupcake liners.
2. In a large bowl combine all ingredients except for sunflower seeds. Mix until well combined. 
3. Stir into batter sunflower seeds or you can wait until muffin batter has been scooped into tins.
4. Scoop batter into muffin tins.  I did so with my small scoop from Pampered Chef.

5. Bake for 11-13 minutes.  Cool for a couple of minutes in pan and then remove to serve and enjoy.


YUM!

A special thank you to Ellen, Nanci, Karen and Susan from Everyday Sisters for being part of the Secret Recipe Club so that I could have you as my first Secret Recipe Club blog.  Also, I'd like to thank Amanda who created this cooking club and Tami for hostessing my group.  I can't wait to find out which blog I get for the month of November!

Happy Mini Pumpkin Muffin Baking!

Friday, October 28, 2011

A PERFECT Bake Sale Cookie Recipe

Recently I made a new cookie recipe.  It had peanut butter in it and LOTS of chocolate chips.  It made a HUGE amount of cookies and they tasted AMAZING.  Every time I bit into one of the cookies all I could think of is how perfect the recipe would be for a bake sale.  Especially if the cookies were wrapped up in a pretty little package with a ribbon. :-) 


Now I just need to find an opportunity to make these cookies again!  Anyone have a bake sale coming up that you need some cookies for it?  Let me know if you do because I've got just the recipe destined for a bake sale.


Peanut Butter Chocolate Chip Cookies
(recipe from the lovely Jamie Cooks it Up! )

Ingredients:

1 cup butter, softened
1 cup peanut butter (I used smooth, Jaime used chunky)
1 cup sugar
1 cup brown sugar
2 eggs
2 1/2 cups flour
1 1/2 tsp baking soda
1 tsp baking powder
1/2 tsp salt
1 (12 oz.) bag semi sweet chocolate chips
1 (12 oz.) bag milk chocolate chips  (I stuck with just milk chocolate and used 2 bags of them instead of 1 of semi and 1 of milk)


Directions:

1. Preheat oven to 350 degrees F. Beat softened butter and peanut butter together in a standing mixer until light and fluffy - a good 4-5 minutes.

2. Add in sugars and eggs. Beat for another 2 minutes.  Mixture will appear frothy when it is done.

3. While butter, sugars and eggs are beating together combine dry ingredients in a medium size bowl.  Add dry ingredients to the beaten wet ingredients.  Mix all together for 1 minute.

4. Next add in chocolate chips and mix just until combined. Scoop out cookie dough onto cookie sheets lined with either parchment paper or Silpat.  I used my medium size scoop that I purchased from Pampered Chef

5. Bake cookies for 8 to 9 minutes - just until they start to crack. The cookies will appear that they need more time to bake but you do NOT want to over bake these cookies.  They will continue to bake on the hot cookie sheet after they come out of the oven.  I let the cookies sit on the cookie sheet for about 5 minutes and then removed them onto a platter.

So yummy! Enjoy!


Happy Peanut Butter and Chocolate Chip Cookie Baking!


Saturday, October 22, 2011

Apple Cinnamon Rolls with Cream Cheese Frosting and the Tate's Bake Shop WINNER

I am delighted to announce that Michelle Ells is the winner of the Tate's Bake Shop giveaway.  Michelle, you have won a fabulous gift of cookies - 3 packages of Dark Chocolate Whole Wheat cookies from Tate's Bake Shop and their cookbook (to add to your collection).  Thank you so much Michelle for entering into my giveaway!

And for the rest of you I have a lovely recipe just perfect for the season of Fall - Apple Cinnamon Rolls frosted with none other but Cream Cheese Frosting - super yum! Layers of all things tasty that I associate with the Fall are in these sweet rolls.  Once your dough is made and rolled out you will layer it first with a brown sugar cinnamon mixture and then chopped apples sprinkled on top. Simply yummy!


I was delighted with how easy these special cinnamon rolls came together.  The dough can actually be made in a bread machine but because I do not own one I made my dough in my Kitchen Aid stand mixer and had great success.   If you would like to make your dough in a bread machine just follow the directions from your machine manufacturer as to which ingredients that I share below should be added first.  It is my understanding that usually all the wet ingredients/liquids go first followed by the seasonings, the flour and then the yeast placed in a well of the flour.

The recipe originates from a blog that I have recently discovered called, Mrs Happy Home Maker.  Such a lovely blog full of mouth watering recipes.  Scrumptious main dishes, breakfast foods and of course desserts of all kinds are just some of the delicious recipes that I have found on this blog.  Definitely take a moment to take a peak at Mrs. Happy Home Maker.  I want to point out that I did not use the original recipe for the frosting, Caramel Cream Cheese Icing but instead made original Cream Cheese Icing.  I was missing a key ingredient for the caramel flavor, caramel ice cream topping as to why I didn't make the icing that went along with the original recipe for these rolls.


Apple Cinnamon Rolls with Cream Cheese Icing
(ever so slightly adapted from Mrs. Happy Home Maker)

Dough Ingredients:

1 cup warm milk (I warmed my milk in the microwave for 45-60 seconds to warm it)
2 eggs, room temperature
1/3 cup butter, melted and cooled for a couple of minutes
4 1/2 cups bread flour (AP flour is fine - I used AP flour)
1 tsp salt
2 1/2 tsp regular yeast (if making your dough in bread machine use yeast for bread machines)

Brown Sugar Cinnamon Filling Ingredients:

 5 Tbsp butter, softened (original recipe called for a whole stick which I didn't end up using)
1 cup brown sugar
2 1/2 Tbsp ground cinnamon


Apple Filling Ingredients:

4-5 medium sized baking apples, peeled, cored and diced
3 Tbsp butter
1/4 cup brown sugar
1/2 tsp ground cinnamon
1 tsp cornstarch

*Cream Cheese Icing:

8 oz. cream cheese, softened
1 stick butter, softened
3 cups confectioners sugar, sifted
1 Tbsp vanilla extract

*If you would like to make your icing into a caramel icing add in 5-6 Tbsp of caramel ice cream topping....should be a lovely result of a frosting for these special rolls!


Directions:

1. Make the dough.  Warm milk in a medium size heat proof bowl  in microwave for about 1 minute (do not get it too hot or the yeast will be killed when added to milk...trust me on this as I have learned the hard way).  Sprinkle yeast over milk, let sit for a couple of minutes and then gently stir to combine and set aside.  Add flour and salt into large bowl of a Kitchen Aid mixer.  Melt butter and set aside for a couple of minutes to cool then pour into flour mixture. Add in slightly beaten eggs and then milk/yeast mixture to the flour mixture.  Mix to combine.  At this point I switched over to my dough hook.  Run mixer for a good 5 minutes until dough comes away from bowl and is shiny in color. 

2. Lightly grease a large bowl and then remove dough from mixing bowl into your prepared greased bowl.  Cover with a clean damp towel and set in a warm place without any drafts.  Allow dough to rise until at least doubled in size - about an hour.

3. Remove dough from bowl onto a lightly floured and allow to rest for 15 minutes before rolling out.
4. While dough is resting make apple filling.  In a medium size sauce pan melt 3 Tbsp of butter.  Add in diced apples, brown sugar, cinnamon and cornstarch. Cook for 15 minutes, stirring every so often.


Cool apple filling as you prepare the dough for layering of all the yumminess.

5. Roll out rested dough into a large rectangle.  Mix together 1 cup brown sugar and 2 1/2 Tbsp ground cinnamon, set aside as you spread 5-6 Tbsp of softened butter over your rectangle of dough....


....and now sprinkle the brown sugar cinnamon mixture over the butter layer....


...and then finally the apple filling....


6.  Starting on a long side of the rectangle carefully roll up the dough.


 No worries if the filling comes out a little bit as you can just spoon it over the rolls once placed in pan.

7. Preheat oven to 400 degrees F. Melt 1/2 a stick of butter in a 9x13 baking pan. Remove pan when butter has melted. Cut rolled up dough into 1 1/2 inch slices - place slices in prepared pan.  Put any remaining filling on top of rolls in pan.


Pop in oven and bake for 15 minutes - rolls should be lightly browned when they are done.

8. While rolls are baking, make the icing as you will want to frost the rolls while they are still warm. In a large bowl combine cream cheese and butter.  Beat together for 3-4 minutes until light and fluffy. Slowly add in sifted powdered sugar along with vanilla extract (and caramel topping if you choose to use it). Beat all together until well combined and smooth - about 2-3 minutes. 

9. Spread icing over rolls while they are still warm. Such a lovely sight I tell ya!


Serve and enjoy this delightful treat!


Happy Apple Cinnamon Rolls with Cream Cheese (or Caramel Cream Cheese) Icing Baking!

Before I leave you, here is a picture of my precious oldest daughter and the newest addition to our family.....Mitten the Kitten :-)


Thursday, October 13, 2011

A Fall cookie recipe and a COOKIE GIVEAWAY!


Did you know that the month of October is National Cookie Month?! How fun and yummy! In honor of such a special month I want to share with you a lovely Fall flavored cookie recipe along with a fabulous cookie giveaway from Tate's Bake Shop.


Last December I had the opportunity of receiving a variety of cookies from Tate's along with their wonderful cookbook - as seen here. When I was contacted once again to review one of their newest kind of cookies -Whole Wheat Dark Chocolate Chip - I jumped for joy!  Dark Chocolate is one my all time favorite kinds of chocolate. Honestly, I like any kind of chocolate but dark chocolate is pretty special.


  Let me tell you when I took my first bite of one of these cookies my eyes feel back into my head with happiness.  SO good!  The cookies are chewy yet crisp - the best of both worlds.  And the taste is perfect - not too sweet with plenty of dark chocolate chips throughout the
cookie.

If you would like THREE  (yes, THREE) bags of these cookies along with the Tate's Bake Shop cookbook please feel free to enter this giveaway. You can do so three ways...

  1. Leave a comment at the end of this post. Any kind of happy comment is welcome.

 2. Follow Tate's Bake Shop on Facebook here (just let me know that you've become a follower of Tate's via another comment below).

3. Become a follower of Baking and Creating with Avril on FB - make sure to leave a comment on my FB page to let me know you are one of my newest followers. 

That's THREE opportunities to win this giveaway!  You can do it!


Winner will be chosen this coming Sunday evening (10.16.11) - all entries must be received by 12 noon on Sunday.  Winner will be announced Sunday night.  I can't wait to find out who the winner is!

AND the good news is that everyone that reads this post can go over to Tate's e-bakery and order anything they would like with a 15% off discount for the remainder of the month of October.  Just enter "COOKIE" at checkout.
 SAWEET! :-)


Now I get to share with you the fun Fall cookie recipe I recently made.  This cookie recipe would be a great treat for kids, especially for an after school snack as these cookies are super easy to make and bake in a jiffy!


Apple Cinnamon Chip Cookies
(recipe slightly adapted from So Domesticated)
 Ingredients:
2 Granny Smith apples (or any kind of baking apple), peeled and chopped
1 tsp lemon juice - keeps the chopped apples from browning
3 cups Bisquick
1/2 cup brown sugar
1/2 cup sugar
1 1/2 tsp ground cinnamon
1/2 cup half and half (I used 2% milk instead with success)
1 egg
1 cup cinnamon chips (I added this to the original recipe)

Directions:

1. Preheat oven to 350 degrees F. Line cookie sheets with parchment paper or lightly spray with non-stick baking oil.

2. Peel and chop apples into small pieces.  Place apples in a bowl and toss with lemon juice. Set aside.

3. In a large bowl mix together Bisquick, both sugars and ground cinnamon.  Set aside.

4.Whisk together half and half (or milk) and egg.  Pour into Bisquick mixture and stir to combine.

5. Add in chopped apples and cinnamon chips. Stir to combine.

6. With a medium ice cream scoop, drop dollops of cookie batter onto prepared cookie sheets.  Bake for 12-15 minutes or until edges are lightly browned.  Makes a good 2 dozen cookies.  Store cookies covered in a tightly sealed container. 

Enjoy!


Happy Apple Cinnamon Chip Cookie Baking!

 And good luck with the Tate's Bake Shop giveaway! :-)


Wednesday, October 5, 2011

Super EASY and Super YUMMY Chicken Chili

Recently as I was browsing through one of my favorite food sites, Tasty Kitchen, I came up upon a lovely recipe for Chicken Chili.  The list of ingredients were very simple (all of which I had on hand) and it was put together in a crock pot. I was sold!  Simple ingredients, easy prep and slow cooker friendly - I couldn't ask for anything better. 


I altered the original recipe from TK member, forevernowandthen, in a couple of places. The original recipe called for a large (16 oz.) jar of salsa of which I didn't have so I used a small jar of salsa and a can of Rotel tomatoes.  The original recipe also called for 2 cans of white beans - I only had 1 can of white beans so I added a can of light kidney beans.  I have to say my alterations resulted in a very yummy meal.

Chicken Chili
(recipe altered from Forever Now and Then )

Ingredients:

1 1/2 lbs boneless and skinless chicken, diced and cooked
1 jar (16 oz.) salsa  (I used a small jar of salsa and 1 can Rotel tomatoes)
1 1/2 lbs Monterey Jack Cheese, shredded (you could easily use a combo of Monterey and Cheddar cheese instead of all Monterey)
2 cans (15 oz. each) white beans (I used 1 can white beans and 1 can light kidney beans)

Directions:

1.  Place all ingredients (cooked chicken, salsa, cheese, beans) in crock pot and stir well to combine.

2. Cook on low for 2-3 hours.  Stir one about half way through the cooking period.

Serve with  tortilla chips and a dollop of sour cream (if you wish).  Enjoy!

Happy Chicken Chili Making!

LinkWithin

Related Posts with Thumbnails

ShareThis