Image Map

Monday, July 30, 2012

Brownie Pies for July's Secret Recipe Club

Recently I have had a hankering for good old fashioned brownie sundae.  Yeah, that's right a decadently rich chocolate brownie with a nice big scoop of ice cream on top and maybe even a little hot fudge sauce drizzled all over it.  Y. U. M.  Some dreams do come true.  Yes indeed.


 I was perusing through my assigned food blog for the Secret Recipe Club this past month and guess what recipe I came upon!?! That's right....a brownie recipe!  Not just any brrrrownie recipe either.  I discovered on Lynsey Lou's blog a brownie recipe called, "Brownie Pie".   My prayers had been answered.  A Brownie Sundae was in my near future.  Hooray!


Lynsey Lou's recipe for Brownie Pie did NOT disappoint.  It was whipped up in a jiffy, the ingredients were all simple and the taste was OUT OF THIS WORLD dee-lish!  I ended up making personal size brownie pies for all four members of my little family instead of just one 9" pie.  It's kind of fun to have your own brownie pie.  My girls sure thought so!  Their eyes practically popped out of their heads when I placed one of these little treasures in front them.  Having a personal size brownie pie with a scoop of ice cream on top was HEAVEN for them. 


I was extremely pleased with the texture and taste of the little chocolate pies.  They had a lovely thin crisp shell on top like all good brownies do and then the inside  was perfectly moist and rich with chocolate.  As many may feel, brownies are not complete with out some chopped walnuts, so I added in a couple handfuls to the batter.  It was a delightful addition I do have to say.


Take a couple minutes out of your day and stir up this recipe.  While the pies (or pie if you chose to make a single 9" brownie pie) are baking go check out Lynsey Lou's blog.  You will find a wonderful amount of scrumptious recipes on it such as, Brown Butter Banana Carmel Muffins, Hot Buttered Rum Pancakes and White Cake with Apricot Filling to name a few that has my mouth watering.  Be sure to keep your eyes open for all the gorgeous napkins, tablecloths and props that she uses in her pictures.  I am such a sucker for pretty linens and Lynsey's collection is just gorgeous! :-)

Mini Walnut Brownie Pies
(oh so slightly altered from Lynsey Lou's recipe)

Ingredients:

1 1/2 cups sugar
1 stick unsalted butter, room temperature
3 eggs
1 tsp vanilla extract
1/2 cup flour
1/3 cup baking cocoa
1/8 sea salt + more for sprinkling on top if you so wish
1/2 - 1 cup chocolate chips (I used milk chocolate)
1/2 -1 cup chopped walnuts (my addition)

Directions:

1. Preheat oven to 325 degrees F.  Grease well 4 mini pie plates or one 9" pie plate.

2. Cream together butter and sugar.  Add in vanilla extract and eggs.  Beat well all together.

3. Add in flour, cocoa powder and salt.  Mix well.  

4. Add in chocolate chips and chopped walnuts (if you wish)

5. Pour batter into prepared pie pans (pan) and bake for 30 minutes.  My minis took just under 30 minutes to bake.

6. Cool slightly and serve with freshly whipped cream, ice cream or chocolate sauce - all of the above is just fine too!

Enjoy!


Happy Mini Walnute Brownie Pie Baking!

Thursday, July 26, 2012

The EASIEST Granola ever!


Granola has always been one of my very favorite things to eat.  Especially the granola my mom makes. She loads it with all kinds of dried fruit, toasted nuts and shredded coconut....yum.  And this may sound weird but having granola with milk about 30 minutes after it is fresh from the oven is one of my all time favorite and comforting snacks.  The granola is still warm and all the flavors are just popping with deliciousness.  A definite must for all of you "granola lovers" out there if you have yet to have granola warm from the oven (or skillet).


My mom has always made her granola in the oven. She coats the ingredients with honey and oil and then gently roasts them - tossing the oats and fruit every 15 minutes so that they become evenly browned and seasoned.  So good!  About a month ago I discovered that a couple of my favorite food blogs were featuring a wonderful granola recipe.  And not just any granola recipe.  Quick and easy granola made in a SKILLET on the stove. What a brilliant concept.  I couldn't wait to try it out myself.  I have now made skillet granola multiply times.  I have given away batches as gifts and I have shared many a bowl topped with fresh berries   with my girls.  Lots and lots of happy tummies have rejoiced with my new discover of making granola on the stove rather than in the oven. You should do the for the tummies in your life that you care and adore.

The beauty of  this recipe is that it is versatile.  You can sweeten the ingredients as you wish using either honey or maple syrup and you can add any kind of dried fruit or nut to your liking.  The sky's the limit here with this granola recipe.


 Fruit and Nut Skillet Granola
(similar recipes can be found on Let's Dish and Lick the Bowl)
Ingredients:

1 stick of butter (if you wish to reduce the butter to 3/4 of a stick it will be just fine)
1/2 cup honey or maple syrup
1/4 cup brown sugar
1 tsp vanilla extract
2 tsp ground cinnamon
4 cups rolled oats (not the quick kind)
1 cup raisins
1/2 cup dried cranberries, chopped dates or chopped dried apricots (any or all of these)
1/2 cup shredded coconut (sweetened or unsweetened is fine)
1 cup silvered almonds or chopped walnuts or pecans

Directions:

1. In a large skillet melt butter.  Add in honey (or maple syrup), brown sugar, vanilla extract and ground cinnamon.  Stir all together until well combined.
 
2. Add in oats and stir to coat thoroughly.  Cook over low heat for about 10-12 minutes until oats are light brown and toasted.
 
3. Take pan off of heat and stir in dried fruit, nuts and coconut.  Happiness has arrived...your granola is complete.  Scoop up a handful and enjoy.


Happy Fruit and Nut Skillet Granola Making!

Wednesday, July 4, 2012

Brown Butter Blueberry White Chocolate Muffins

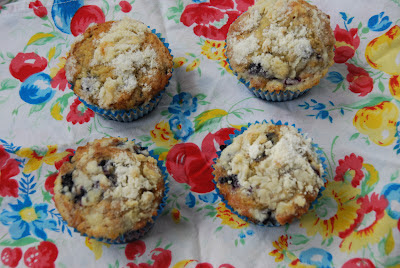
Brown Butter Blueberry White Chocolate Muffins....what a mouthful!  A delicious mouthful for sure.  Tart blueberries, sweet white chocolate and the nuttiness of browned butter all surrounded by tender crumbs topped off with a sweet crumble.  A blueberry muffin recipe that is a MUST. 


How is it that I have missed the boat for so long on browning butter?!?!  Oh. My. Goodness. Do I LOVE browned butter!!! The taste that it adds to this muffin recipe is wonderful. I can not wait to bake more with browned butter! That being said be warned as you will most likely see many more recipes in the future on my blog with browned butter.  Do you have a favorite recipe that uses browned butter?  PLEASE do share!!!


I love that Joy the Baker has come out with her first cookbook as this is where I found this lovely muffin recipe.  If you have yet to purchase this book do yourself a favor and treat yourself to it.  It is packed full of GORGEOUSLY scrumptious recipes.  A talented and oh-so-sweet blogging friend of my mine, Carrie from Bakeaholic Mama, hosts a fabulous blogging event every Sunday that features a recipe from Joy's cookbook.  This event is called, Sunday's with Joy.  Take a peek at it as I am sure you will find lots of fun and delicious recipes from Joy The Baker that you will want to try. :-)


Brown Butter Blueberry White Chocolate Muffins
(Slightly altered from the recipe found in Joy The Baker Cookbook)

Muffin Ingredients:

7 Tbsp unsalted butter
1/3 cup milk
1 large egg
1 large egg yolk
1 tsp vanilla extract
1 1/2 cups all-purpose flour
3/4 cup sugar
1 1/2 tsp baking powder
1 cup white chocolate chips (my addition)
2 cups fresh blueberries (I used frozen bb's and it worked just fine)

Topping Ingredients:

3 Tbsps unsalted butter, cold
1/2 cup all-purpose flour
3 Tbsps sugar


Directions:

1.  Place oven rack onto the upper third of the oven and then preheat oven to 375 degrees F. Line a 12 cup muffin tin with liners and then set aside.

2. Make muffin batter first by browning the butter.  Place 7 Tbsps of butter in a small saucepan over medium heat.  Butter will first melt, then forth and then lastly crackle - which is the water cooking out of the butter. The crackling will subside and then the butter will start to brown - this happens quite quickly so keep your eye on the butter so that it doesn't burn. Remove saucepan from heat when you see that it becomes a medium brown color and it has the wonderful nutty smell.  Immediately pour hot butter into a small bowl and set aside.  This will allow your butter to not continue to cook and possibly burn.

3. In a small bowl whisk to combine,  milk, egg, egg yolk and vanilla extract. Add in browned butter and whisk to combine.  Set bowl aside.

4. In a medium bowl combine flour, sugar and baking powder.  Whisk all together.

5. Pour wet ingredients into dry ingredients all at once. Stir to combine. Do not over mix.  Add in white chocolate chips and blueberries and gently but thoroughly stir all together. .

6. Scoop muffin batter into prepared muffin tins.  I used my lovely medium scoop for this step.

7. Make crumble topping but combining cold butter, flour and sugar all together in a medium bowl. Incorporate butter with the dry ingredients by either using a pastry cutter or your fingers.

8. Sprinkle crumble topping over muffins.  Pop muffins into preheated oven and bake for 18-20 minutes until golden brown and when a toothpick is inserted in center comes out clean.  Serve muffins warm or at room temperature.


Happy Brown Butter Blueberry White Chocolate Muffins Baking!

LinkWithin

Related Posts with Thumbnails

ShareThis