Image Map

Wednesday, November 27, 2013

The Cake Slice Baker's November Cake ~ Applesauce Spice Cake

 
 Hello and Happy November!!
 
I have recently joined a baking group called The Cake Slice Baker's and I couldn't be more excited!  Not only have I been able to meet a group of lovely bakers but they are also extremely talented and oh so, very friendly.  For the next year the Cake Slice Baker's will be baking from a cookbook called, Great Cakes by Carole Walter.   Each month we will choose a recipe from this book based on a poll and present it on-line on or after the 20th of each month.  This month everyone baked an Applesauce Spice Cake from Great Cakes.  I was delighted with this recipe as the cake was delicious!


I found this cake to be full of warm Fall flavors.  Lots of good spices, chopped fruit and nuts all surrounded by a tender and moist cake.  And then because I just love a good icing I whipped up the suggested topping of a Brown Sugar Glaze and drizzled it over the cake.  Perfection! 


I did change a couple of things slightly from the original recipe.  Unfortunately, I did not have any nuts in my pantry so instead I added raisins and dried cranberries which I plumped up in some boiling water for a couple of minutes. I also omitted the allspice that the recipe called for as I was in the  mood for just nutmeg and cinnamon. 
 
  The steps that were required to create this cake were put together with great thought and care. Such as sifting the dry ingredients a couple of times before adding them into the wet ingredients.  I also found it nice to add the granulated and brown sugar by the tablespoon mixing well in between each addition instead of all at once.
 
A perfect Fall cake to share a gatherings or to enjoy simply with a cup of delicious hot tea.


Applesauce Spice Cake
 
Cake Ingredients:
 
2 1/4 cups sifted all-purpose flour
1 tsp baking soda
1/4 tsp salt
1 1/2 tsp ground cinnamon
1 tsp ground allspice
1 tsp ground nutmeg
3/4 cup pecans, lightly toasted and chopped
1/3 cup (2/3 stick) butter
1 tsp grated lemon rind
1/3 cup vegetable shortening
3/4 cup granulated sugar
2/3 cup light brown sugar, lightly packed
2 large eggs
1 medium-sized tart greening or Granny Smith apple, peeled and chopped medium small (about 2/3 cup)
1 tsp vanilla extract
1 cup sweetened bottled applesauce
 
Brown Sugar Glaze Ingredients:
 
3 Tbsp butter
3 Tbsp light brown sugar
3 Tbsp heavy cream
3/4 cup sifted powdered sugar
1/2 tsp vanilla extract
 
Directions:
 
1. Preheat oven to 350 degrees.  Butter and flour a fluted or bundt pan.
 
2. Sift together flour, baking soda, salt and spices in a triple sifter a couple of times.  Stir in chopped nuts and set aside.
 
3. In a large bowl of  mixer cream together butter and lemon rind. Beat at medium-high speed for 1 minute and then add in shortening.  Mix for an additional minute.
 
4.  Add in granulated sugar, 1 tablespoon at a time.  This will take 3-4 minutes to complete.  Next add in brown sugar the same way and scrape sides of the bowl occasionally.
 
5. With the mixer on medium-low speed add in eggs one at a time in 1 minute intervals.  Add in fresh chopped apple (and dried fruit if you wish) along with vanilla extract.
 
6. Keeping the mixer on low speed add in flour mixture alternately with applesauce - starting and ending with the flour mixture.  Only beat batter until flour is just incorporated after each addition.  Scrape sides of bowl occasionally.
 
7. Pour batter into prepared pan and smooth the top.  Bake in the center of the oven for 50-60 minutes or until cake is golden brown and toothpick inserted into the center comes out dry.
 
8.  Cool cake for 10-15 mintues before inverting onto a serving plate.  While cake cools prepare glaze. 
 
9.  In a medium size sauce pan melt together brown sugar and butter over low heat.  Stir in heavy cream.  Cook until mixture comes to a gentle boil and then allow to simmer for 1-2 minutes.  Remove from heat to add in sifted powdered sugar - whisking until smooth.  Add in vanilla extract.  If the glaze is too thick add in more heavy cream, 1 Tbsp at a time.  Pour glaze over warm cake. 
 
~Store cake at room temperature under a glass dome or in an airtight container for up to 2 days.  If you store in refrigerator cake will store up to 10 days.  Cake should be wrapped tightly and unglazed.
 
Enjoy!  And be sure to enjoy the links below for all the beautiful Applesauce Spice Cakes that my fellow Cake Slice Baker's made too!


Happy Applesauce Spice Cake Baking!


Monday, November 25, 2013

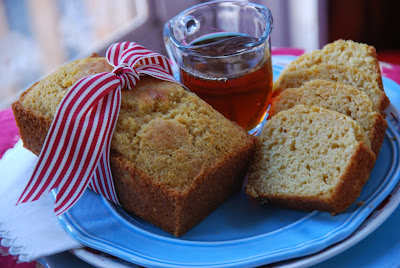
Maple Cornbread mini Loaves

Today I bring you a VERY special treat from my monthly assignment of the Secret Recipe Club.  I discovered a delicious recipe for Cornbread Muffins on the blog called, Enriching your KidsShirley, who writes and creates this blog, is full amazing ideas for healthy and nutritious meals for her children.  I  loved exploring through her blog as I read all the different (and foreign to me) names of her dishes and ingredients that originate from India. 

 
I came upon this recipe for cornbread muffins and decided to make it but with a little twist.  I had just bought a 1/2 gallon of REAL maple syrup from a friend of mine and thus I was just itching to open it for a taste.  No better way than to do so by baking with it! So, I switched out the honey that was called for in the recipe for maple syrup.  Delicious!
 
 
And then to take it just one step further I made the cornbread into mini loaves instead of muffins. I pictured wrapping up a little loaf of this bread along side a bottle of maple syrup. Both could be tucked away in a sweet basket as a homemade gift for the up coming holiday season.  There is nothing better than a gift from your kitchen in my book!
 
 
I definitely encourage a visit to Enriching your Kid as I am sure you will enjoy your time there just as I did.  And, be sure to check out all the scrumptious creations in the links found below as these are all from my fellow Secret Recipe Club friends! :-)
 
Maple Cornbread mini Loaves
(original recipe found on Enriching your Kid)
 
Ingredients:
1 cup cornmeal
1 cup flour (Shirley's recipe called for whole wheat - I used white)
1 tsp baking powder
1 tsp baking soda
1 egg, slightly beaten
1 cup milk
1/2 cup maple syrup (or HONEY)
1 Tbsp butter, melted
 
 
Directions:
1. Preheat oven to 350 degrees F.  Grease desired pans (2 mini loaf pans or 12 regular size muffin tins).
 
2. In a large bowl combine and mix well all together the cornmeal, flour, baking powder and soda. 
 
3. Mix together egg and milk and pour into a well of the dry ingredients.  Add in melted butter and maple syrup too.  Stir just until combined being careful not to over mix batter.
 
4. Pour into prepared pan and bake.  20-22 minutes for mini loaves or 15 minutes or muffins.  Cool slightly before serving.  A little drizzle of warmed maple syrup over the top would be delightful!


Happy Maple Cornbread mini Loaves Baking! 


Monday, October 28, 2013

Cinnamon Roll Cheesecake


I don't know who invented the cheesecake but gosh all mighty I would just LOVE to give that person a big hug of gratitude for such a creation.  What a truly brilliant and delicious concept of a dessert! So versatile.  So elegant. Completely the best.  And always at the top of my list for dessert, a treat or even for breakfast for that fact.


Each month, receiving my assignment from the Secret Recipe Club is like opening a gift.   I have no idea what will be inside the link (a present in my eyes) that has been provided to me. And then with a quick click of my computer suddenly "the gift" of my assignment is revealed.  EVERY. SINGLE. TIME. I discover the blog I am to treasure for the next month I feel honored and excited.  I not only get introduced to amazing people who also share their love and passion for food but I also get free rein to pick ANY recipe of my liking from their collection of recipes.  And yes, most often it is a dessert of some kind as I tend to always steer towards such a option.  This past month I stayed true to my usual path and choose a recipe for a cheesecake from the beautiful Bobbi of Bobbi's Kozi Kitchen.  A Cinnamon Roll Cheesecake.  A gift of a gift! 


I loved having the opportunity to explore Bobbi's blog.  She shares her incredible journey of weight loss and teaching herself how to make delicious, healthy and quality food straight from her own kitchen.  She is a hero in my eyes! She has a great out look in life and her taste in food is completely divine.  I drooled over her Pumpkin Applesauce and salivated over her Grilled Fish Tacos with Cilantro Lime Cream and I even whipped drool off my lips for her Blackberry Custard Pie but yet my love for cheesecake won over all the above recipes when I discovered the recipe for Cinnamon Roll Cheesecake.  I had never seen such a recipe for a cheesecake! I had to make it. 


What a gem of a cheesecake recipe! DELICIOUS!!! Yes, there are quite a few steps to make this cheesecake come alive but nothing that you can't handle.  I enjoyed every moment of this recipe.  I took my time, read the recipe to the "T" and finished with a unique and scrumptious dessert.  My family loved it and complimented me over and over again.  At one point I heard Jeff say, "wait is this a cheesecake or is it a cinnamon roll?"  That's right Honey Pie, it's BOTH!!! Oh, and the cream cheese frosting was also a huge hit!  Yummy raves from everyone!
 
 
Cinnamon Roll Cheesecake
      (recipe from Bobbi's Kozy Kitchen)
 
Ingredients for -
Cinnamon Roll Batter
2/3 cup sugar
1/4 cup unsalted butter, at room temp
1 egg, at room temp
1/2 cup milk
1 Tbsp vanilla extract
2 cups flour
2 tsp baking powder
1/2 tsp salt
 
Ingredients for -
Cheesecake filling
16 oz. (2 8oz. packages) cream cheese, at room temp
1 cup sugar
1 Tbsp vanilla extract
2 Tbsp flour
3 eggs, at room temp
 
Ingredients for -
Cinnamon Filling
1/3 cup unsalted butter, melted
1 cup brown sugar
3 Tbsp ground cinnamon
 
Ingredients for -
Cream Cheese Topping
2 oz. cream cheese, at room temp
3 Tbsp unsalted butter, at room temp
1 Tbsp lemon juice
1 cup powdered sugar
milk (if needed to thin out the topping)
 
 
Directions
 
1. Preheat oven to 350.  Spray 9" spring form pan with non-stick spray.  Line bottom with parchment paper if you wish (as I did).
 
2. Make Cinnamon Roll Batter - cream together butter and sugar until light and fluffy.  Add in egg, vanilla extract and milk.  Beat well all together. In a medium size bowl sift together flour, baking powder and salt.  Gradually add flour mixture into the wet ingredients until combined.  Batter will be thick.
 
3. Carefully spread 1/2 of the Cinnamon Roll Batter into the bottom of the prepared spring form pan.  I used an off set knife for this process as it takes a little patience to spread the thick batter.  Set pan aside.
 
4. Make Cheesecake Filling - Beat together cream cheese and sugar until light and fluffy (about 2 minutes). Add in eggs, one at a time. Add in vanilla extract and flour - beat all together for a good minute.  Pour filling into pan.
 
5. Make Cinnamon Filling - Mix together melted butter, brown sugar and cinnamon. Drop filling by the spoonful evenly over filling.
 
6. Drop remaining 1/2 of Cinnamon Roll Batter  by the spoonful over the Cinnamon Filling and then swirl together with a serrated knife. It will feel thick to swirl but just do your best, it will be fine! :-)


7. Bake cheesecake for 50-55 minutes.  Cake will be puffy and lightly browned when done.  Cool cake completely before refrigerating for at least 4 hours - over night is best. 
 
8. Make Cream Cheese Topping - beat together cream cheese and butter until light and fluffy.  Add in lemon juice, vanilla extract and powdered sugar.  Beat all together for at least 1-2 minutes. If topping is too thick add in 1 Tbsp of milk at a time until you reach your desired consistency. Spread over cooled cake and serve.  Refrigerate any left over cheesecake.


Enjoy!!


Happy Cinnamon Roll Cheesecake Baking!


Friday, October 25, 2013

Risotto and Beef Stuffed Tomatoes


All year long I wait patiently for FRESH garden tomatoes out of my mother's garden.  There is nothing better than a beautiful, ripe, red tomato!  Popped right into my mouth from the vine or sliced thickly on a piece of homemade bread with cheddar cheese makes my taste buds sing with happiness.  I also LOVE a good stuffed tomato.  Comfort food at it's best in my book! 


  It takes time and patience to prepare stuffed tomatoes.  A true recipe from the heart as it is a deliciously comforting dish that only requires simple ingredients.  I chose to make my stuffing with ground beef to accompany the risotto.  Ground chicken, pork, turkey or sausage could be easily put in place of the beef. 
 
I found this recipe to be a perfect weekend meal as it does take a little time to prepare with the use of Arborio rice in the filling.   But the risotto is a perfect addition to the tomatoes and meat as it has such a lovely texture and is full of flavor.
 
 So grab those last garden tomatoes, your favorite ground meat and some lovely risotto so that you can whip up a batch of stuffed tomatoes for this coming weekend.  It's truly the right thing to do!
 
 
Risotto Stuffed Tomatoes
(recipe from Ms. enPlace)
 
Ingredients:
 
2-4 large tomatoes
1 lb ground meat of your choice (I used ground beef)
1 Tbsp olive oil, plus more for drizzling \
2 Tbsp chopped garlic - about 2-3 cloves
1/2 cup Arborio rice
1/2 cup reserved tomato juice from tomatoes
1 1/2 cups chicken broth, warmed
1/3 cup loosely packed chopped basil or parsley
salt and pepper to taste
 
 
Directions:
 
1. Cut off top 1/3 of each tomato and set aside.  Remove insides of each tomato with paring knife/spoon and reserve what you scoop out.  Be careful not to puncture the walls of the tomatoes as you work.  Drain reserved tomato pulp over a bowl in a strainer.  Breaking up the tomato pieces will help this process along.
 
2. Place tomatoes in a medium greased baking dish.  Propping the tomatoes up against one another may need to happen in order for them to stay upright.
 
3. Using a large skillet heat 1 Tbsp olive oil to sauté your meat over medium heat.  Saute meat until lightly browned.  Add in garlic and then lower your heat, cooking a few minutes more.
 
4. Add rice into the skillet with the ground meat/garlic mixture.  Saute until the rice is translucent - about 5-7 minutes.  Add in 1/2 cup of the reserved tomato juice - stir until almost all absorbed.  Add in warmed broth - 1/2 cup at a time, each time stirring after each addition until adsorbed.  Test rice for "doneness" after about 15 minutes.  If rice is still hard add in more liquid - 1/2 cup at a time, stirring until almost absorbed each time.  If rice is chewy, remove skillet from heat. Stir in herbs along with salt and pepper to taste.
 
5. Preheat oven to 400. Spoon mixture into prepared tomato shells (most likely you will have extra filling left over that you can use for another meal/dish - we made burritos out of our extra filling). Place tomato tops over the stuffed tomatoes and then drizzle with olive oil.  Bake for 35-40 minutes - tomatoes will be soft and the rice tender when done.  Remove your lovely stuffed tomatoes from the oven and cool for 10 minutes before serving.
 
 
 Enjoy!!


Happy Risotto and Beef Stuffed Tomato Making!


Monday, September 30, 2013

Apple Acorn Squash

 
Hooray for the magic of Fall as it has arrived here in New England!  I feel so fortunate to be able to experience such beauty!  The trees are all in full glory of reds, yellows, oranges and golds.  And at least once every day this past week I have seen and heard flocks of geese flying south for their winter homes.  All signs of the crisp and warm season of Fall that has gently settled into our lives for the next couple of months.


In my effort to embrace and welcome Autumn I choose a lovely recipe of Apple Acorn Squash to share you today.  I discovered this recipe from a beautiful lady named, Bean who writes, creates and photographs for her blog called, Without Adornment.  I was given the opportunity to explore Without Adornment this past month as it was my September assignment through the Secret Recipe Club.  For those of you that prefer to stay away from gluten by choice or even necessity Bean's blog is a must for you to check out. All of her recipes are gluten free unless otherwise noted.  And they look fabulous! Along with all of her beautiful recipes, Bean shares stories of her adventures in life with her hubby along with her talented creations of cakesGorgeous, gorgeous cakes! Along with her adventures and recipes she also has a beautiful gallery of her photography. Such a talented lady I say!


I was delighted with how my Apple Acorn Squash came out.  Completely easy to put together.  Completely delicious! And oh yes, completely Fall.
I did add a little butter along with salt and pepper to this recipe.  They can easily be omitted if you wish to stay clear of extra fat or sodium.


Apple Acorn Squash
recipe slightly adapted from Without Adornment
 
1 Acorn squash
2-3 apples, peeled and sliced  
2 Tbsp brown sugar
1 tsp cinnamon
1-2 Tbsp butter
salt and pepper
 
 
Preheat oven to 375.  Cut squash in half and then scoop out seeds. Season each half with salt and pepper if you wish along with a pat of butter.  Toss apple slices with brown sugar and cinnamon and then carefully spoon into each of the squash. Another pat of butter can go onto of the apple pile if you are so inclined.  Place squash halves in a baking dish with just enough water to cover the bottom of the dish.  Cover with tinfoil and bake for 45 minutes or until squash is done.  Enjoy!


Happy Fall!  And Happy, Happy Apple Acorn Squash baking!

Wednesday, August 21, 2013

Easy Blueberry Sauce

 
Some things are essential and routine in my world.  Every morning I have to have a cup of coffee.  Every time I come home from work the first two things I will do is wash dishes in my sink (because there are always dirty dishes available for my cleaning pleasure) and either start a load of laundry or switch over a load of laundry (if my family is luck I will fold a load of laundry).  Every June I go strawberry picking and every July through August I pick blueberries.  Without blueberry picking I would be lost in life.  It makes me happy.  It gives me peace of mind.  It provides me with fresh, bright and delicious treasures to bake and create with.


I have made blueberry jam before but never in my life have I made blueberry sauce.  What is wrong with me!?! Man, have I missed out!  It is such a tasty and simple treat to make.  And goodness it can be drizzled, poured or spooned over so many things.  Pancakes, waffles, crepes, vanilla ice cream, toast and even cake are all perfect for blueberry sauce.  Pop a spoonful in your mouth and you have got it made.


Grab some fresh blueberries, some sugar, a couple squeezes of lemon juice and some corn starch and you will be ready to join the EASY Blueberry Sauce Club.  Yup, that's right a club.  Those of us that worship and adore blueberries need to stick together.  It sure is going to be a BIG club!!

This recipe will make about 2 cups of sauce.  I doubled the recipe the first time I made it and have yet to make a differently as I just LOVE having an abundance of this delicious treat around for all of our sweet needs.
 
EASY Blueberry Sauce
(recipe discovered on Annie Eat's)
 
Ingredients:
3 cups fresh (or frozen) blueberries
1/2 cup sugar
1 tablespoon fresh lemon juice
2 tablespoons water
2 1/2 tsp cornstarch
 
On medium heat in a medium-large sauce pan heat blueberries and sugar together until berries start to pop.  As berries and sugar are heating up, in a medium bowl combine lemon juice, water and cornstarch and pour into berries.  Stir to combine and heat until it all comes to a lovely boil.   Continue to heat sauce over low heat for a couple of minutes until sauce thickens stirring occasionally. Remove pan from heat and cool.  Serve warm over whatever suits your fancy or eat cold by the spoonful.  Enjoy!

Happy Blueberry Sauce Making!


Monday, July 29, 2013

DOUBLE White Chocolate Walnut Cookies (July SRC)


Often when I go to the grocery store I find myself going down the cookie aisle.  And of course I check out them out because yes, I love cookies.  I always think to myself, "Goodness, Avril you are nuts if you buy cookies! You can make them yourself!!" These thoughts usually steer me away from making such a crazy purchase.  But then my plan of baking up a batch of cookies is tossed to the bottom of my "to do list" and there are no cookies in the cupboard.  My poor family!!!


Well, don't feel bad for my family any longer because this gal (that would be me) baked up a serious batch of cookies for them recently. That's right, DOUBLE White Chocolate Walnut Cookies.   I was encouraged to bake these cookies when I was browsing through my Secret Recipe Club assignment for July - Kirsten's blog called, Loving Life.  What a sweetie pie that Kirsten is!  I always love having a "little visit" from her when she leaves a comment on my blog.  And yes, just like her lovely personality her recipes are just as delightful. I did change Kirsten's original recipe around a bit for these cookies as I was missing a few ingredients.  But the beauty of this recipe is that it can easily be altered to the flavors you wish to use based on the flavor of pudding mix and chocolate chips. Pudding mix is totally in these cookies if you were wondering if you had read that last sentence correctly.  And goodness does it just make the cookies into something magic!  Not only does it help with the flavor of the cookies but also the soft texture of them. 


You will find my slight alternations to the recipe written in red italics.  Take some time out of your busy schedule and whip up this recipe.  You will be happy if you do!
 
DOUBLE White Chocolate Walnut Cookies
                     (recipe slightly altered from Loving Life)
 
Ingredients:
 
2 cups flour
1 tsp baking soda
pinch of salt
1 cup butter, slightly softened at room temp.
1/4 cup white sugar
3/4 cup brown sugar
1 small box instant pudding - flavor of your choice (Kirsten's girls used chocolate fudge but I used white chocolate)
2 eggs
1 tsp vanilla extract
2 cups chocolate chip morsels - flavor of your choice (Kirsten's girls used peanut butter chips, I used white chocolate chips)
chopped nuts - optional  (I used chopped walnuts)
 
Directions:
 
1. Preheat oven to 350. Line cookie sheets with parchment paper or Silapat. Set prepared baking sheets aside.
 
2. In a medium bowl whisk together well,  flour, baking soda and salt.  Set mixture aside.
 
3. In a large bowl cream butter and then add sugars and pudding mix.  Beat all together for 2 minutes until light and fluffy. 
 
4. Add in eggs and vanilla extract to butter/sugar mixture.  Beat well all together until all is well combined.
 
5. Carefully incorporate flour mixture into butter/sugar/egg mixture.
 
6.  With a wooden spoon stir in chocolate chip morsels and nuts.
 
7.  Scoop cookie dough onto prepared sheets and bake for 10 minutes for medium cookies, 12 minutes for large cookies.  Cookies will have nice golden brown edges and may appear soft in the middle when done.  Cookies will firm up as they cool.
 
8.  Allow cookies  to cool for a couple minutes before transferring them onto a wire rack to cool completely before storing in an air tight container.


Enjoy!  And Happy DOUBLE White Chocolate Walnut Cookie Baking!


Monday, June 24, 2013

Cilantro Rice Salad


 I have to say that making summer-time salads has become my new obsession happiness.  I still adore baking sweets and treats but I honestly think that my next favorite category in the kitchen has become making those special salads that can be added to bbq's, picnics and warm weather celebrations. 
 
I love that you can take a grain or pasta and create a cold salad packed with veggies and herbs and then tossed with a simple vinaigrette.  Viola perfection of delicious-ness!
 
Recently, I was browsing through the recipe index on Mom's Test Kitchen's to find a recipe to make for my June's assignment for the Secret Recipe Club.  First of all let me tell you Jaime has a FANTABULOUS collection of recipes on her blog! Apple Cinnamon Pancakes first caught my attention until I spotted her Craisin Cinnamon Roll Coffee Cake.  But then, like I have mentioned above,  summer-time salads have been really grabbing hold of my taste buds lately so when I noticed Jaime had a recipe for Corn, Tomato and Asparagus Salad I had a feeling I was going to sway towards the savory side of my taste buds instead of my usually SWEET side.  Well, then all bets were off.  I discovered a recipe for Cilantro Rice Salad and knew I had picked a winner!  I was SO right. SO right I say!  This lovely little treasure of a summer-time salad is completely and insanely delicious. And it is made with very little effort, simple ingredients and a versatile recipe on top of all that.  Jaime's original recipe called for serveral ingredients that I didn't have on hand (a red pepper, limes and green onions) so I substituted in a couple different veggies for those that I didn't have and the salad came out completely fine.  I also added in some cherry tomatoes for color and taste. Although I used the juice of one lemon and was happy with my substitution for the missing limes called for in the recipe, next time I will definitely use fresh lime juice as I believe that lime and cilantro are meant to be together always and forever. 


Find an excuse to make this salad.  Crash a BBQ, invite your favorite people over to your own party or make it just because you deserve a yummy treat.  Just make this gosh-darn-delicious salad!! Do. It.
 
 
Cilantro Rice Salad
(recipe slightly adapted from Mom's Test Kitchen)
 
Salad base ingredients:
2 cups chicken broth
1 cup rice (I used long grain white)
1/2 chopped fresh cilantro
1 green or red pepper, chopped (my addition)
1/2 cup green onions, chopped (I used regular onion as I didn't have the green onions on hand)
1 cup cherry tomatoes, cut in half (my addition)
juice of 3 limes (I used juice of 1 lemon instead...it was yummy)
 
Dressing ingredients:
1/3 cup canola oil
1 Tbsp red wine vinegar
1 Tbsp Worcestershire sauce
1 Tbsp cumin
1 tsp garlic salt (my addition)
ground pepper to taste
 
Directions:
 
1.  Bring chicken broth and rice to a boil in a medium/large sauce pan.  Once broth comes to boil, cover pan tightly and turn heat down to a simmer.  Simmer rice for 15-20 minutes until liquid is gone and rice is fluffy.  Cool rice at room temperature or in fridge.
 
2. Make dressing for salad while rice cools.  In a large bowl whisk together lime (or lemon juice), oil, red wine vinegar, Worcestershire sauce and cumin.  Add in cooled rice and chopped veggies to the dressing. Toss all together.  Refrigerate until desired time to eat and ENJOY!!  
 
 
Happy, Happy Cilantro Rice Salad Making!


LinkWithin

Related Posts with Thumbnails

ShareThis