

Simple. Amazing. Magic this cake is! And soooooo VERY patriotic indeed. How can you go wrong making a cake that when cut into comes out looking like the American flag?!? I knew I couldn't when I first discovered this cake on 17 and Baking - a lovely lovely blog by an amazing young woman. You will simply be blown away when you visit this blog. I couldn't wait to find an excuse to challenge myself with such a cake. This past weekend I was able to give myself the "challenge" - and you know I was a success!
This cake does involve a little tiny bit of work for the final out-come but really it's NOT that bad. All it takes is making your favorite yellow or white cake (you can even use a box mix!) - I made the Traditional Vanilla Birthday Cake recipe from the lovely Magnolia Bakery Cookbook.... I will share the recipe with you on this post. After you have made your cake batter then you need to become friends with RED and BLUE dye. You are going to divide your cake batter into 3 portions and dye one portion RED and another BLUE while keeping the last remaining portion as is (WHITE). Bake your 3 portions of cake batter in a round 9" cake pan. Now you will need to make a white frosting - I made a delicious cream cheese frosting (no worries, recipe will be shared) from The Joy of Cooking. Of course you could make a yummy white chocolate frosting or even a light and fluffy butter cream frosting if you wish instead of the cream cheese frosting. The sky is the limit! - just make sure it is a WHITE frosting.


Okay, let's get down to business....first the recipes that I used and then all the dets on how I assembled the cake to make all the magic happen.
Traditional Vanilla Birthday Cake
*Makes 1 three-layer 9" cake or 24 cupcakes*
(recipe from The Magnolia Bakery Cookbook)
Ingredients:
1 cup (2 sticks) unsalted butter, softened
2 cups sugar
4 large eggs, at room temperature
1 1/2 cups self-rising flour (It makes me HAPPY HAPPY to use self-rising flour in any recipe...it's kinda a magic flour! - I know, a little weird but it's one of my "things").
1 1/4 cups all-purpose flour
1 cup milk (I used 2%)
1 tsp vanilla extract
Cake Directions:
1. Preheat oven to 350 degrees F. Grease and lightly flour three 9" round cake pans - line with parchment paper if you wish to be extra cautious.
2. In a large bowl cream butter on medium speed until nice and smooth. Add in sugar gradually and beat until fluffy - a good 3 minutes.
3. Add eggs one at a time, beating well after each addition.
4. Combine flours and add in four parts, alternating with the milk and the vanilla extract - beat well after each addition. You will have a beautiful vanilla cake batter.....

5. Now comes the fun part! Get out your food coloring.....

and divide batter into 3 bowls. Color one of the portions of batter with BLUE dye and a 2nd portion with RED dye (I used about a 1/4 of a bottle for each color)....


....and bake for 20-25 minutes. Cool your cakes completely. Frosting time!
Fluffy Cream Cheese Frosting
(The Joy of Cooking is the source of this recipe)
Ingredients:
2 (8 oz.) packages of cream cheese
10 tbsp of butter, softened
4 tsp vanilla extract
4 cups powdered sugar, sifted
Directions:
1. Beat together cream cheese, butter and vanilla extract until well combined - about 2-3 minutes.
2. Gradually add in sifted powdered sugar. Beat until light and fluffy.
Assembly of the Cake
1. Prepare your cake layers.
a. Cut your WHITE and RED cake in 1/2 horizontally.....a serrated knife works best. You will now have 2 WHITE layers and 2 RED layers of cake.
b. DO NOT CUT THE BLUE CAKE LAYER IN 1/2 like you did for the RED layer and the WHITE layer. Instead you are going to cut a circle out of the middle of the BLUE cake. I used a bowl as a guide to do so.....


Such HAPPY HAPPY fun!
Enjoy!!! I know you will as so many others will too! :-)

This post has been linked to....
Tuesday Tastes on Crazy Daisy
Tuesday's at the Table
Foodie Tots
Traditional Vanilla Birthday Cake
*Makes 1 three-layer 9" cake or 24 cupcakes*
(recipe from The Magnolia Bakery Cookbook)
Ingredients:
1 cup (2 sticks) unsalted butter, softened
2 cups sugar
4 large eggs, at room temperature
1 1/2 cups self-rising flour (It makes me HAPPY HAPPY to use self-rising flour in any recipe...it's kinda a magic flour! - I know, a little weird but it's one of my "things").
1 1/4 cups all-purpose flour
1 cup milk (I used 2%)
1 tsp vanilla extract
Cake Directions:
1. Preheat oven to 350 degrees F. Grease and lightly flour three 9" round cake pans - line with parchment paper if you wish to be extra cautious.
2. In a large bowl cream butter on medium speed until nice and smooth. Add in sugar gradually and beat until fluffy - a good 3 minutes.
3. Add eggs one at a time, beating well after each addition.
4. Combine flours and add in four parts, alternating with the milk and the vanilla extract - beat well after each addition. You will have a beautiful vanilla cake batter.....

5. Now comes the fun part! Get out your food coloring.....
and divide batter into 3 bowls. Color one of the portions of batter with BLUE dye and a 2nd portion with RED dye (I used about a 1/4 of a bottle for each color)....

....the 3rd portion of batter will remain WHITE.
6. Pour your 3 portions of batter into prepared cake pans....

....and bake for 20-25 minutes. Cool your cakes completely. Frosting time!
Fluffy Cream Cheese Frosting
(The Joy of Cooking is the source of this recipe)
Ingredients:
2 (8 oz.) packages of cream cheese
10 tbsp of butter, softened
4 tsp vanilla extract
4 cups powdered sugar, sifted
Directions:
1. Beat together cream cheese, butter and vanilla extract until well combined - about 2-3 minutes.
2. Gradually add in sifted powdered sugar. Beat until light and fluffy.
Assembly of the Cake
1. Prepare your cake layers.
a. Cut your WHITE and RED cake in 1/2 horizontally.....a serrated knife works best. You will now have 2 WHITE layers and 2 RED layers of cake.
b. DO NOT CUT THE BLUE CAKE LAYER IN 1/2 like you did for the RED layer and the WHITE layer. Instead you are going to cut a circle out of the middle of the BLUE cake. I used a bowl as a guide to do so.....

You will do the same with 1 of the 1/2 WHITE layers and 1 of the 1/2 RED layers. Set these circles aside. You will now have extra cake to eat/do as you please - the middle of the BLUE layer and the outside circles of 1 of the WHITE layers and 1 of the RED circles.

2. Place the WHITE (whole cake without the circle cut out of it) on the bottom of your platter you wish to serve your cake on. Frost the top of the cake....

Place the RED layer on top and frost.....

....and now your BLUE ring layer.....

....frost the top and inside of the ring of the BLUE layer.
3. Take the WHITE small circle cake (that you cut from 1 of the WHITE layer cakes) and gently place inside the BLUE layer cake......

....and now frost the top of the WHITE circle.....

....and place the RED small circle cake ontop of that and frost....

4. Frost the sides of the whole cake with a thin layer of frosting = your "crumb frosting" layer.

Set cake aside (in refrig is best if you have room) to allow frosting to harden a bit on cake. A good hour is all it takes.
5. Once the "crumb frosting" layer has slightly hardened you can go over the cake again with the remaining frosting and give it a nice fluffy appearance. On 17 and Baking she demonstrates how to give a fun "fireworks" effect on top of the cake with the frosting. First make circles all around the top of your cake either with a butter knife or an off-set spatula.....

...then starting from the center of the cake out, drag a toothpick through the frosting to the edge of the cake...

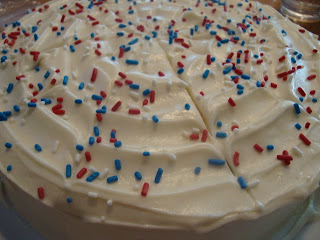
Leave as is or decorate with sprinkles....

Voila!!! Your RED, WHITE and BLUE Flag Cake is completed!

Such HAPPY HAPPY fun!
Enjoy!!! I know you will as so many others will too! :-)

Happy RED, WHITE and BLUE Flag Cake Baking!
This post has been linked to....
Tuesday Tastes on Crazy Daisy
Tuesday's at the Table
Foodie Tots
such an awesome looking cake!
ReplyDeleteYou did such a great job on this cake! I saw it on "17 and baking" also and will be making it soon! Great tutorial! Thanks for visiting my blog, and commenting:)
ReplyDeleteHow cute is this idea? Perfect for the upcoming 4th of July! Your cake looks great!!
ReplyDeletei am so excited to try this out one day! yours look incredible!
ReplyDeleteLOVE it! Good job Mama!
ReplyDeleteHi! Thanks for stopping by on my Oreo post. I came over to tell you how much I looove this cake idea, and that I am a happy new follower of your sweet blog. I'll be looking forward to future posts from you. I love baking, too! Nice "meeting" you, friend. Happy Wednesday to you. : )
ReplyDeleteHow totally clever! I love your idea!
ReplyDeletewww.makingmemorieswithyourkids.blogspot.com
what a fabulous cake! Magnificent! Thanks for sharing your recipe with Tuesday Tastes! People's Choice Award Polls are open now, come vote for your favorite!
ReplyDeleteHappy Day,
Jasey @ Crazy Daisy
http://crazyjayzplace.blogspot.com/2010/06/tuesday-tastes-11.html
Great job on the cake! Very festive!!!
ReplyDeleteI absolutely LOVE this cake. I can't wait to try it.
ReplyDeleteCasey
www.theoverloadedmommy.blogspot.com
Very clever! That is a great idea. My kids would just love this!
ReplyDeleteThat's really cool! I saw a cake kinda like that but it had a heart in the middle. Oh, and I think I've seen it with a cross.
ReplyDelete~ingrid
I am looking for my memories through the stories, the narrative of people. I feel it is difficult but I will try.
ReplyDeletepovaup