Image Map

Friday, April 30, 2010

A Berry Birthday Cake for a "Fruity Friday"


Ohhhhh yeah.....simple ingredients for a delicious oh-so-scrumptious BERRY BIRTHDAY kind of cake.  Happiness.  Simple and true happiness to make someone that you love a birthday cake that is so yummy and brings BIG smiles to every one's faces.  This is truly one my most favorite things in life to do....to make birthday cakes for those that I adore and love.  This time around it was a cake for my beloved Jeff. Along with the fact that it was his 40th BDay cake (and boy did he take it well...some people freak with such mile stone birthdays...he embraced it with happiness and ease - I hope to do the same in just a couple of years).

When I asked Jeff what kind of cake he wanted for his birthday after a little thought he said, "no chocolate....how about something with raspberries and a vanilla cake."  Right away I went to Joy the Baker's blog knowing that I could find a cake recipe that included all of Jeff's requests.  I found the recipe I am about to share with you below.......

Berry Birthday Cake
(discovered on Joy the Baker from the Organic and Chic cook-book)

Ingredients:

2 sticks unsalted butter, softened to room temp

1 3/4 cups sugar

4 large eggs

1 cup whole milk

1 tbsp vanilla extract (make sure it is REAL vanilla extract...you don't want it to be fake in this recipe)

1/2 vanilla bean, seeds scraped out (unfortunately I didn't have a vanilla bean so instead I just used a little extra vanilla extract)

2 3/4 cup flour

1 1/2 tsp baking powder

1/2 tsp salt

1-2 cups of berries of your choice for decoration/taste/beauty
Directions:

1. Preheat oven to 350 degrees F.  Butter and flour two 8" (or 9") round cake pans and set aside.  If you wish you can also make this recipe into cupcakes instead of a cake - makes 24. 

2. Cream butter and sugar on medium speed for 3-5 minutes or until light and fluffy.  Scrape the sides of the bowl with a rubber spatula to ensure that everything is well mixed.


3. Add eggs, one at a time - beating for 1 minute after each addition.


4. In a small bowl whisk together the flour, baking powder and salt (this is where Jolie was able to help make her Daddy's BDay cake :-) 


5. In another bowl combine milk, vanilla extract and vanilla bean seeds.

6. With a mixer on low speed alternate adding the flour mixture and the milk mixture in 3 batches.  If you are using a standing mixer you may need to cover your mixing bowl with a clean kitchen towel when incorporating the flour.  Start and end with the flour mixture.  When the batter is just combined, shut off the mixer and thoroughly incorporate the dough with a rubber spatula


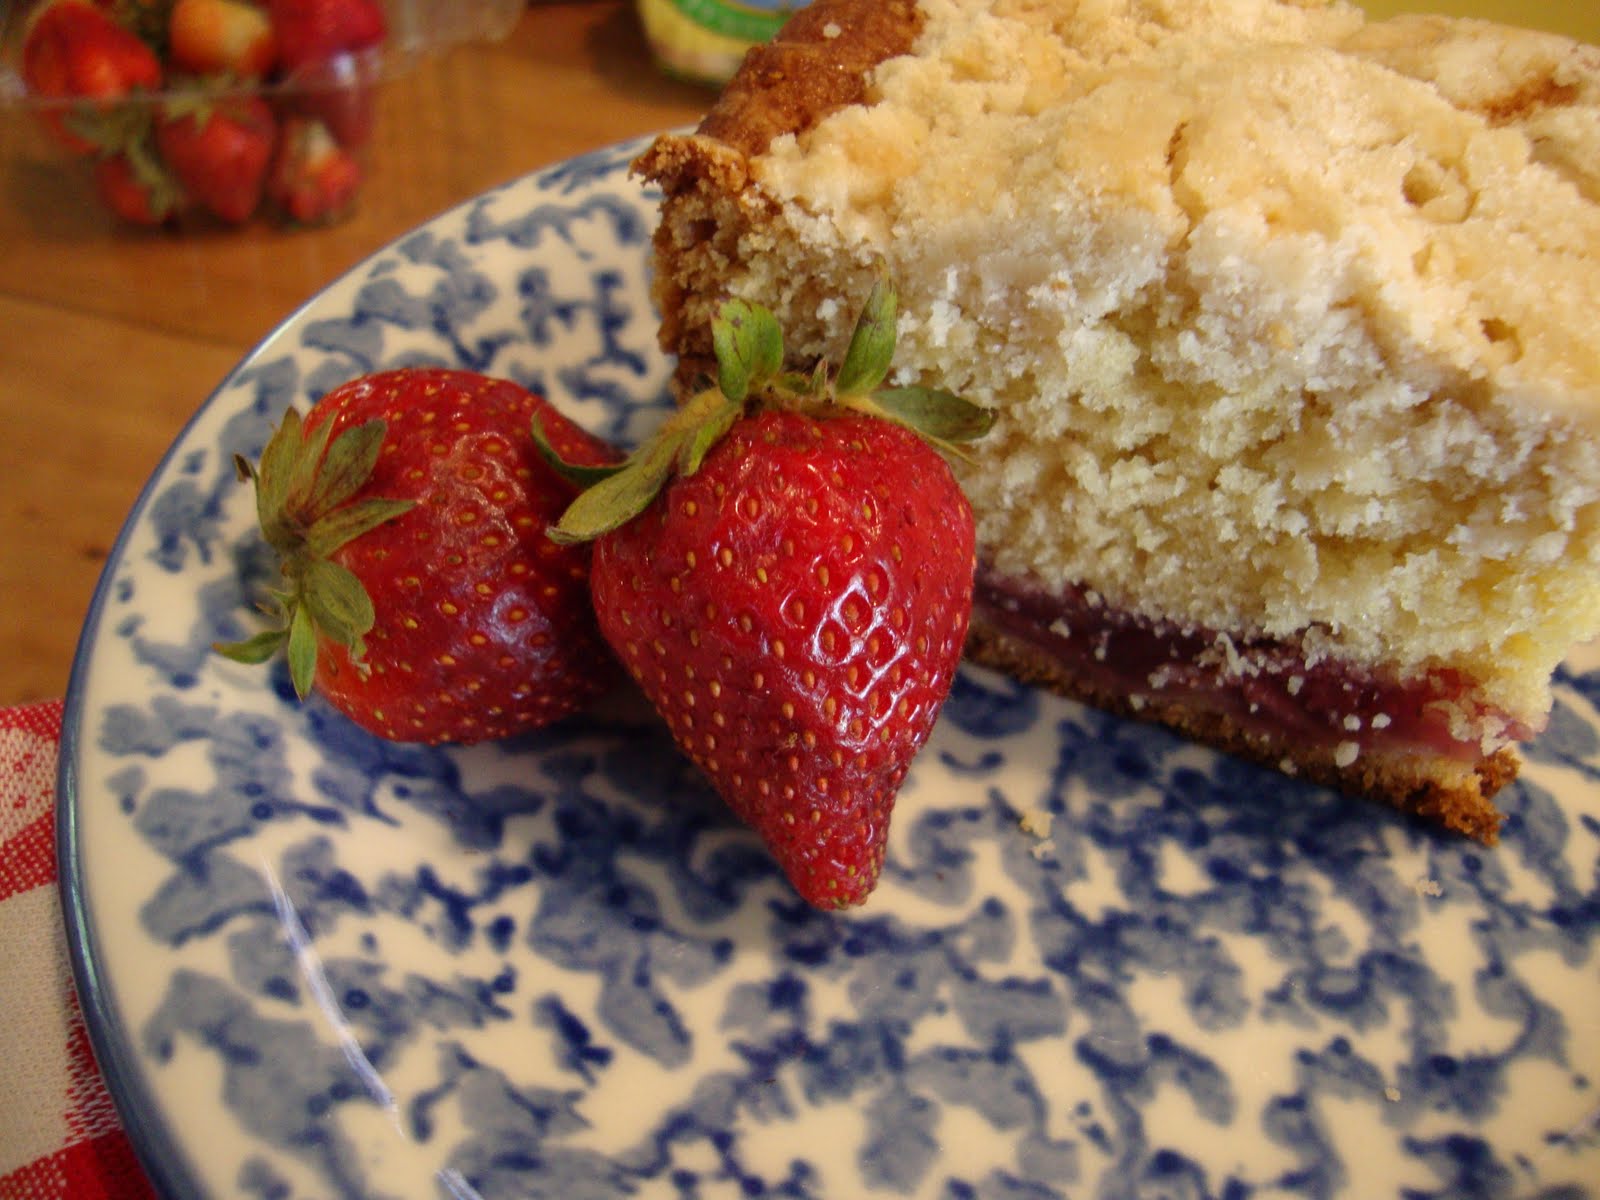
7. Divide the batter between the two pans.  I dotted my cakes with berries to bake right into the cake.
Bake for 35-40 minutes or until a pale golden color on top of cake - keep in mind that a 9" round cake will not take as long to bake an 8" cake for it is not as thick.  Insert a cake tester in center of cakes...if it comes out clean the cakes are done.  If making cupcakes only bake for 25-30 minutes.


Cool completely before decorating with your choice of frosting and berries.  I made this frosting....

Vanilla Whipped Buttercream Frosting
(recipe adapted from Joy the Baker's blog from the Organic and Chic cook-book)

Ingredients:

2 sticks (1 cup) unsalted butter, softened

1 cup sugar

1/4 cup sifted flour

1 1/2 tbsp REAL vanilla extract

Directions:

1. Cream the butter on medium speed, 3-5 minutes.  Add sugar and beat on high speed until light and fluffy, 5-7 minutes.  Stop the mixer occasionally to scrape down the sides of the bowl and beat again.

2. In a small saucepan combine 1/4 cup milk with the sifted flour and vanilla extract.  Whisk together until there are no lumps.

3. Over medium heat slowly and add the remaining 3/4 cup milk, whisking constantly.  Cook until the mixture comes to a low boil. 

4. Reduce heat to low and continue mixing with a whisk until mixture starts to thicken - this can happen very fast....you definitely have to be paying attention to this step.

5. When mixture starts to thicken, immediately remove saucepan from heat but continue to stir.  Not only does this stirring allow the mixture to continue to cook but it also keeps it from getting lumpy. 


6. Whisk for a couple minutes...this allows you to have a smooth consistency along with helping to cool down the mixture before you add it to the butter/sugar mixture.  The mixture must be at room temperature before added to the butter/sugar mixture.  If you want you can always pop it in the freezer for a couple of minutes to help speed up the process.

7. With the mixer on low speed, slowly add the flour/milk mixture to the butter/sugar mixture.  Increase the speed to medium and beat until the frosting is light and fluffy - 3-5 minutes. 

8. Frost your cake as desired.  I put berries and frosting between cake layers..... 


....and then frosted the top and sides of cake.  The frosting takes a little work but oh my is it dee-lish!!!


Such a beautifully happy and DELICIOUS cake!!!


Happy Berry Birthday Cake Baking!
~avril :-)

This post has been linked to...


Wednesday, April 28, 2010

Perfect Snickerdoodle Cookies, a Birthday Card AND a MckLinky :-)


Cookies....nothing better than a homemade yummy cookie - along with a glass of milk of course!  These cookies remind of my childhood.  The flavor of cinnamon and sugar in particular.  Do you have a favorite cookie that reminds you of your childhood?  Please do share with MckLinky at the bottom of this post.


Perfect Snickerdoodle Cookies
(discovered on Tasty Kitchen from the member named "Megan")

Ingredients:

1 cup shortening

1 1/2 cup sugar

2 whole eggs

2 3/4 cup flour

2 tsp cream of tartar

1 tsp baking soda

1/2 tsp salt

1/2 cup of sugar/cinnamon mixture (1/2 cup sugar mixed with 1-2 tsp cinnamon - depending on how much you prefer)


Directions:

1. Beat together shortening, sugar and eggs.

2. Add in flour, cream of tartar, baking soda and salt.  Mix well all together. 

3. Chill cookie batter for at least 30 minutes.

4. Preheat oven to 350 degrees F.

5. Mix together 1/2 cup sugar and 1-2 tsp cinnamon in a medium bowl.


6. With a teaspoon or a melon baller (which is what I used) roll chilled cookie dough into small balls.  Roll in sugar/cinnamon mixture to coat the balls well.


7. Place rolled cookies on cookie sheet (ungreased) and bake for 8-10 minutes.


 9. Cool on cookie rack.  Enjoy the site of mountains and mountains of Snickerdoodles appear before your very eyes!!


My birthday was a couple weeks ago - I was showered with so many happy moments/memories along with presents and gorgeous cards.  I'm such a lucky girl! 

Below you will see a card that my dear precious friend, Kylah made for me - I treasure her along with EVERYTHING she makes for me.  I thought the cookies wrapped in red gingham ribbon matched the card perfectly!


Happy Snickerdoodle Cookie Baking!
~avril :-)

This post has been linked to...

If you have a favorite cookie recipe from your childhood or simply that you just really enjoy please link it up to the MckLinky found here.  Don't forget to include in your post that you've linked up to Baking and Creating with Avril. :-)

Sunday, April 25, 2010

Shannon's Quick and Easy Fish - "Close to my Heart" recipe


Friends in my life are so very very precious to me. I truly do not know how I would survive in all my day to day activities without the amazing people that are in it.  I am blessed with a HUGE amount of friends...that I am eternally gratefully for every single day.  LOVE you guys!!! Mawahhhhhhhh :-)

Not only do I find friendship, support,  happiness, adventures, knowledge, laughter and comfort through my friends but best of all I often discover new and delicious recipes from them too! These recipes I consider and call "Close to my Heart" recipes.  "Close to my Heart" recipes allows me to remember a special moment or memory along with the goodness of the taste that it offers.  It is full of richness in every sense of the way.

One of the very first recipes that I will be sharing on my blog as a "Close to my Heart" recipe comes from my beloved and precious friend, Shannon.  We were freshman college room-mates (yikes almost 20 yrs ago we meet!) when we first began our friendship.  Amazing. Simply amazing. I treasure her.  I adore her to pieces!!! :-)

Shannon gave me this recipe about a year ago and I make it at least once a month.  It's quick.  It's yummy. And yes, it's pretty healthy for you too.

Shannon's Quick and Easy Fish
Serves 4
Preheat oven to 375 degrees F

Ingredients:

2 filets of white fish of your choice (most often I get Haddock)

3 tbsp olive oil

2 tbsp butter, cut into small slices

couple shakes of garlic salt

couple shakes of ground pepper

1 fresh lemon - one 1/2 for the juice the other 1/2  for serving wedges along side the fish

6-8 Ritz crackers, crushed

Directions:

1. Coat baking dish (I unusually use a 9x13 glass baking dish for this recipe) with 2 tbsp olive oil.  Place fish in dish and roll around in the olive oil to coat.  Drizzle fish with remaining tbsp of olive oil.

2. Sprinkle with garlic salt and pepper and then crushed Ritz crackers.

3. Squeeze 1/2 of fresh lemon over over both fish filets. 


4. Dot with sliced butter pieces.


5. Place in preheated oven (375*) and bake for 12 minutes - just until nice and flaky.  Be careful NOT to over bake the fish...it will be dry if over baked (I have learned the hard way).

Serve with favorite sides and enjoy!
~avril :-)


This post has been linked to Crazy Daisy: Tuesday Tastes

Friday, April 23, 2010

Strawberry Coffee Cake on a "Fruity Friday"


Welcome to "Fruity Friday"!!!

Yes, I am going to try my hardest and post a recipe containing some type of fruit every Friday.  I kind of like that catchy phrase "Fruity Friday"!! - don't you?

To kick off "Fruity Friday" I am going to post a recipe that includes strawberries.

 Red juicy SWEET strawberries.  Nothing better!!! - well, maybe except for cherries....in my book at least. :-)

I love it when I come across a recipe that I know I will make over and over again in my life-time.  It's usually a recipe that is easy to make, that tastes yummy (of course!), that has aesthetic appeal (it's always important for me to make something that offers pleasure to the eyes along with the taste buds in my book) and that uses an ingredient that is close to my heart (such as strawberries).  All I can say, is that this recipe that I am about to share with you today is definitely going to be one that I make over and over and over again in my life-time.  That I can guarantee.  I'm pretty sure you will feel the same once you make it yourself. 

Ready?  Get set!  Let's do it!!!!

Strawberry Coffee Cake
(recipe from Joy the Baker)

Ingredients:

Topping

3 tbsp cold unsalted butter, cut into 1/2-inch cubes

1/2 cup flour

3 1/2 tbsp sugar

Strawberry Sauce

1 heaping cup of sliced strawberries (I actually used 1 1/2 cups)

1/3 cup sugar

2 tbsp cornstarch

2 tsp water

Cake

1/2 cup butter, softened

1 cup sugar

2 eggs

2 cups flour

1 tsp baking powder

1 tsp baking soda

1/2 tsp salt

8 oz. sour cream (I have used regular and light...both work just fine)

1 tsp vanilla extract

1/2 tsp almond extract

Directions:

1. Make your topping.


2. Combine all topping ingredients in a small bowl.  Blend together with a pastry blender (I LOVE this tool in my kitchen....if you don't have one, do yourself a favor get one ASAP) or your fingers until crumbly. (see picture below) Set bowl aside.


3. Make strawberry sauce.


4. Combine all strawberry sauce ingredients in a small sauce pan.  Cook over low heat for 5-7 minutes, stirring constantly until the sauce is thickened and the strawberries are soft and somewhat broken down. Set aside to cool.


5. Grease a 9x9 or 10x10 baking pan.  Set aside.  Preheat oven to 350 degrees F.


6. Beat together 1 stick of softened butter and 1 cup sugar until light and fluffy, about 3 minutes.  Add eggs one at a time, beating well after each addition.  Add in vanilla and almond extract.

7. Sift dry ingredients together.  Add to creamed mixture in 3 parts alternating with the sour cream in 2 parts - beginning and ending with the dry ingredients.  Beat until just combined.


8. Spoon 2/3 of the batter into the prepared pan.  Spread with cooled strawberry sauce. 

9. Spoon remaining batter over strawberry layer and spread evenly.  Top with crumbled topping.


10. Bake at 350* for 50-60 minutes - until a knife inserted into the center of the cake comes out clean.


Cool a little bit and cut to your liking.  It's sooooo yummy warm.......


Happy Fruity Friday to ALL!!!
~avril :-)


*This post has been linked to....

Wednesday, April 21, 2010

Chicken and Mushrooms in Garlic White Wine Sauce


Sunday night I was craving a dish with chicken and mushrooms - don't ask me why.....that's just what I wanted.  So, I made my way over to one of my favorite places to find a recipe - Tasty Kitchen.  If you have yet to discover this site don't delay any longer and take time out of your day to do so.   TK is fabulous!- it is jam packed with a HUGE aray of recipes.  It's HEAVEN for me.

After searching for just a matter of minutes I came across this recipe that I am about to share with you below.  It comes from an adorable member of TK named "Siggy Spice" - and guess what!? - she has an adorable or so scrumptious blog too!!!!  Check her out....go ahead I dare ya!


Chicken and Mushrooms in Garlic White Wine Sauce
(discovered on Siggy Spice's blog)

Ingredients:

Egg noodles (I used about 1/2 of a large bag)

2 tbsp flour, divided

1/2 tsp salt

1/4 tsp pepper

2 tbsp olive oil

1 lb boneless, skinless chicken breasts - cut into 1" pieces

1 (8oz) package mushrooms, sliced

1/2 tsp dried tarragon, basil or parsley (I used parsley because that's what I had on hand)

1 tbsp minced garlic - fresh or from a jar (I used 2 cloves fresh garlic)

1/2 cup dry white wine

1/2 cup chicken broth

grated parmesan cheese - for topping 

Directions:

1. In a medium size bowl combine 1 tbsp flour, 1/4 tsp salt and 1/8 tsp pepper - stir to combine.  Toss in chicken to coat.

2. Heat 1 tbsp olive oil in a large non-stick skillet over medium-high heat.  Add chicken and saute for a good 4 minutes or until browned.  Remove chicken from pan and set aside.

3. With the same pan from the chicken add the remaining 1 tbsp of olive oil.  Add mushrooms and spice of choice.  Saute for 2 minutes, then add garlic and saute for an additional minute or so until any liquid evaporates and the mushrooms darken.  Be sure NOT to burn the garlic.

4. Add wine to the pan; cook for 1 minute - scraping the browned bits from the bottom of the pan.

5. Add remaining flour - stir constantly.  Add in remaining salt and pepper and then chicken broth.  Cook for 1 minute or until slightly thickened - which happens fast so stir frequently.

6. Return chicken to pan.  Cover and simmer for 2 minutes.  Uncover; cook for 1 minute or until chicken is cooked thoroughly.  


7. Cook egg noodles according to package directions and add to hot chicken/mushroom mixture.  Cook all together for a couple minutes to thoroughly combine the yumminess of the sauce from the chicken/mushroom mixture.

8. Serve topped with cheese.
Feeds about 4 healthy servings.

Yummy YUM yum!

***And one of the best parts of this scrumptious dish is that it is low in calories - only 350 calories per serving


Happy Chicken and Mushrooms with White Wine Sauce Cooking!
~avril :-)

Monday, April 19, 2010

Blueberry Gems and a MckLinky for "Blueberry" recipes :-)

I just adore blueberries!  I adore their color, their taste, their size.....even their smell.  I LOVE blueberries. Picking blueberries makes me happy....it's almost like a form of therapy because it is such peaceful, non-stressful and relaxing activity for me.   I am seriously counting down the days until blueberries are actually ready to pick here in NH (for those of you local to the Southern NH area - Monadnock Berries is the best place to go around here).

 And I LOVE baking with blueberries too! Don't you?  What is your favorite recipe to bake with blueberries?  Please do share with MckLinky at the bottom of this post. 


I have tried a lot of blueberry muffin recipes over the years - some are definitely better than others.  One of my most favorite recipes for blueberry muffins I am sharing with you today - Blueberry Gems.  And guess where I found this recipe??!!???  YES, from one of my top beloved Queens of Cooking (QOC) - Paula Deen.  She is a gem....just like these muffins. :-)

Start off by gathering your ingredients for this recipe - which believe it or not does NOT include any butter!!!  Yes, you are reading that correctly.....NO butter in a Paula Deen recipe.  I don't know what got into her when she created this recipe but there is absolutely NO butter in it.  Just good old fashioned oil.

Now, this recipe is so easy to make so don't hesitate to invite a little one to join you in the making of it. I asked Jolie (my daughter) to join me - as I often do when I bake - and she invited her dolly "Sarah" to join us too.   They both did a fabulous job mixing up the self-rising flour and sugar. :-)


Make a little "well" in the flour mixture after you are done combining the ingredients together.  This is where you will ever so gently pour the wet mixture into the bowl.

I find that whisking the eggs, milk, oil and vanilla extract together works best.


And now you pour your wet mixture as seen below in the "well" of the flour mixture.


Mix all together until almost combined and then add in blueberries.  The key to this recipe is to NOT over- mix the batter.  This is the biggest reason why I add in the blueberries before the wet and dry ingredients are completely mixed together....it allows everything to be mixed together BEFORE over-mixing the batter. 


You can either use regular size muffin tins or mini muffin tins.  And you can either grease the muffin tins or use muffin liners.  It is your preference.

This recipe makes at least 12-16 regular size muffins OR 24-26 mini muffins.


Ok, enough fooling around.  Here is the recipe......
Blueberry Gems
(from Paula Deen's cookbook,  Paula Deen Celebrates!)

Ingredients:

2 cups self-rising flour

1 1/2 cups sugar (you could easily decrease the sugar to 1 1/4 cups if you wish to do so)

2 eggs, slightly beaten

1 tsp vanilla extract

1/2 cup vegetable oil

1/2 cup whole milk (I used 2%)

1 cup blueberries, fresh or frozen (I used frozen)

Directions:

1. Preheat oven to 375 degrees F. Grease or line muffin tin/tins.

2. Combine flour and sugar in a large bowl.  Make a well in the center of the flour mixture.  Set aside.

3. Whisk together eggs, vanilla, oil and milk in a small bowl.  Gently pour liquid mixture into well of the flour mixture. Mix with spoon until just combined.

4. Add in blueberries - gently fold into batter.

5. Spoon batter into prepared muffin tins.

6. Bake for 23-25 minutes for regular size muffins. 15-17 minutes for mini size muffins.  Muffins will be nicely browned and puffed when done.

Enjoy!


Please do share your favorite BLUEBERRY recipe!!!

Just click on the link below to share......
(I only meant to post one MckLinky but being my 1st time doing this I messed up so just pretend you only see one MckLinky and use the 1st one).

This recipe has been linked to Hoosier Homemade and Mommy's Kitchen :-)

Thursday, April 15, 2010

Perfect Potatoes au Gratin


What a scrumptious dish!  A couple of weeks ago I made this recipe for Easter dinner along side the ham as one of the side dishes. 

It is EASY to make.  Easy to EAT.  Easy to LOVE. And EASY to want to make it AGAIN!!!

Once again, one my "Queen's of Cooking" (QOC) - The Pioneer Woman - was who I discovered this recipe from.  I seriously worship this woman.....if you haven't discovered that already.  :-)

Perfect Potatoes au Gratin
(recipe has been adapted from The Pioneer Woman)

Ingredients:

4-5 whole Russet potatoes, scrubbed clean

2 Tbsp butter, softened

1 1/2 cup heavy cream (I used 1/2 and 1/2)

1/2 cup whole milk (I used 2%)

2 Tbsp flour

4 cloves garlic, crushed or minced

1 tsp salt

freshly ground pepper, to taste

1 cup sharp cheddar cheese, freshly grated

Directions:

1. Preheat oven to 400 degrees F.

2. Smear softened butter all over bottom of baking dish (2 qt baking dish or a pie pan).

3. Slice potatoes, then cut in slices and forths.  Place in a bowl of water as you cut them so that they don't get brown....also a great way to decrease the starch in them.


4. In a medium bowl, whisk together milk, cream, flour, garlic, salt and pepper.

5. Place a 1/3 of the potatoes in the bottom of baking dish.  Pour a 1/3 of the cream mixture over the potatoes.  Repeat 2 more times, ending with the cream mixture. 

6. Cover with foil and bake for 30 minutes.  Remover foil and bake for an additional 20 minutes, or until potatoes are golden brown and bubbling. 

7. Add grated cheddar cheese to the top of potatoes and bake for another 3-5 minutes, until cheese is melted and bubbly.

8. Allow to stand for a few minutes before serving by the spoonful.

Deeeeelish!

Happy Perfect Potatoes au Gratin Baking!
~avril :-)

*This recipe has been linked to Mommy's Kitchen -  for "Potluck Sunday"*


Wednesday, April 14, 2010

Chocolate Caramel Bars


Ahhhhh it's a sea of chocolate, caramel and pecans.....YUM-O!!! (as Rachel Ray would say) - :-)

Just wait, it only gets better.....another layer of chocolate melts into all the yumminess of the first layer of chocolate, caramel and pecans.


 It's all baked together to make a happy ooey-gooey delight. 
 Below this picture almost looks like a puffy layer of "chocolate clouds" nestled against all the delicious yumminess of chocolate, caramel and pecans......H-E-A-V-E-N.  Heaven.  Pure heaven at that!


Chocolate Caramel Bars
(recipe was discovered on the blog Bake or Break Recipes)

Ingredients:

1 box German Chocolate cake mix

3/4 cup butter, melted

2/3 cup (from a 5 oz. can) evaporated milk, divided into 1/3 cup portions

1 (14 oz.) bag caramels (I used Brach's Milk Maid caramels)

1 cup chopped pecans

1 cup semisweet chocolate chips

Directions:

1. Preheat oven to 350 degrees F. Grease a 9x13 baking pan.

2. In a large bowl combine cake mix, melted butter and 1/3 cup evaporated milk. Beat at medium speed  until smooth. 

3. Spread 1/2 the mixture in the prepared pan. Set aside the other 1/2.

4. Unwrap ALL of the caramels (it's a pain but some has got to do it....and believe me it is well worth all the work) and place in a heavy medium size sauce pan.  Add to the caramels the other 1/3 cup of evaporated milk. (Patiently) cook over medium-low heat stirring constantly with a wooden spoon until the caramels are completely melted.

5. Pour caramel/evaporated milk mixture over chocolate layer in pan.

6. Sprinkle with chopped pecans and chocolate chips.

7. Drop remaining chocolate mixture over nuts, caramel and chocolate chips. *It will now look like the 2nd picture posted above.

8. Bake for 20-25 minutes.  Cool in pan as long as you can handle doing so.  The cooler the bars are the easier they are to cut and remove from pan.

Enjoy!


Happy Chocolate Caramel Bar Baking!
~avril :-)

This recipe has been linked up to the blog Stop and Smell the Chocolates :-)

LinkWithin

Related Posts with Thumbnails

ShareThis