Image Map

Monday, November 2, 2015

Twisted Cinnamon Rolls for SRC


Baking up a batch of cinnamon rolls is truly one of my most favorite things to do as the weather gets cooler.  I believe it is the combination of the cinnamon sugary sweetness along with working with a puffy and soft dough to create such a treat that makes my baking heart so happy.   Beautiful Swanson of Chef in Disguise recently added a whole new level of happiness to my love for baking cinnamon rolls.  She has taught me how to make TWISTED Cinnamon Rolls from a gorgeous recipe that I discovered on her blog via my November Secret Recipe Club assignment. 


4 lovely layers of dough blanket melted butter which is then sprinkled with a cinnamon sugar coating on top of each dough layer.  The layered circle of deliciousness is cut into 8 portions which are then cut again with a slit in their centers.   The slit in the mid section provides the tip of each portion to be looped into it which creates the twist.  So much fun!  Swanson has created a perfect photo description of the process to make these twists.  Please check it out HERE


Chef in Disguise is a blog full of gorgeous food and recipes.  My sense of awe and amazement continued to grow each time I took a moment to look through the recipes and stories that exist on Swanson's blog.  Understandably I immediately fell in love with the Cinnamon Bread Twists.  I also have my eye on a recipe for preciously delicious little "tea bag" cookies 
along with a fascinating recipe for Spiced Banana Chocolate Jam  .  Not only will you find authentic and simple middle eastern recipes but well known  recipes that catch your eye because of the beauty shown through Swanson's photography and staging. 

I leave you now with this recipe for Cinnamon Roll Twists and hope that you take a moment to browse through Chef in Disguise for a delicious visual experience.  


I adjusted the recipe slightly as I slathered the twists with Maple Cream Frosting as requested by my family.  Not a bad request at all!  If you'd like to stick to the original recipe, pour sweetened condensed milk over the twists once they have cooled a bit from coming out of the oven.  Either way is d'lish.

Cinnamon Roll Twists (with Maple Cream Frosting)
      (recipe from Chef in Disguise)  

Dough Ingredients:
3/4 cup milk, warmed slightly
1/4 cup water, warmed slightly
1/4 cup sugar
1/4 unsalted butter, softened
1 egg
2 tsp yeast
3 1/4 cups flour
1/2 tsp salt

Filling Ingredients:
4 TBSP butter, melted
1/2 cup sugar
2 TBSP cinnamon

Maple Cream Frosting Ingredients:
2 TBSP butter, melted
1 1/2 cup powdered sugar
1 tsp maple flavoring
2-3 TBSP milk

Directions: 
In a large bowl mix together milk, water, sugar, butter, egg and yeast.  Set bowl aside.  

In a medium bowl sift together flour and salt.  Add sifted flour and salt to the wet ingredients and mix well.  Knead by hand or with a dough hook for a couple of minutes.  Place dough into a well greased bowl and cover with a clean dish cloth.  Allow to rise in a draft free space until dough has doubled in size - about 1 hour. 

Mix together 1/2 cup sugar and 2 TBSP cinnamon in a medium bowl.  Set aside.  

Once dough has doubled in size - take out of greased bowl and cut into 4 equal portions.  Roll out each portion into a circle.   Melt 4 TBSP's of butter and brush generously over each  layer.  Start first with one circle, brush with melted butter and then sprinkle with sugar/cinnamon mixture.  Do so 2 more times ending with the top layer of dough that should be just brushed with butter. 

Preheat oven to 375 degrees F. 

Cut circled layers into 8 equal portions.  In the center of each portion cut a slit that starts about a 1/2" from the top and ends at an 1" before the bottom (see a detailed picture HERE...scroll about 1/2 way down the post).  Take the tip of each portion and carefully loop through the cut slit - this creates the twist of the twist.  Pinch the wider ends of each portion together.  

Place twists onto a parchment paper lined round baking pan.  Brush twists with any remaining butter.  Place pan into preheated oven and bake for 20-25 minutes or until twists are lightly browned and baked through. 

As twists cool slightly mix together Maple Cream Frosting - in a medium bowl combine melted butter, powdered sugar, maple extract and cream.  Slather over slightly cooled cinnamon twists. 

Enjoy! 


 Happy Cinnamon Roll Twist Baking! 


Monday, October 5, 2015

Baked Apples for SRC

Apples filled with dried fruit, chopped walnuts, brown sugar and cinnamon, cooked all together to make the perfect Fall time snack or dessert. Cooked in the microwave always for a quick and delicious treat anytime of the day. 


Cool air with beautiful Fall colors in the trees has gently settled into South-Western NH.  With this change in weather I have found myself quickly becoming more drawn to all the flavors that I associate with the Fall such as pumpkins and apples.  Pies, cakes and bars have been rolling out of my oven at lightening speed.  I blame most of it on the vast amount of gorgeous apples that this Fall season has provided. The apples that are dropping off of the trees this year are big, beautiful and tasty.   The unlimited supply of apples has given me the extra push to produce as many baked confections that I can find which calls for apples.  


Baked Apples is a recipe that fell quickly into my "all things baked with apples" category.  Thus, as I was browsing through Lori's Culinary Creations, my Secret Recipe Club assignment for this month,  I quickly picked Lori's recipe for Baked Apples.  Believe it or not it was my very first time making a recipe for baked apples.  I am delighted to say that my first try at baked apples was perfect!  I love the recipe I discovered from Lori!  It was simple, quick and delicious.  

  
Lori's recipe calls for Jonagold or Braeburn apples - I had Cortland apples on hand so I used them knowing that Cortlands bake up nicely and I wasn't disappointed.  I then filled each 1/2 of prepared apple with a mixture of brown sugar, cinnamon, chopped nuts and some dried fruit and then covered the apples securely with plastic wrap and popped the pan in to the microwave.  I wasn't quite sure how the baked apples would come out due to being "baked" in the microwave.  I had nothing to fear.  4 minutes cooked in microwave and the filled apples came out to perfection.  They were a tender texture and the filling melted beautifully into the apples.  


 I have no doubt that all of Lori's recipes on Lori's Kitchen Creations are just as good as this recipe for Baked Apples.  I was amazed and quite impressed with the variety and amount of recipes she has showcased on the her blog.  I am looking forward to baking up a batch of Pineapple Cornbread - I love all things made with cornmeal.  I also want to make a HUGE batch of her Creamy Cilantro Ranch Dressing - I am a die hard lover of cilantro. 

     Baked Apples 

Ingredients:
2 large apples - Jonagold, Braeburn or Cortland, cored and cut in 1/2
2 TBSP dried cranberries
2 TBSP raisins
2 TBSP chopped walnuts
2 TBSP brown sugar, lightly packed
1 tsp ground cinnamon
1-2 TBSP butter

Directions:
In a small bowl combine all together dried fruit, nuts, brown sugar and cinnamon.  Lightly spray a microwave proof baking dish that will contain your apples.  Place apples inside baking dish cut side up.  

Fill with mixture and then evenly dot each filled apple with butter.  Cover dish securely with plastic wrap on all sides except one allowing for one corner to vent.  

Cook in microwave for 4 minutes.  Allow to cool for 2 minutes before serving.  A scoop of ice cream is lovely on top of each baked apple if you wish! 

Enjoy! 


                            Happy Baked Apple Making!


Monday, September 7, 2015

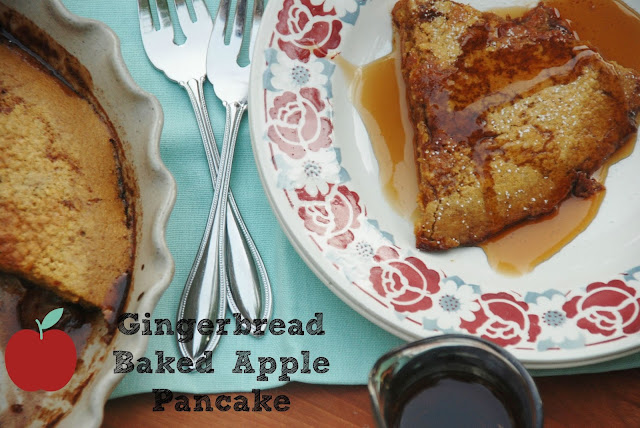
Gingerbread Baked Apple Pancake (SRC)


I never have to be asked twice what I want for breakfast.  It's always pancakes.  Pancakes with real maple syrup.  And really, any kind of pancake is fine by me.  They can be fluffy buttermilk pancakes, pancakes loaded with berries or even pancakes that are flavored with a touch of cinnamon and sprinkled with toasted walnuts are all just lovely.  How about putting apples in pancakes?! Heck yes! How about adding some special spices and a few tablespoons of molasses to make the pancake a gingerbread flavored pancake?  OMG yes!  Let's do it. 


A Gingerbread Baked Apple Pancake is the actual name.  One big, beautiful and delicious pancake that screams FALL TIME.  First there is a layer of sweet and gently spiced apples and then a perfect pancake batter that has a touch of molasses stirred into it which is poured over the apples.  Just before this pancake is popped into the oven a sprinkling of sugar and spice goes over the top.  Delicious!  Within about 10 minutes you have a beautiful masterpiece of a pancake coming out of the oven.  I suggest having warm maple syrup to  drizzle on top of the servings along with a dash of powdered sugar.  


Kate of Kitchen Trial and Error is the lovely creator of this recipe.  I "met" her through my Secret Recipe Club assignment for this month of September. What an absolute gem Kate is!!! A beautiful mother of 2 children and is a fellow New Englander as she lives in NY state. 

I have found myself wanting to make EVERYTHING on her blog.  All of her recipes speak to my taste buds in such a delicious way!  The variety of recipes that are found on Kitchen Trial and Error is astonishing.  If you like caramel sauce than you should definitely try your hand at Kate's recipe for Caramel Pear Butter - I know I want to! I also want to make her Coffee Blondies (I LOVE anything coffee flavored!) along with the recipe for Slow Cooker Honey Mustard Drumsticks with Tangy Apple Slaw (this recipe sounds divine to me!).  

Make a point to whip up this lovely baked pancake - it's delicious and it feeds a family of 4 quite easily.  Fall is biting at our heels  - embrace it with this recipe by your side. 


Gingerbread Baked Apple Pancake 
                    ( recipe from Kitchen Trial and Error )

Ingredients:
2-3 large applesn - peeled, cored and sliced
1/2 cup sugar
1 1/2 tsp cinnamon
1/2 tsp ground ginger
1/4 tsp ground cloves 
1/4 tsp ground nutmeg
3 eggs
3/4 cup pancake mix
6 Tbsp milk
2 Tbsp molasses

Directions  
 Preheat oven to 425 degrees F.  Butter a pie dish and set aside.

In a medium bowl combine sugar and all the spices.  Divide this mixture in 1/2 into 2 bowls. Set aside one bowl.  In the second bowl toss in prepared apples and coat well with sugar/spice mixture. Pour apple mixture into pie plate and cover with plastic wrap.  Place pie plate with apples in microwave and cook for 5 minutes.  Carefully peel off plastic wrap.

Mix up pancake batter in a large bowl - combine eggs, pancake mix, milk and molasses.  Stir together until smooth.  Pour batter over cooked apples and bake in preheated oven for 10-12 minutes.  Cool for a couple minutes and then serve with warm maple syrup and a dash of powdered sugar.  Enjoy!!


<!-- end InLinkz script —>

Thursday, August 20, 2015

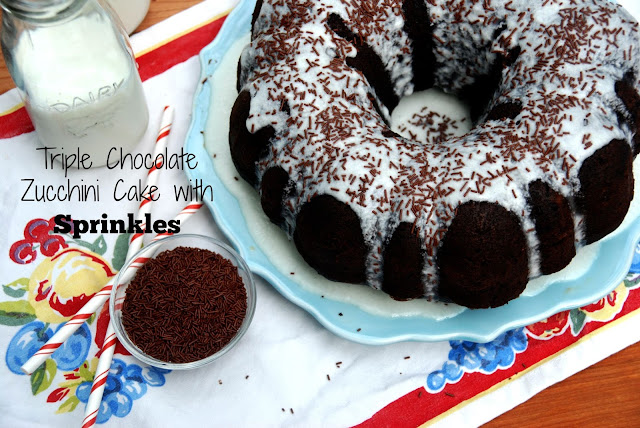
Triple Chocolate Zucchini Cake with Sprinkles (#BundtBakers)


Terri of Love and Confections chose this month's theme for the Bundt Baker's --->  SPRINKLES!!  "If it can be sprinkled and used to decorate a Bundt inside or out, then it's fair game" were the guidelines given by sweet Terri. I couldn't be more delighted with this theme.  Sprinkles on top makes everything better is what I believe.  Don't you?!  Not only does sprinkles make ice cream, whipped cream, cake or cupcakes look fancy and pretty but also yummy and special too.  Thank you, Terri for picking such a brilliant theme this month!


Right away I knew I wanted to use the chocolate sprinkles I had in my pantry from King Arthur Flour.  Some sprinkles can have a very bland and stale taste but NOT the chocolate sprinkles from King Arthur.  These chocolate little treasures are like mini chocolate kisses landing on your tongue when eaten.  I honestly think they are the BEST sprinkles ever! Paired with these sprinkles I thought it only appropriate to bake a recipe from King Arthur Flour and I knew exactly which one I wanted to bake -  Chocolate Zucchini Cake.  I had baked this cake earlier this summer and was astonished at how simple and delicious the recipe came out.  It was not only moist but decadent.  Cocoa powder along with semi-sweet chocolate chips and espresso powder all make up the rich chocolate flavor and then the zucchini and sour cream added into the batter allows for a ultra moist cake. This is a cake that you will make once and then make again and again.  You can bake it in a 9x13 or a bundt pan - either way is perfectly fine.


Frost the cake with chocolate chips that are melted onto the warm cake (as the original recipe calls for) or glaze it with a simple vanilla glaze and sprinkle it with SPRINKLES as I did. Either way is delicious.  Also, keep in mind that you can use whole pastry flour instead of all-purpose flour - I used half whole wheat and half AP flour and it gave the cake a wonderful texture and flavor. 

Triple Chocolate Zucchini Bundt Cake with Sprinkles
                                               (recipe from King Arthur Flour)

Cake Ingredients: 
1/2 cup butter, at room temperature
1/2 cup canola oil
1 3/4 cup sugar (I used 1 1/2 cups sugar - I also have used 1 cup maple syrup and 1/2 cup sugar with great success)
1 tsp vanilla extract
1 tsp baking soda
1/2 tsp salt
2 large eggs
1/2 cup sour cream, buttermilk or yogurt
2 1/2 cups flour
3/4 cup baking cocoa or Dutch-process cocoa
2 tsp espresso powder, optional but tasty
3 cups shredded zucchini (about a 10" zucchini)
1/2 cup semi-sweet chocolate chips

Vanilla Glaze Ingredients:
2 Tbsp butter, melted
3 cups powdered sugar
1 tsp vanilla extract
1-2 tbsp milk (more or less if needed for desired consistency)
chocolate sprinkles

Directions:
Preheat oven to 325 degrees F.  Grease bundt pan and set aside.

In a large mixing bowl, beat together butter and oil until smooth.  Add in sugar, vanilla extract, baking soda and powder and salt until smooth.  Beat in eggs.

Add in sour cream, buttermilk or yogurt alternately with the flour.  Add in cocoa and espresso powder, mixing until all is smooth.

Gently fold in shredded zucchini and chocolate chips.  Spoon batter into prepared pan and place into oven.  Bake for 35-40 minutes or until toothpick comes out clean when inserted into center.

Mix up glaze while cake is cooling completely.   In a medium bowl combine all glaze ingredients - except for the sprinkles -  mix until smooth.  Pour glaze over cooled bundt and then sprinkle with sprinkles.  Serve with happiness!

br /> Here are this month's "Sprinkles" Bundts:


BundtBakers

#BundtBakers is a group of Bundt loving Bakers who get together once a month to bake Bundts with a common ingredient or theme. You can see all of our lovely Bundts by following our Pinterest Board. We take turns hosting each month and choosing the theme or ingredient.

Updated links for all of our past events and more information about BundtBakers can be found on our homepage.

Thursday, August 6, 2015

FIVE Ingredient Blueberry Brownies


Blueberries.
Chocolate.
Both are my favorites.  Combined together they make magic.  Pure, delicious magic!

And magically, after years of trying to replicate this very recipe I was given the secret to it's success.  Only 5 simple ingredients create these brownies.  FIVE.  An egg, some oil, water, Ghirardelli brownie mix (because that's really the best kind brownie mix around) and blueberries.

I jumped for joy with this lovely, lovely recipe finally in my hands.  I felt as though I had won the lottery, found a pot of gold at the end of the rainbow and the biggest treasure chest of my dreams were all given to me at once as I walked away with this recipe in my hands.  My prayers had been answered.  Blueberry Brownies could now be accomplished with perfection.


I am delighted to pass on this recipe to all of you chocolate loving, blueberry loving friends.  I honestly think it will change your world in a decadent chocolate, rich texture, blueberry packed loveliness kind of way.

Please pay it forward and whip up a batch of these brownies as quickly as possible.  Share them with as many people as you can.  It is crucial that we spread the love and deliciousness of Blueberry Brownies with everyone in the world.  I really think that world peace can now be accomplished with Blueberry Brownies at our side.  Please help me with this cause.


FIVE Ingredient Blueberry Brownies 

Ingredients:
1 box Ghirardelli brownie mix
1 egg
1/3 cup oil
1/3 cup water
1 1/2 cups blueberries, fresh or frozen

Directions:
Preheat oven to 325 degrees F.  Lightly grease an 8x8 pan and then line with parchment paper - set aside.

In a large bowl combine brownie mix, oil, water and egg.  Mix until smooth.  Gently fold in blueberries.

Pour batter evenly into prepared pan and bake for 35-40 minutes or until toothpick inserted into center comes out clean.  Cool, cut and serve and spread the love!  

Happy FIVE Ingredient Blueberry Brownie Baking!

Monday, August 3, 2015

Blueberry Shortbread Tart (SRC)

Each month for the Secret Recipe Club I get giddy with excitement.  This excitement is over discovering a wonderful food blog and recipe from said blog that I have been assigned to for the month, through the SRC.  Excitement over such a thing may sound silly, but seriously, it is the God honest truth.  This feeling is similar (I suppose) to discovering a chest of gold at the end of a treasure hunt.  As soon as my monthly SRC assignment comes to me via email, the hunt begins.  I use caution, diligence and great care as I search for that perfect gem of a recipe on my assigned food blog that gives my baking heart an extra beat in its rhythm and happiness in it's song. 


This month I am beyond delighted, beyond excited, and just plain old jumping up and down with happiness to share the recipe that I picked from Mother Would Know.  A recipe for,  Blueberry Shortbread Tart (also called Shortbread Tart with Jam).  Simple, delicious and amazing.  Really, really amazing.  Uniquely amazing at that.  I state this fact of "unique amazing-ness" because the shortbread crust is actually grated, that is right, GRATED, not rolled, but GRATED into the tart pan. Once the crust has been made it is then wrapped carefully in plastic wrap and then frozen in the freezer.  Then after it is fully frozen,  it is then GRATED into the precious tart pan (a pie plate or 9x13 baking pan can also be used), gently patted down into place and then layered with a fruit jam of your choice.  I chose blueberry as that is the fruit that my world revolves around at the moment.  Any kind of jam can be used.  Home made, store bought, whatever floats your boat. 


The best part of this treasure of a tart is that the list of ingredients can be counted on your two hands and the steps are as easy as 1, 2, 3 to make it.  I am a busy lady so discovering quick, easy and scrumptious recipes are definite keepers in my world.  I was able to whip up the shortbread, wrap it up tightly,  place it in the freezer, wrap up a shower gift, do both my girls hair and even change my outfit within a 20 minute period of time today.  Then, 4 hours later I completed the tart within just 15 minutes and popped it into the oven.  For me, baking often gets squeezed into the small gaps of free time.  This tart is the perfect example of such a need. 


Laura, who is the creative master behind, Mother Would Know, has a fantastic flare for collecting, producing and guiding her readers through her vast amount of delicious recipes.  If you like this recipe I am sharing today with you, just you wait as Laura's whole blog has recipes, one after the other, that are mouth watering, unique, beautiful and enticing.  I love the beautiful pictures she uses along with well written language and descriptions that go hand in hand with all of her recipes.  Provencal Vegetable Soup Au Pistou , Balsamic Blueberry Blast, Tuna Stuffed Tomatoes are just a few of the recipes I plan to make from Laura's collection in the near future. 


Huge hugs of gratitude to Laura for "welcoming" me into her lovely food corner of her world!  I feel honored and completely delighted to now have this precious recipe for Blueberry Shortbread Tart and I look forward to collecting many more treasures from Mother Would Know in the future. :-) 

Blueberry Shortbread Tart
(recipe discovered on Mother Would Know)

Ingredients:
2 sticks, unsalted butter at room temperature
1 cup sugar
2 egg yolks
2 cups flour
1 tsp baking powder
1/4 tsp salt
1 cup jam of your chose
1/2 cup fruit (to match jam flavor) - my addition 

Directions:

In a medium bowl whisk together flour, baking  powder and salt.  Set aside.

Beat butter until light and fluffy.  Add in sugar and beat for a good 2 minutes to incorporate well into the butter.  Add in egg yolks - beat to combine.  Slowly beat in flour mixture - mix until just incorporated.  

Wrap dough in plastic wrap and place in freezer for at least 2 hours - until dough is completely frozen. 

Preheat oven to 350 degrees F.  Using a hand grater, grate 1/2 of dough into a tart pan, pie plate or baking dish of your choice.  With your fingers, gently guide grated dough evenly all around your pan.  Tap down slightly.  Place remaining dough in freezer while you spread jam over crust.  Layer with fresh fruit and then grate remaining dough over the jam/fruit layer. 

Bake for 35-40 minutes.  Watch carefully so that edges of tart do not burn.  I used a pie shield (as did Laura) to help keep the edges from NOT burning. 


Remove tart from oven when it becomes fragrant and golden brown.  Cool tart for 30 minutes before slicing and serving.  Enjoy!! 


Happy Blueberry Shortbread Tart Baking!


Monday, July 6, 2015

Ginger Peach Baked Oatmeal (SRC)


I eat oatmeal at least 4 times a week.  It fills me up, gives me the energy to start my day and it's delicious.  I often put dry fruit in it as it cooks and bubbles away on the stove top.  The dried fruit sweetens the oatmeal naturally so that all I need is a drizzle of real maple syrup on top and my breakfast is complete. 

As I browsed through, A Taste of Madness, my July assignment for the Secret Recipe Club, I immediately became smitten with Cathleen's recipe for Ginger Nectarine Baked Oatmeal.  As stated above, oatmeal is truly my go to meal for breakfast, so the idea of baking up a whole pan of oatmeal packed with yummy flavors of ginger and fruit definitely appealed to me.  I was not disappointed.  The recipe was simple, quick and super yummy.  I made a few small changes to the recipe - I used peaches instead of nectarines, maple syrup in place of brown sugar and lastly half almond milk and half 2% milk instead of all milk.  I will definitely be making this recipe again and I highly recommend it too all my oatmeal eating and loving readers to do the same.


Another recommendation I am encouraging you all to do is to take some time to browse through all the recipes on A Taste of Madness.  Cathleen has a fantastic collection of recipes!  I adore the fact that there is a large number of recipes for ice cream and for donuts too.  I have gathered ingredients together to make Blueberry Pudding Ice Cream along with the Salt and Vinegar Roasted Chickpeas.  Both recipes make my mouth water!


I thank you, Dear Cathleen,  for such a wonderful baked oatmeal recipe.  My family and I enjoyed every bite!

Ginger Peach Baked Oatmeal
(recipe slightly altered from A Taste of Madness)

Ingredients:
3 cups rolled oats
2/3 cup real maple syrup (or brown sugar)
1/2 cup whole wheat flour (1/3 cup if you use brown sugar)
1 tsp ground ginger
2 tsp baking powder
1 tsp salt
2 eggs
1 cup almond milk
1 cup milk (any combination of milk is fine as long as you have 2 cups of "milk" in all)
1/4 cup canola oil
1 tsp vanilla
2 ripe peaches (or nectarines), diced

Directions:
Preheat oven to 350 degrees F.  Grease a 9x13 pan and set aside.

In a large bowl combine all dry ingredients and then add in wet ingredients.  Stir to combine well.  Gently mix in diced peaches.  Pour batter into prepared pan and bake for 25-30 minutes, or until middle is set.  Cool slightly, serve and enjoy!


Happy Ginger Peach Baked Oatmeal Baking!

&lt;!-- end InLinkz script —>

Thursday, June 18, 2015

Strawberry Lemonade Bundt Cake ~ #BundtBakers


 Believe it or not it's that time of the month that #BundtBakers present their creative creations of deliciousness.  This month the theme for #BundtBakers was chosen by the extremely talented,   Anne of From My Sweet Heart.  In the cake, on the cake, around the cake or all of it,  lemon was the theme.  Immediately I knew that I wanted to use the combo of strawberries and lemons.   Strawberries paired with lemons are lovely.  The sweetness of the berries balances out the tartness of the lemons and together they are a fantastic pair,   complementing one another fully.   


 I loved this cake from the moment I started mixing all the ingredients together.  The batter is flavored with grated lemon, lemon juice and a small amount of lemon extract.  All three lemon sources allow for the perfect lemon taste to the cake.  A delicate yet perfect lemon flavor shines in each bite of this cake.  Sour cream, butter and eggs all lend a hand in offering a richness to the cake too.  And then lastly the strawberries which are sliced and diced and then tossed with a little bit of flour and powdered sugar are folded into the batter to pair up with the lemon.  A perfection of a cake.


 A simple glaze of powdered sugar and lemon juice could easily be used to drizzle over this bundt.  I decided I wanted to have a bit of a fancier topping than just a simple glaze.  I also needed to cover up some of the areas on the cake that didn't release as gracefully from the pan as I had hoped.  I added some melted butter, lemon peel and dash of lemon extract to the powdered sugar and lemon juice to create exactly the topping I was after.  I was delighted visually as was my taste buds.  The frosting topped off the cake perfectly with decadence.


 Embrace the strawberry season as fresh strawberries are in abundance and bake up this cake.  Or buy some fresh strawberries at the super market if you can't pick them fresh.  This cake is perfect for those that want to impress yet simple enough to do so with truly very little effort.  


I send Anne big hugs of happiness for her fantastic choice of a "lemony" theme for our #BundtBakers group this month.  I enjoyed every minute of baking with lemons (and strawberries) by my side!   I also want to thank the creator of this group, Stacey of Food Lust People Love, for the amazing job she does to keep all the bits and pieces together to make the #BundtBakers such a fantastic group each and every month.  Merci beaucoup to both of you!!! 


Strawberry Lemonade Bundt Cake 
               (recipe adapted from I Heart Nap Time

Cake Ingredients-
1 cup unsalted butter, softened
2 cups sugar
3 eggs
2 TBSP fresh lemon juice
zest of 2 lemons
1/2 tsp lemon extract
2 1/4 cups flour
1/2 tsp baking soda
1/2 tsp salt
8 oz sour cream
1 1/2 cups fresh strawberries, diced
1/2 cup powdered sugar
2 TBSP flour 

Frosting Ingredients-
4 TBSP butter, melted
1 cup powdered sugar
zest of 1 lemon
1/2 tsp lemon extract
1-2 TBSP fresh lemon juice - more or less depending on what consistency you want

Directions -

Preheat oven to 375 degrees F.   Grease and flour bundt pan - set aside. 

In a medium bowl whisk together flour, baking soda and salt - set aside. 

In a large bowl beat together butter, sugar and lemon zest for 2-3 minutes.  Add in eggs, one at a time, beating well with each addition.  Add in lemon juice and lemon extract. 

Add to butter mixture the flour mixture and sour cream - alternating between the 2, starting and ending with the flour.   

In a medium bowl toss strawberries with powdered sugar and flour.  Gently fold strawberries into batter.  Pour batter into prepared bundt pan.  

Place cake into oven and reduce oven temperature to 325 degrees F.  Bake for 60 min - 1 hr and 10 minutes or until toothpick inserted into the middle of cake comes out clean.  Cool cake for 20 minutes before inverting onto serving plate.  Cool completely before frosting (or glazing).

While cake cools make your frosting.  Melt 4 TBSP of butter and pour over powdered sugar in a medium bowl.  Stir to incorporate.  Add in zest of lemon,  lemon extract and lemon juice and mix well.  Alter consistency of frosting by adding in more lemon juice if you wish. Pour over cooled cake, using a butter knife if needed to direct the frosting to a specific location.  Slice and enjoy!! 


Happy Strawberry Lemonade Bundt Cake Baking!


BundtBakers
#BundtBakers is a group of Bundt loving Bakers who get together once a month to bake Bundts with a common ingredient or theme. You can see all of our lovely Bundts by following our Pinterest board right here. We take turns hosting each month and choosing the theme or ingredient. Updated links for all of our past events and more information about BundtBakers can be found on our homepage.

Sunday, June 14, 2015

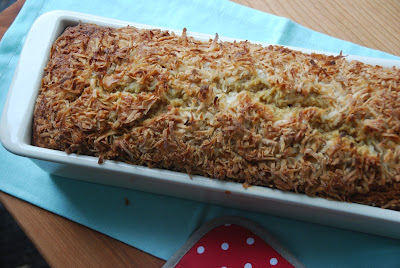
Delicious Coconut Banana Bread


I have baked hundreds of banana breads.  It really is one of my most favorite thing to bake.  I often find myself looking over the bananas at the market for those that are no longer perfectly yellow or even slightly green but rather for bananas that have brownish-black speckles on them.  I have an eye out for ripe, banana bread ready bananas.  Bananas that are overly ripe are gems in my eyes. 


Recently, I found a gem of recipe for banana bread.  I am so excited to be sharing it with all of you! Honestly, I may have found my all time favorite recipe for banana bread.  It's made with a few unusual ingredients that you don't usually find in banana bread.  Coconut milk, canola oil and even almond extract are a few of these unusual additions in this recipe.  

The first time I made this recipe I followed it to the T.   I used all the required measurements and ingredients.  The bread came out amazing!  Absolutely delicious with a lovely texture.   The only way this banana bread could be any better would be if I could make it a bit healthier.  The original ingredient list called for all-purpose white flour and white sugar.  Which is fine but I really wanted to see if I could alter the recipe slightly and still get the same delicious results. 


I was completely delighted with my alterations!  My "healthier" substitutions were a success as the bread still tasted wonderful along with the soft crumb presence in each slice.  In place of the white flour I used whole wheat flour and then swapped out the white sugar for maple syrup.  The best part of this healthier version was when I could tell my friends and family that they didn't have to feel guilty about eating such a delicious banana bread.  It was a HUGE hit all around!  


Impress you friends and family and make this banana bread.  Everyone will love you for it! 

Coconut Banana Bread 
 (recipe altered from The Recipe Critic)
  
 Ingredients:
1/2 cup canola oil (melted coconut oil could easily be used in place of the canola oil) 
1 cup maple syrup (granulated white sugar can also be used in place of the maple syrup)
2 eggs
1 tsp vanilla extract
1 tsp almond extract
1 3/4 cup whole wheat flour + 2 Tbsp (extra flour is added because of the use of maple syrup)
3/4 cup all purpose flour 
2 tsp baking powder
1/2 tsp baking soda
1 tsp salt 
1 cup mashed ripe bananas (3-4 medium size bananas) 
1 cup coconut milk
1/2 cup shredded coconut

Directions:

Preheat oven to 350 degrees F.  Grease a 9x5 loaf pan (I used a tea loaf pan which is 12x4) and set aside.

In a large bowl whisk together oil and maple syrup.  Add in eggs and extracts.  Set aside.

In a medium bowl combine the flours, baking powder, baking soda and salt.  Mixing well with a whisk.

In another medium bowl combine mashed bananas and coconut milk.  

Alternating with the wet ingredients and flour mixture add them to the oil/maple syrup mixture.  Pour batter into prepared pan.  Sprinkle 1/2 cup of shredded coconut over batter and swirl gently with a butter knife to slightly incorporate into the unbaked bread. 

Bake bread for 1 hour to 1 hour and 15 minutes or until toothpick inserted into center of bread comes out clean.  If the coconut starts to brown too much cover with tin foil until bread is completely baked.  Cool bread before slicing.  Enjoy! 


Happy Coconut Banana Bread Baking!

LinkWithin

Related Posts with Thumbnails

ShareThis