Image Map

Saturday, September 29, 2012

Apple Pie Cheesecake (12 Weeks of Holiday Treats)

12 weeks until Christmas friends.  Yup, I am NOT kidding.  But not to worry because I have your back.  Help is right here for all your baking, treat making, homemade gift ideas needs.  For the next 3 months, one a week you will be handed a variety of amazing and totally delicious recipes and ideas to help you figure out the best of the best for holiday treats.  Yours truly along with a spectacular group of many talented food bloggers will provide you with a plethora of such resources once a week for the next 12 weeks.  So sit back, relax and be ready to drool. :-)


Speaking of drooling happiness how about a fabulous cheesecake recipe?  You know the kind with apples, cinnamon and sugary goodness all on top? Ahhh yes, an Apple Pie Cheesecake.  Heaven in a springform pan.  HEAVEN.


What could be better than a cookie crust that surrounds a silky cheesecake filling and then topped off with slices of cinnamon sugary dusted apples?  The perfect dessert for a special holiday party or even given as a gift to a special friend.  This cheesecake could easily be made for Thanksgiving, Christmas or even New Year's.  A delicious dessert that is easy to make and makes everyone fall over backwards for seconds.


The crust is easily adaptable to your preference.  If you don't wish to use the crust recipe I have to share you can make a graham cracker or even a ginger cookie crust.  Apples go well with a variety of flavors.  I jazzed up the apple layer of the cheesecake by drizzling  it with a lovely homemade caramel sauce.


Apple Pie Cheesecake
(recipe discovered from Dinner with Julie)
 
Crust Ingredients:
1 cup flour
1/2 cup sugar
1 egg yolk (reserve egg white for later)
1/2 cup butter, at room temperature
 
Filling ingredients:
2 8oz. packages of cream cheese, at room temperature
1/2 cup sugar
2 large eggs
1 tsp vanilla extract
 
Apple topping ingredients:
2 large apples (I used Cortland) - peeled, cored and thinly sliced
1/2 cup sugar
1 tsp ground cinnamon
 
Directions:
1. Butter or grease 9" springform pan and set aside.
 
2. Prepare crust by combining all crust ingredients in a medium bowl.  Mix well all together with a fork or pastry cutter.  Ingredients will be appear as big soft crumbs.  Press mixture into prepared springform pan on bottom and up sides.
 
3. Prepare filling by beating cream cheese and sugar together until smooth and lump-free.  Add in eggs, one at a time and then reserved egg white and vanilla extract. Pour filling into prepared crust.  Preheat oven to 400 degrees F.
   
4. Prepare apple topping by combining sliced apples, sugar and cinnamon - toss gently so that sugar and cinnamon coat apples.  Arrange sugary-cinnamon apple slices over cheesecake filling to cover completely.
 
5. Bake cheesecake for 12 minutes at 400 degrees F. and then reduce to 375 to continue baking for another 30-35 minutes.  Cheesecake will be puffed and lightly browned but slightly jiggly in center when done.  Turn off oven and open door slightly to allow cheesecake to cool for a good 45-60 minutes.   Then take out of oven and cool further to room temperature.  Refrigerate over night before serving. 


Serve with a lovely drizzling of your favorite caramel sauce or freshly whipped cream.  A delight of a dessert!  Enjoy!


Happy Apple Pie Cheesecake Baking!


Monday, September 24, 2012

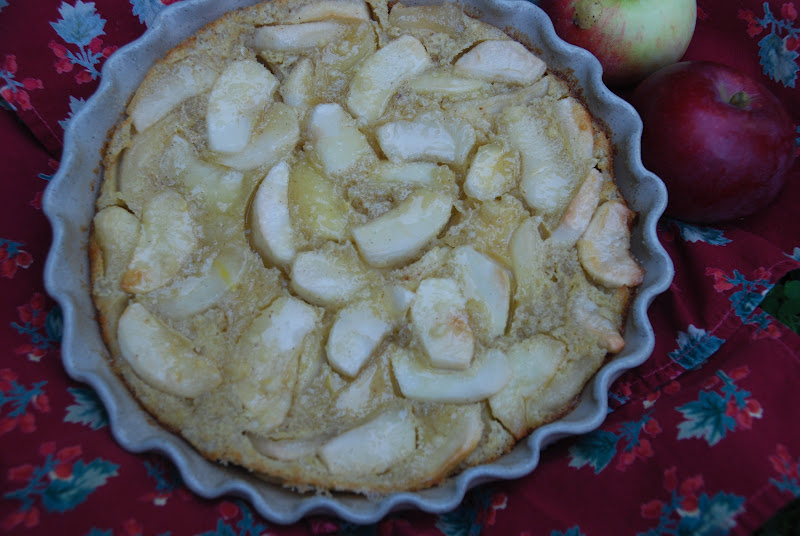
Apple Clafoutis for September SRC


Clafoutis.  Such a beautiful word that just rolls off your tongue.  Try it.  Pronounced as, Cla-Fou-Tee.  See wasn't that wonderful to say!?!

Just as wonderful as saying clafoutis I would like to introduce you to a very special food bog called, My Judy the FoodieMy Judy the Foodie was my assigned blog for the month of September for the Secret Recipe Club.  Not only is this food blog packed with amazing recipes that make your mouth water and drool but more importantly the love, dedication and happiness that has given life to this blog is just beautiful.  Shari, daughter to Judy (as in Judy of My Judy the Foodie), created this blog in an effort to teach herself how to be in the kitchen with confidence and ease along with honoring her mom who was a beautiful master in the kitchen. In reading through Shari's blog it became clear to me that her mother surrounded her herself by all things beautiful and meaningful including food.  And through her kitchen magic Judy created happiness and special moments all around her that were deeply treasured by all.  Shari has done a beautiful job through her own words (and video's!) exploring her mother's recipes and then sharing them with all of us lucky people.   I was honored to have been part of Judy and Shari's world for this past month as I soaked up all the deliciousness and kitchen passion through my SRC assignment.  Sending you hugs Shari!  You are an amazing woman!  Truly amazing. :-)


Apple Clafoutis was my pick from all the delicious recipes from My Judy the Foodie which I will share with you today.  I could not have been happier with my choice!  Clafoutis hold a special place in my heart as my family in France often make such a dessert.  Instead of using apples they use FRESH cherries, apricots or plums from their fruit trees.  Delicious!  The simplicity of mixing up a clafoutis is lovely.  Your fruit of choice is surrounded by simple ingredients such as eggs, milk, flour,sugar and melted butter which can all be mixed by hand.  Grab those apples you have in abundance right now and make your heart and palate sing with joy over this dessert.  And then invite me over for a piece - I can never have enough clafoutis! :-)


Apple Clafoutis
(recipe from My Judy the Foodie)
 
Batter Ingredients:
3 eggs
2/3 cup sugar
2/3 cup flour
1 cup milk
4 Tbsp butter, melted
1 tsp vanilla extract
1 tsp ground cinnamon (my addition as I can never go without adding cinnamon to an apple recipe)
 
Apple ingredients:
1 Tbsp butter
4 large apples, peeled, cored and cut into 1/2" slices
1/2 cup sugar
3 Tbsp rum (which both Shari and I omitted)


Directions:
 
1. Prepare your apples by melting 1 Tbsp butter and sugar in a large frying pan. Mix melted butter and sugar together to combine.  Peel, core and slice apples and then place into pan with melted butter and sugar.  Cook apples for 10 minutes, occasionally stirring gently.
 
2. Prepare batter while apples are cooking.  In a large bowl whisk together all batter ingredients.  Your batter will have the appearance similar to a pancake batter. 
 
3. Grease and dust with sugar a pie plate.  Add in 2 cups of batter to the prepared pie plate.  Gently add in cooked apples.  Leave the syrup of the apples behind for later use. Pour remaining batter over apples.
 
4. Bake your clafoutis in a 350 degrees oven for 30-35 minutes.  The clafoutis will be golden brown and set in the center when done.  The center will be just a little bit jiggly but that's what a clafoutis will do when baked.
 
5. Pour remaining apple syrup over your clafoutis when you take it out of the oven.
 
Serve warm or cold...either way is delicious!


Happy Apple Clafoutis Baking!


Monday, September 10, 2012

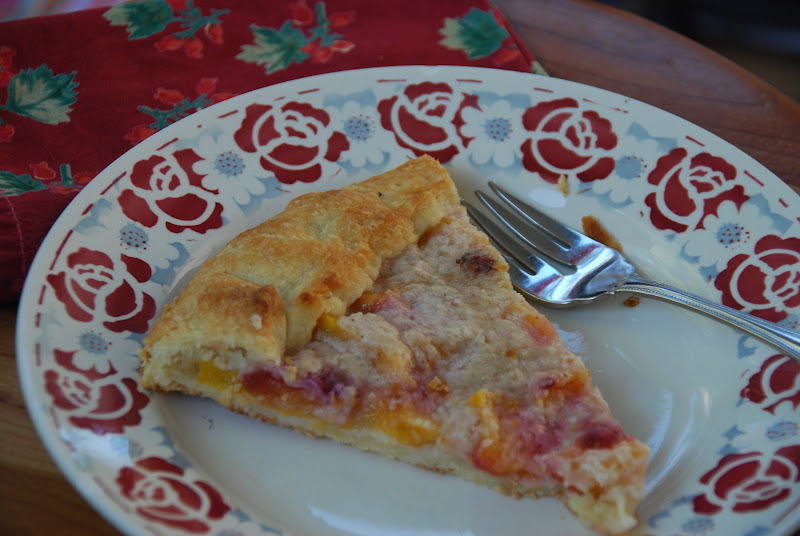
Rustic Peach Tart with Crumble Topping

Although I am on the verge of all things apple and pumpkin in my baking world I want to continue celebrating Summer by offering a perfect PEACH of a recipe.  Easy, beautiful, completely delicious and packed with peaches!


You start with a lovely crust made in a food processor (or a pastry cutter - either one is fine). And then keep in mind the word, "COLD".  The butter you use should be COLD and then the prepared pastry should be kept COLD in the refrigerator while you make the crumble topping.  A perfect crust comes from all things COLD.
 
 
Beautiful peaches are sprinkled with a crumbled topping allowing for the perfect sweetness to top off the tart. Ahhhh, the magic of peaches.  Grab a hold of the last couple moments that Summer still suggests and make this rustic tart.  It will be well worth it.  I promise.  
 
Rustic Peach Crumble Tart
             (recipe from Farm Flavor)
 
Pastry Ingredients:
 
2 cups all-purpose flour
1/4 cup sugar
1/2 tsp kosher salt
2 sticks unsalted butter, COLD and diced
1/4 cup ice water
 
 
Filling and Crumble Ingredients:
 
4 cups sliced and peeled FRESH peaches
1/4 cup sugar (white or brown is fine)
2 Tbsp all-purpose flour
1 Tbsp tapioca (flour will work fine if you don't have tapioca)
1/4 tsp kosher salt
1/4 tsp ground cinnamon
4 Tbsp unsalted butter, COLD and diced
 
1. Make pastry by placing DRY pastry ingredients into food processor fitted with a steel blade.  Pulse a couple of times to combine together. 
 
2. Add in COLD diced butter and pulse 12-15 times or until butter is the size of peas.  Add in iced water through the feed tube as the food processor is on.  Pulse several times - stop just before dough comes together.
 
3. Turn dough onto a well-floured surface and shape into a disk.  Wrap in plastic wrap and refrigerate for at lease 1 hour.
 
4. Make crumble topping by adding 1/4 sugar, flour, tapioca, salt and cinnamon into bowl of food processor.  Pulse a couple of times to combine ingredients.
 
5. Add in COLD butter and pulse until mixture is crumbly.  Keep crumble topping in refrigerator until needed to sprinkle over peaches.
 
6. Preheat oven to 450 degrees F.  Roll out COLD pastry dough into approximately an 11-inch circle onto a lightly floured piece of parchment paper.  Transfer onto cookie sheet.
 
7.  Cover dough with peaches, leaving about a 1 1/2 -inch border.Sprinkle crumbled topping over peaches.  Gently fold the pastry border over the peaches, pleating to make a circle. 


Bake for 25 minutes, or until crust is lightly browned and peaches are tender.   Cool for at least 20 minutes before serving.
 
Enjoy!


Happy Rustic Peach Tart with Crumble Topping Baking! 


Sunday, September 2, 2012

Zucchini Cornbread

 
Ladies and gentlemen it is time for you to try your hands at making a cornbread.  Yes, a cornbread.  Not just any kind of cornbread either.  I want you to get ready to make a cornbread that has a very special ingredient.  Zucchini.  That's right ZUCCHINI.


The Browned Eyed Baker offered this recipe earlier this summer.  As soon as I saw it I had to try it right away.  I was so glad that I did as this recipe created a wonderful cornbread that was not only beautiful to the eyes but also beautiful on the taste buds.  This bread is moist and has a perfect crumb texture. I even enjoyed this bread lightly toasted the second and third day.  And it was a great way to sneak in some extra veggies into my dear daughters as they too enjoyed this bread.


Grab that last zucchini in your garden and make this bread!
 
Zucchini Cornbread
(recipe from Brown Eyed Baker)
 
Ingredients:
 
1 medium zucchini
1 1/2 cups all-purpose flour
3/4 cup yellow cornmeal
1/2 cup sugar + 1 Tbsp sugar
1 tsp baking powder
1/2 tsp baking soda
3/4 tsp salt
1/2 cup unsalted butter, melted and cooled
2 eggs
1/2 cup buttermilk
 
Directions:
 
1. Preheat oven to 350 degrees F. Grease and flour a 9 x 5 inch loaf pan.  Set pan aside.
 
2. Trim ends of zucchini and cut 6 thin slices off and set aside for garnish.  Shred the remaining zucchini.  Toss grated zucchini with 1 tablespoon sugar and then place in colander and allow to drain for 30 minutes.  After at least 30 minutes, gather drained zucchini in a clean kitchen towel (or a doubled up paper towel) and squeeze out any possible remaining water.
 
3. In a large bowl combine flour,1/2 cup sugar,  cornmeal, baking powder, baking soda and salt.  Whisk all together and then set aside.
 
4. In a medium bowl combine melted butter, eggs and buttermilk.  Whisk together.  Add grated zucchini to butter mixture and stir gently to combine.
 
5. Pour wet ingredients into the flour mixture and stir all together with a rubber spatula until no traces of flour remain.
 
6. Pour batter into prepared loaf pan and bake for 50-55 minutes. Bread will be golden brown and a tester inserted in the middle will come out clean when done.  Allow bread to cool in pan for 10 minutes before removing from pan to cool further on a wire rack.  Bread can be stored at room temperature and wrapped in plastic wrap for up to 3 days.


Enjoy!
 
 
Happy Zucchini Cornbread Baking!


Monday, August 27, 2012

New England Oatmeal Cookies for The Secret Recipe Club


Serious, SERIOUS happy pitter patter of my heart happened to me this past month for I was assigned through The Secret Recipe Club to a New England based food blog called, I Am Honey Bee .  That's right folks, this blog is based in the lovely city of Boston.  Less than 2 hours away from me!!! Hip, Hip, HOORAY!  I just love finding fellow food bloggers that live in New England. 


The adorable, Nicole is the brains and beauty of I Am Honey Bee.  She offers a huge variety of wonderful recipes.  I chose a cookie recipe (no surprise there!) but I was seriously on the edge of trying out Nicole's recipe for Insalata Caprese.  The cookie recipe that I chose to bake is called, Maple Walnut Oatmeal Cookies.  I mean really! - how could I NOT make such a cookie recipe!?!  Living in the heart of NH, maple anything is a delight to me.  And these cookies baked up to be a HUGE delight to me and my little family.  Yum. SERIOUS yum!


The cookies were full with maple flavor along with a soft middle with a nice crisp edge allowing for the perfect amped up oatmeal cookie.  And because I adore raisins in my oatmeal cookies I threw a bunch of those in along with the chopped walnuts that Nicole had in her cookies.  Thus the title of these cookies becomes, Maple Raisin Walnut Oatmeal Cookies....the perfect New England oatmeal cookie in my book.  Next time I may add some dry cranberries into the batter just to make it an "ALL" flavors of New England cookie. :-) 


Maple Raisin Walnut Oatmeal Cookies
(recipe slightly altered from, I Am Honey Bee)
 
Ingredients:
 
1 cup flour (I used all-purpose but Nicole used whole wheat)
1 tsp baking soda
1/2 tsp salt
2 sticks unsalted butter, at room temperature
1/4 cup granulated sugar
1/2 cup brown sugar
2 eggs
2 tsp real vanilla extract
1 cup maple syrup (I used 1/2 cup maple syrup and 1/2 cup granulated maple syrup)
4 cups rolled oats
1 3/4 cups chopped walnuts
1 cup raisins (my addition)
 
Directions:
 
1. Preheat oven to 350 degrees F.  Line baking sheets with parchment paper or a Silipat.
 
2. Sift together flour, baking soda and salt in a medium sized bowl.  Set bowl aside.
 
3. Cream together butter and sugars until light and fluffy.  Add in eggs one at a time, beating well in between each egg. Add in vanilla extract and maple syrup.  Beat well to combine all together.
 
4. Add in sifted dry ingredients to the wet mixture and mix well. 
 
5. Add in oatmeal and mix well.  Toss in nuts (and raisins if you so wish) and mix to combine.
 
6. Drop cookie batter by the rounded tablespoon onto prepared sheets.  Bake for 10-12 minutes or until edges of cookies start to brown and center is still slightly moist.  Cookies will continue to bake once out of the oven and cooling.
 
Enjoy!  And ENJOY some more!


While you are enjoying your cookies please be sure to browse through my fellow Secret Recipe Club-ers blogs....they seriously ROCK! Just see the great links below..... :-)
 
Happy Maple Walnut Raisin Oatmeal Cookie Baking!

Thursday, August 16, 2012

A SUPER Moist Blueberry Cake

As a baker living in New England I can always appreciate discovering a new and successfully delicious recipe that calls for blueberries. I adore baking with fresh blueberries.  Baking with frozen blueberries isn't too shabby either.....especially if I have picked them fresh myself and frozen them for later use.


I whipped up this lovely blueberry yumminess of a cake with some freshly picked blueberries.  And the recipe that I used did not disappoint.  The cake came out with a wonderful flavor and gorgeous texture.  What more could you ask for in a cake?!  I do have to say that having both yogurt and sour cream as ingredients in this recipe leaves NO room for a dry cake.  This cake is super moist.  Greek or regular yogurt can be used along side the sour cream.  I chose to use Greek lemon yogurt as I thought it was pair well with the blueberries.  Plain or vanilla Greek yogurt would work fine too if you wish to tone down the lemon flavoring in the cake.

  I do have to admit that I was patting myself on the back when I took my first bite of this cake as it tasted SO good.  I remember thinking, "Goodness, I could sell this cake with NO problem!" - meaning that it came out so nicely that I envisioned setting up shop in front of my house and holding out a sign advertising "Blueberry Lemon Cake For Sale" because I was so impressed with the cake.  I highly recommend you make this cake yourself! 


I topped off the cake with a dusting of powdered sugar.  Next time I think I will drizzle it with a lemon glaze. YUM.


Blueberry Lemon Cake
(recipe discovered on the blog, The Martha in Me)

Ingredients:

2 1/2 cups flour
2 tsp baking powder
1/2 tsp salt
1 cup butter, at room temperature
1 cup sugar
4 eggs
1 tsp vanilla extract
1/2 cup sour cream
1/2 cup yogurt (Greek or regular is fine...I used lemon Greek yogurt)
2 cups blueberries (I used FRESH)
2 Tbsp freshly grated lemon zest

Directions:

1. Preheat oven to 350 degrees F. Grease and flour well your cake pan(s) of your choice.  I used my favorite kind of cake pan....a bundt cake pan.

2.In a medium bowl whisk together flour, baking powder and salt.  Set bowl aside.

3. Combine sour cream and yogurt in a small bowl.  Set bowl aside.

3. Cream together butter and sugar together until light and fluffy. Add in eggs, one at a time, beating well between each addition. Beat in vanilla extract.

4.  Add in flour mixture to the butter/sugar/egg mixture alternately with the sour cream/yogurt mixture.

5.In a medium bowl toss together the blueberries, lemon zest and 1 tsp flour.  Gently fold in blueberries to the cake batter.

6. Pour batter in prepared pan and bake for 60-70 minutes.  Cool in pan for 20 minutes before inverting cake to a serving plate.


Happy Blueberry Lemon Cake Baking!


Monday, July 30, 2012

Brownie Pies for July's Secret Recipe Club

Recently I have had a hankering for good old fashioned brownie sundae.  Yeah, that's right a decadently rich chocolate brownie with a nice big scoop of ice cream on top and maybe even a little hot fudge sauce drizzled all over it.  Y. U. M.  Some dreams do come true.  Yes indeed.


 I was perusing through my assigned food blog for the Secret Recipe Club this past month and guess what recipe I came upon!?! That's right....a brownie recipe!  Not just any brrrrownie recipe either.  I discovered on Lynsey Lou's blog a brownie recipe called, "Brownie Pie".   My prayers had been answered.  A Brownie Sundae was in my near future.  Hooray!


Lynsey Lou's recipe for Brownie Pie did NOT disappoint.  It was whipped up in a jiffy, the ingredients were all simple and the taste was OUT OF THIS WORLD dee-lish!  I ended up making personal size brownie pies for all four members of my little family instead of just one 9" pie.  It's kind of fun to have your own brownie pie.  My girls sure thought so!  Their eyes practically popped out of their heads when I placed one of these little treasures in front them.  Having a personal size brownie pie with a scoop of ice cream on top was HEAVEN for them. 


I was extremely pleased with the texture and taste of the little chocolate pies.  They had a lovely thin crisp shell on top like all good brownies do and then the inside  was perfectly moist and rich with chocolate.  As many may feel, brownies are not complete with out some chopped walnuts, so I added in a couple handfuls to the batter.  It was a delightful addition I do have to say.


Take a couple minutes out of your day and stir up this recipe.  While the pies (or pie if you chose to make a single 9" brownie pie) are baking go check out Lynsey Lou's blog.  You will find a wonderful amount of scrumptious recipes on it such as, Brown Butter Banana Carmel Muffins, Hot Buttered Rum Pancakes and White Cake with Apricot Filling to name a few that has my mouth watering.  Be sure to keep your eyes open for all the gorgeous napkins, tablecloths and props that she uses in her pictures.  I am such a sucker for pretty linens and Lynsey's collection is just gorgeous! :-)

Mini Walnut Brownie Pies
(oh so slightly altered from Lynsey Lou's recipe)

Ingredients:

1 1/2 cups sugar
1 stick unsalted butter, room temperature
3 eggs
1 tsp vanilla extract
1/2 cup flour
1/3 cup baking cocoa
1/8 sea salt + more for sprinkling on top if you so wish
1/2 - 1 cup chocolate chips (I used milk chocolate)
1/2 -1 cup chopped walnuts (my addition)

Directions:

1. Preheat oven to 325 degrees F.  Grease well 4 mini pie plates or one 9" pie plate.

2. Cream together butter and sugar.  Add in vanilla extract and eggs.  Beat well all together.

3. Add in flour, cocoa powder and salt.  Mix well.  

4. Add in chocolate chips and chopped walnuts (if you wish)

5. Pour batter into prepared pie pans (pan) and bake for 30 minutes.  My minis took just under 30 minutes to bake.

6. Cool slightly and serve with freshly whipped cream, ice cream or chocolate sauce - all of the above is just fine too!

Enjoy!


Happy Mini Walnute Brownie Pie Baking!

LinkWithin

Related Posts with Thumbnails

ShareThis