Image Map

Friday, October 29, 2010

White Chocolate Blondies with Maple Butter Sauce - Week #5 of 12 Weeks of Christmas Cookies


Do you ever find something that just makes you so happy you could just skip all over town with happiness?!?  Yup....I've have experienced that kind of happiness with this lovely oh-so-d'lish recipe. Once again, I have to applaud a huge hand of appreciation to the Tasty Kitchen as this is where I came across this treasure of a recipe which was found from the TK member, thecountrycook.   As my good friend Kylah pointed out...."This dessert is just like Applebee's!" And my goodness is she ever right! 

The bars are one of the fastest bars to whip together and pop in the oven.....but the sauce takes a little bit more patience.  You have to cook down all the ingredients for a good 20-30 minutes - and that time table is after you find the right heat level on your stove so that the sauce doesn't boil - you want the sauce to cook at a gentle simmer - needless to say boil over and get all over your stove like it did for me.  It wasn't a pretty sight.  But I gathered all my strength (and patience) and continued on with the "cooking down" of the sauce.  This time really making sure the heat of the burner didn't allow any further "boiling over".   And like magic after time the sauce oozes with a glorious maple flavor and slightly thickens.  Perfect to pour over your vanilla ice cream topped blondie. 


Thus I offer you my 5th addition to the 12 Weeks of Christmas Cookies.


White Chocolate Walnut Blondies with Maple Butter Sauce
(recipe found on Tasty Kitchen from The Country Cook)

Blondie Ingredients:

3 cups flour

1/4 tsp salt

1 tsp baking soda

10 Tbsp unsalted butter, melted

2 cups brown sugar

3 whole eggs, lightly beaten

1 tsp vanilla extract

1/2 cup chopped walnuts

1 cup white chocolate chips


Sauce Ingredients:

2 Tbsp's unsalted butter

1 1/2 cups heavy cream

6 Tbsp's (REAL) maple syrup

3 Tbsp's light corn syrup


Blondie Directions:


1. Preheat oven to 350 degrees F. Spray a 9x13 baking pan and set aside. In a medium bowl, sift together flour, salt and baking powder.  Set flour mixture aside.

2. In a large mixing bowl, mix melted butter and brown sugar together until well-blended.  Add in beaten eggs and vanilla extract.  Stir well all together.

3. Slowly add in flour mixture to the butter/sugar/egg mixture.  Stir thoroughly but make sure you do not over mix the batter....it will make your blondies tough.  Fold in nuts and chocolate chips.  Beware...your batter will be pretty thick.

4. Scoop batter into prepared pan.  Pop into oven and bake for 25-30 or until toothpick inserted in the middle comes out clean.  Cool and cut into squares to serve with the sinfully delicious Maple Butter Sauce and a scoop of good vanilla ice cream.  Oh Baby! - HEAVENLY!!

Maple Butter Sauce Directions:


1. Melt butter in a medium sauce pan over medium heat - be careful not to burn butter.

2. Add in heavy cream, maple syrup and corn syrup.  Lower heat slightly and allow mixture to come to a gentle simmer.  Be sure to stay close to the stove to monitor heat and make sure that the mixture does not come to a boil and thus boil over sauce pan (this will be a HUGE mess....as my experience tells me).

3. Once mixture comes to a gentle simmer cook for 20-30 minutes - stirring occasionally - until sauce reduces by 1/3 and becomes slightly thickened (As the sauce cools it will thicken further).  This is the only hard part of this recipe....being patient as the sauce reduces and slightly thickens....remember to just monitor the heat of the stove so that it does not boil-over.

Serve sauce over blondies with a scoop of good vanilla ice cream of your choice.....


Happy White Chocolate Blondies with Maple Butter Sauce Baking!


Week 5 Twelve Weeks of Christmas:

Wednesday, October 27, 2010

Macho Nacho Pie

Macho, Macho Man......la la la la la la la laaaaaaaaa....... :-)

Yes, this is the song that went through my head as I made at this savory pie.....


Such a yummy pie....super easy peasy to make and full of great flavor!  Don't be afraid to jazz up this pie to your liking.  I added corn to the recipe but later thought about also adding chopped green peppers or even a little salsa or some diced green chilies. 

Go ahead and be a "Macho Man" and make this recipe into your own!

Nacho Pie
(recipe adapted from Taste of Home)

Ingredients:


1 lb. ground beef - ground turkey or chicken can be easily substituted

1/2 cup chopped onion

1 can (8oz.) tomato sauce

1/2 cup canned corn

2 Tbsp's taco seasoning

1 tube (8oz.) refrigerated  crescent rolls

1 1/2 cups crushed tortilla chips, divided

1 cup sour cream

1 cup shredded cheese - Mexican blend, cheddar or monteray jack all all great cheeses to use


Directions:

1. In a large pan cook beef and onion over medium heat.....


  Cook until beef is no longer pink. Drain any fat.  Stir in tomato sauce, corn and taco seasoning....


  Bring to a boil and then reduce heat to simmer uncovered for 5 minutes.

2. While meat/tomato mix is simmering prepare pie crust.  Separate crescent dough into 8 triangles.  Place triangles into 9" pie pan with points of triangles towards the middle of pan.  Seal all perforations together as you press crescent rolls onto the bottom and up the sides of the pie pan.

3. Sprinkle 1 cup crushed chips onto bottom of crust......


  Top with meat mixture and then layer carefully with sour cream....


  Sprinkle with grated cheese and then the remaining crushed chips....


4. Bake for 20-25 minutes at 350 degrees F or until cheese is melted and crust is golden brown.....


  Let stand for 5 minutes before serving.

Serve with extra sour cream and a scoop of salsa. 
Enjoy!


Happy Nacho Pie Baking!

This post has been linked up to Eat at Home Cooks.

Saturday, October 23, 2010

Howdy Buckeye! - Week 4 of 12 Weeks of Christmas Cookies


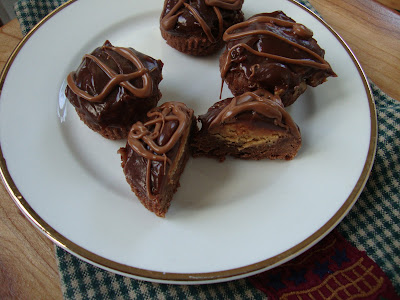
I seriously blame Betty - Betty Crocker that is - for this rich and DEE-lightful (and I don't mean that in the "lite" sense but rather the "scrumptious" sense) 2 bite chocolate-y and peanut-y treat that I have made for the 4th week of my 12 Weeks of Christmas Cookies baking group. 


Yes, it is all Betty's fault.  She created this little treasure of a recipe that should NOT be ignored....especially if you are a chocolate and peanut butter fan.  Make this recipe (it is an easy recipe but it involves a couple of steps - be warned)  and you won't regret it. You may even want to double it.  It will be absolutely perfect for your holiday gatherings.  Your friends and family will be begging for more (and the recipe of course). :-)

Enough said.  Here is the recipe.

Buckeye Delights
(recipe found in the cookbook, Best of Betty Crocker 2011)

*recipe makes 32-36 treats

Cookie Base Ingredients:


1 pouch (1.5oz) Sugar Cookie mix

1/3 cup unsweetened baking Cocoa Powder

1/2 cup (1 stick) butter, unsalted - softened

1 egg


Filling Ingredients:


1/2 cup Powdered Sugar

1/2 cup Peanut Butter

2 Tbsp Butter - softened

1 tsp Vanilla Extract

1/4 tsp Salt


Topping Ingredients:


1/2 cup Whipping Cream

1 cup + 2 Tbsp Semisweet or Milk Chocolate Chips -(I used Milk Chocolate Chips)

1 Tbsp Peanut Butter


Directions:

Make Cookie Base....

1. Preheat oven to 350 degrees F. Line mini muffin tins with mini cupcake liners.

2. Combine all cookie base ingredients in a large bowl.  Mix until soft dough forms.  Press 1 tablespoon of dough into individual liners.....


3. Bake for 8-10 minutes or until puffy and set.  Cool for 2-3 minutes and then gently press a teaspoon into the center of cookie to make an indentation where the filling will go.....


  Don't wait too long to make this indentation or else your cookie cups will crack.  Cool cookie cups completely as you make the filling.

Make Filling....

1. In a small bowl combine all filling ingredients and mix until well blended. 

2. Spoon about 1 tsp of filling into cookies and spread gently....


 Set cookies aside as you make the topping.

Make Topping....

1. In a small sauce pan over low heat, bring whipping cream to a gentle boil and then remove from heat.  Stir in 1 cup chocolate chips.....


  Mix together until well combined. 

2. Refrigerate topping for 30 minutes or until thick and cooled.  Spread over filled cookie cups with a butter knife....


Man, Oh Man is that ganche frosting soooooo GOOD!!!

3.  Take remaining 2 tablespoons of chocolate chips and place in a resealable plastic bag along with 1 tablespoon of PB....


.....Partially seal bag and microwave for 30-60 seconds (it took me 60 seconds).  Knead with your fingers to combine and to completely melt the chocolate chips with the PB.

4. Snip a small corner off of bag.  Squeeze bag over frosted cookie cups in a drizzle fashion....


....then stand back with happiness over the gorgeous yumminess you just created.  HUGE pat on your back at this point for such a good job!

Refrigerate about 30 minutes or until set.  Store covered in refrigerator.


Happy Buckeye Delights Baking!

Week 4 Twelve Weeks of Christmas:

Wednesday, October 20, 2010

Pumpkin (White) Chocolate-Chip Pound Cake


Hello there pumpkin friend!  I just wanted to let you know that I simply adore you.....you are full of gorgeous color, texture and taste (especially in a baked tasty treat).  :-)

I got to play a little bit with my pumpkin friend this past week.  I made some adorably d'lish mini loaves of Pumpkin (White) Chocolate-Chip Pound Cakes for my first month of The Cake Slice baking group.  My Dear Dad was part of an Art Tour a couple of  weekends ago in which he was able to open up his photography studio for all to come see and visit.  It is often a family affair when he does an art show.  My sister, my mom and even Jolie come together and help him set up, spruce up and even take down his pictures at the end.  Because I was not available to help him set up I offered to provide some of the refreshments (no better excuse to bake some special treats!) - I decided to make some goodies that were easily handled.....in other words, mini goodies!  I made Pecan Muffin Cutie Pies and slices of Mini Pumpkin (White) Chocolate Chip Loaves.  Both were HUGE hits and disappeared just like that!

I was particularly excited to make this Pumpkin Chocolate Chip Pound Cake recipe for it is the first recipe I have made part of The Cake Slice Bakers group that I have recently joined.  We will be baking out of Cake Keepers Cakes by Lauren Chattman cookbook for the next 12 months.  Get ready for some wonderful recipes coming your way from this book....I have already tagged a bunch of DEE-lish recipes that appeal to me as I have been browsing through this book.


You can find all the lovely blogs that are also part of The Cake Slice Bakers group HERE. :-)


I was quite pleased with this recipe.  My mini loaves came out with a lovely crumb texture full of pumpkin flavor that only improved over time.  I did consider making a fluffy cream cheese frosting to go over the breads but then decided against it.  I felt like the yummy full flavor of the bread would be taken away from the frosting.  No need to foul around with a good thing!

Pumpkin (White) Chocolate-Chip Pound Cake
 (recipe from Cake Keeper Cakes cookbook)

Ingredients:


*1 3/4 cup flour

*1 tsp baking soda

*1 tsp baking powder

*1 tsp cinnamon

*1/2 tsp salt

*1/4 tsp ground ginger

*pinch of nutmeg

*1 stick butter, unsalted - softened

*1 1/4 cup sugar

*3 large eggs

*1 cup pumpkin puree

*1 tsp vanilla extract

*1/3 cup milk

*1 cup mini chocolate chips (I used white chocolate chips instead)

*1 cup chopped walnuts (I did not use these)


Directions:

1. Preheat oven to 350 degrees F. Grease desired bread pan (mini or regular) with non-stick spray and then lightly dust pans with flour.

2. Combine first 7 ingredients (dry ingredients) in a medium bowl.

3. Cream together butter and sugar in a large bowl.  Beat for 3 minutes until light and fluffy - scrap down bowl at least once.

4. Keeping the mixer on medium-low speed add in eggs, one at at time.  Scrap down bowl in between each addition of the eggs.   Add in pumpkin puree and vanilla extract - mix to combine. Add in milk...


5. Slowly add in flour mixture (1/2 a cup at a time) as mixer is on low speed.  Scrap down bowl to ensure all flour is combined to the pumpkin mixture.

6. With a wooden spoon stir in chocolate (which every kind you wish) chips and nuts (if desired) to batter....


7.  Pour batter into pan/pans.  Smooth the top of bread with a rubber spatula....


 Bake for 55 minutes for a regular size loaf pan and about 30-35 minutes for the mini loaves.  Bread should be firm to the touch and a toothpick inserted in the center should come out clean when fully baked.

8. Cool bread/breads in pan/pans for 5 minutes and then remove onto a wire rack to cool completely.  Slice and serve.

Enjoy!


Yum to Pumpkin Chocolate Chip Pound Cake!!!


Happy Pumpkin Chocolate Chip Pound Cake Baking!

This recipe has been linked to....


From My Tiny Kitchen - Pumpkin Blog Hop Party

Monday, October 18, 2010

Cheesy "Bloomin' Onion" Bread and the WINNER


Remember these two lovely items?  Well, the WINNER of this little duo is....


....is #7, April from Abby Sweets!  Congrats to you April!  I will be contacting you to find out your mailing address so that I can send you your little prize bundle.   I had so much fun with my first giveaway....I can't wait to do another one! :-)

After all that excitement I have a VERY d'lish appetizer recipe to share.   And WOW is it serious YUM!  Easy to make.  Lots of melted cheese.  And it disappears FAST so don't even think of walking away too far once you bring it out of the oven.


Cheesy "Bloomin' Onion" Bread
(recipe discovered on Your Homebased Mom's blog - Thank you Leigh Anne!)

Ingredients:


*Round Sourdough Bread - unsliced with a good hardy crust  (I used 2 small  round sourdough breads from Panera)

*8 oz. Monterey Jack Cheese - thinly sliced (I also added some horseradish cheddar which wonderful addition to the M.J. cheese flavor)

*1/2 cup butter - melted

*1/2 cup finely diced green onions, including the white part

*2-3 tsp Poppy Seeds

Directions:

1. Preheat oven to 350 degrees F.

2. Take your bread and carefully cut into bread (DO NOT CUT ALL THE WAY THROUGH BREAD TO THE BOTTOM CRUST) with a sharp bread knife going in both directions....


...place bread on a foil covered cookie sheet.


3. Place slices of cheese between cuts in bread.  Sprinkle with green onions....


....pour melted butter all over top of bread (I used 1 stick for 2 small breads)....


....and then sprinkle with poppy seeds....


(Leigh Anne suggests wrapping whole bread in tin foil before placing in the oven - I did not do this step (guess I got too excited for the whole recipe that I didn't read the directions very well) - only had tin foil on the bottom of the cookie sheet.  You are welcome to do what feels best to you.)

....pop bread in the oven for 15 minutes - or until cheese is nicely melted.

Take out of oven.....


(Oh HAPPINESS!!!)

 ...and let cool for a couple of minutes (if you can stand it) before you place bread/breads in front of your crowd and it is is devoured!!!


Happy Cheesy "Bloomin' Onion" Bread Making!

This post has been linked up to...


Friday, October 15, 2010

Mini Pecan Muffin Cutie Pies - Week #3 of 12 Weeks of Christmas Cookies

Happy 3rd Week of Christmas Cookies!!!

This recipe is dedicated to all of you that love pecans and anything "mini" - you are going to LOVE this gem of a recipe! 


Okay, so technically these little Cutie Pies are not cookies, bars or candies but they are seriously a scrumptious little treat and absolutely perfect for a holiday treat platter. And, they are super super easy to make! 

After seeing this recipe on Lick the Bowl Good (Hey, Monica!) I knew as soon as I promised my Dad that I would help provide refreshments for his art show this past weekend that these little gems would be perfect.  Perfectly delicious and perfect for people to just grab as they were looking around at all my Dad's beautiful photographs.   And I have to say, I was soooo right!  They disappeared just like that!


Mini Pecan Muffin Cutie Pies

Ingredients:


*1 cup chopped pecans - don't be afraid to add in an additional 1/4 cup if you'd like your Cutie Pies to be even more pecan-y

*1/2 cup flour

*1 cup packed brown sugar

*2/3 cup butter, melted (10 1/4 Tbsp = 2/3 cup butter)

*2 eggs

Directions:

1. Preheat oven to 350 degrees F.

2. Combine all ingredients in bowl....


.... and mix until well combined.

3. Spray mini muffin tins (24-28) and fill 3/4 of the way full....


....pop in oven for about 18 minutes.

4. Cool for 5 minutes then remove cutie pies from pans onto a wire rack to continue cooling comopletely.  Do not let them sit too long or else you are going to have to put in some extra muscle power to get them out of the pans.

Hello there Cutie Pie!


Enjoy!

Happy Mini Pecan Muffin Cutie Pie Baking!


Week 3 Twelve Weeks of Christmas:

LinkWithin

Related Posts with Thumbnails

ShareThis