Image Map
Showing posts with label Holiday. Show all posts

Tuesday, March 10, 2015

(Healthier than McD's) Shamrock Shake


In our house we always enjoy a good holiday.  St Patrick's Day is no exception.  There may not be a drop of Irish blood in our family history but how can one resist dressing in green, building lepracaun traps and crafting colorful rainbows with piles of gold at the end of them all in an effort to drink up all that this holiday offers us. In the kitchen I love making the one pot meal of a boiled dinner and then treating everyone to a tray of Shamrock Shakes from McD's.  Goodness those shakes are just so yummy! 


This year I decided to try my hand at making my own Shamrock Shakes instead of the full-of-who-knows-what green and minty shakes from McD's.  And guess what ladies and gents, I had success!  Not only did I create a scrumptious shake that appealed to my girls and had them asking for more but it was also MUCH healthier than the shakes I served them in previous years.  What happiness for me! 


I used a frozen banana and a couple cubes of ice to make the shake thick and then I added in some almond milk, a couple drops of green food coloring and 2 drops mint extract (be SO careful when adding this into your mixture as you don't want to add too much or else the shake will taste just like toothpaste...yuck). I also dropped in a Thin Mint girl scout cookie because a cookie added into anything is just plain old fun.  At the last minute, before I put the lid onto the container of my Nutribullet, I added in 2 scoops of good vanilla ice cream.  I just had to! - I honestly feel like the shake would just not be festive without ice cream.  Oh yes, as you have seen, whipped cream and a cookie on top was also a necessity for my shakes.  REMINDER: this shake is "healthier" not "healthiest" by my standards.


I had so much fun making this recipe as I got to play around with making the drinks pretty.  Delicious and pretty drinks go far in my book.  I only wish I had gently placed a cherry on top of my mounds of fluffy white whipped cream too.  Next time for sure. 


Wishing all of you (Irish or not) a VERY Happy St. Patrick's Day.  May it be full of luck and mischief, lots of beautiful green attire and many a "Healthier" Shamrock Shake.

"Healthier" Shamrock Shake 
recipe makes 1-2 servings, depending on your glass size

Ingredients:
1 frozen banana
3-4 ice cubes
1 1/2 cups almond milk or milk of your choice
3 drops green food coloring
2 drops mint extract
2 scoops good vanilla ice cream (meaning ice cream that contains only 5-6 ingredients - said ingredients need to be those that you can read and recognize too)
1 Thin Mint cookie + a few more for garnish
whipped cream, freshly beaten or from a can
cherries - for garnish (as you don't want to forget them like I did)

Place all of the ingredients into a blender or a Nutribullet and blend well for about 20-25 seconds. Shake will be smooth and thick when done.  Pour into glasses and garnish with whipped cream, cookies and cherries.  Enjoy!


Happy "Healthier" Shamrock Shake Making!

Monday, December 15, 2014

Chocolate Dipped Macaroons


Do you know that today I found an almost empty quart of milk and a plate of half eaten cookies in the fort my kiddos built?  Yes, that's right my girls do not fool around when it's play time to play "house" or hide and seek.  Cookies and milk are invited into their precious little world of make believe.  Fortunately for them my little kitchen has been buzzing with all kinds of baked sweets and treats for this season of holiday festivities.  As a baker and lover of all things holiday my kitchen workshop has been laden with all things chocolate, parchment paper and vanilla extract as I try to keep up with the sweet needs of my girls and wanting to fill tins and baggies up with treats for others.


Today I was able to try my hand at making macaroons for the very first time.  Chocolate Dipped Macaroons at that! Simple, delicious and beautiful macaroon cookies. I have Melissa of Fried Rice and Donut Holes to thank for the recipe. I was honored to have her blog assigned to me as part of the Cookie Carnival 2014 event via the Secret Recipe Club.  This month the Secret Recipe Club is show casing COOKIES because let's face it, December should really be called Cookieber instead as in many, many parts of the world this month is all about cookies along with all things holiday and magical. 


Melissa of Fried Rice and Donut Holes has a wonderful collection of cookie recipes.  I was very tempted to make her Eggnog Dark Chocolate Chip Cookies but then decided to take the road leading to coconut happiness topped off with milk chocolate and decided to make these cookies instead.  Can you blame me!? I didn't think so.  I loved this recipe! All you need is a  short list of simple ingredients along with NO fancy moves to make these cookies.  Just a large bowl, a good mixing hand and a nice hot oven.

Chocolate Dipped Macaroons
(recipe from Fried Rice and Donut Holes)

Ingredients:
14 oz. of sweetened coconut
4 egg whites
2/3 cup sugar
1/2 cup flour
1 tsp vanilla extract
1/2 tsp salt
1 cup chocolate morsels (I used milk chocolate but semi-sweet or dark is fine too

Directions:
1. Preheat oven to 325 degrees F.  Line 2 cookie sheets with parchment paper.
2. Combine all ingredients in a large bowl and mix well all together.
3. Using 2 spoons or a cookie scoop, drop cookie mixture onto prepared sheets.  Leave about 1" in between each cookie. Bake for 25-28 minutes or until cookies are lightly browned.  Cool cookies on wire racks while you melt your chocolate in a double boiler.
4. Once cookies have cooled completely dip into melted chocolate.  Lay cookies upside down to allow chocolate to cool and harden before placing on platter or into treat baggies to give away. 

  Happy Chocolate Dipped Macaroons Baking! 


Sunday, December 26, 2010

A VERY Belly Christmas and a BURSTING with Flavor Cake


Sending all of you a VERY Merry Christmas and a Happy, Happy New Year as I burst at the seams with only 3 weeks (approximately :-) left of my pregnancy.   I wishing each and everyone of you a joyous and happy New Year too!  Again, my cup runith over with gratitude and happiness for all that I have gained and experienced this past year in my daily life adventures outside of this blog and "inside" of it too.  I truly feel blessed and honored to be so fortunate with such a wonderfully full life.

Speaking of "full" I have a lovely cake FULL of flavor that I made through

The Cake Slice Baker's group last week.


Lauren Chattman author and creator of Cake Keeper Cakes gives this cake a very simple title of, Cranberry Cake but I think it should be called, Fabulous Cranberry Almond Coffee Cake.  I state this because this cake is amazing in all its simple glory of having fresh cranberries surrounded by a moist and sweet cake that is finished off by a delightfully crunchy almond topping.....reminding me of a coffee cake rather than just a simple cake.  It could be eaten for breakfast, at tea time and even as a wonderful dessert after dinner.  And it is super, super easy to put together.  In fifteen minutes flat I had the cake stirred up and placed in the oven baking away happily.  The hardest part was waiting for it to be done.  It does take a good hour for this treasure to bake.  I learned from the other talented ladies in the TCSB's group that the oven temp of the original recipe actually needed to be increased to 325 as 300 took forever for it to fully bake the cake.  Even at 325 I still had to bake the cake longer than I anticipated.  The middle of the cake just needed that extra time to fully bake. 


That being said all you need is a bag of FRESH cranberries, regular ingredients in your pantry and some good ole fashioned "patience" to allow the cake to bake to its fullest.  You will then have a master piece of a festive cake that will bring happiness and YUMMINESS to many.  Bake and share this cake ASAP!


Cranberry Cake (also known to me as Fabulous Cranberry Almond Coffee Cake)
(recipe from Cake Keepers Cakes by Lauren Chattman)

Streusel Topping Ingredients:

1 cup sliced almonds

2 Tbsp unsalted butter, melted

2 Tbsp packed brown sugar

Cake Ingredients:

2 cup flour

1 tsp baking powder

1/4 tsp salt

3 large eggs

2 cup sugar

3/4 cup (1 1/2 sticks) butter, melted and cooled

1 tsp vanilla extract

1 bag (12 oz) FRESH cranberries


Streusel Directions:

1. Preheat oven to 325 degrees F.  Grease a 10" round springform pan.

2. Combine sliced almonds, melted butter and 2 Tbsp's  brown sugar in a medium bowl.  Mix all together and then refrigerate until ready to use.

Cake Directions:

1. In a medium bowl combine flour, baking powder and salt...whisk all together.

2. In a large bowl combine eggs and sugar - beat with an electric mixer on medium-high heat for a good 5 minutes.  Mixture will become light and fluffy and increased in volume.

3. Turn mixer down to low and slowly add in melted and cooled (1 1/2 sticks) of butter.  Turn mixer up to medium speed and beat for 2 minutes.  Add in vanilla extract at the end of 2 minutes. 

4.  Gently mix in flour - 1/2 cup at a time.  Then stir in FRESH cranberries.

5. Pour batter into prepared springform pan.  Smooth top of cake with a rubber spatula.  Sprinkle cake with Streusel Topping prepared previously.

6. Bake cake for about 1 hour to 1 hour and 15 minutes.  Cake will be golden brown and a toothpick inserted in the center will come out clean when cake is done.  If you feel like your cake is getting too brown too fast yet needs more time to bake cover with tin foil as it completes it's baking time.

7. Let cake cool in pan on a wire rack for 10 minutes and then release sides of the springform pan.  Cool completely, cut into slices and serve.

Happiness with FRESH cranberries will be enjoyed by all!


Happy Cranberry Cake Baking!


Tuesday, December 21, 2010

TWO Last Minute HOMEMADE Yummy Gifts

How are your holiday preparations coming along?  Have you finished all your shopping, wrapped all your presents, sent out your cards and started to bake and cook for your holiday meals?  Goodness, that all sounds sounds overwhelming!!!  I may have about 1/2 of the above finished....one project at a time is all I can continue to say to myself  in an effort to keep my stress level down.  So in light of reducing stress I am here to offer you TWO simple and scrumptious recipes for HOMEMADE food gifts.  You are going to LOVE them!

I am going to start with a fabulous fudge recipe (a rich, smooth and decadent treat)...


 and then I will follow it up with a colorful and sweet popcorn treat (coated with white chocolate and studded with M n M's and Honey Roasted peanuts)....


Get your napkins ready....you will be drooling over both recipes I can tell you that. :-)


Nutella Fudge
(recipe from Let's Dish - also found on Cookin' Canuck)

Ingredients:


1 Tbsp butter - for buttering pan

1 (14oz) can sweetened condensed milk

1 tsp vanilla extract

8 oz. bittersweet or semisweet chocolate chips

1 cup Nutella - at room temperature

3 Tbsp unsalted butter - at room temperature, cut into 1/2" pieces

sprinkles or sparkled sugar (optional)

Directions:

1. Grease the bottom and sides of an 8x8 square baking pan with 1 Tbsp of butter.  Line pan with parchment paper...make sure 2" of overlap exist on the sides of pan from the parchment paper.

2. In a medium heat proof bowl combine sweetened condensed milk, vanilla extract, chocolate chips, Nutella and 3 Tbsp butter....


3. Set heat proof bowl over a simmering pan of water.  Make sure simmering water does not touch bottom of heat proof bowl - this will cause the chocolate mixture to burn if not watched carefully. 

4. Stir mixture occasionally until chocolate chips  are melted fully and the whole mixture is smooth.  This takes about 5-7 minutes....


5. Pour mixture into prepared pan.  Spread with a spatula to smooth over the top....


 Sprinkle with sprinkles or sparkling sugar if you wish.....


  Cover and refrigerate fudge until firm - at least 2 hours if not longer.

6. Lift fudge filled parchment paper out of pan and cut into small squares.  Package as you wish and giveaway with happiness!


Happy Nutella Fudge Making!


Now onto the yummy popcorn....


White Chocolate Popcorn
(recipe discovered on Jaime Cooks it Up! -one of my very favorite blogs!)

Ingredients:


  2 bags of microwave popcorn - (I air popped my popcorn and made about 10 cups of popcorn instead of using microwave popcorn)

2 (12oz) bags of white chocolate chips

1 Tbsp shortening

1 cup Holiday M and M's

1 cup Honey Roasted peanuts

Directions:

1. Pop your popcorn - microwave or air pop - into a large bowl.  Set aside.

2. Put white chocolate in a microwave safe bowl.  Heat for 45 seconds then stir.  Continue to heat and stir every 30 seconds.  Heat chocolate slowly for you don't want to burn your chocolate by melting it too fast in the microwave.

3. Once chocolate is completely melted add in the 1 Tbsp of shortening.  Stir well to fully incorporate....


4. Slowly pour white chocolate over popcorn......


 and mix carefully.  (I poured a little over my popcorn and then stirred it through gently and then repeated until all the white chocolate was mixed into the popcorn) 

5.  Add in M and M's and peanuts....


  The peanuts and M and M's will stick nicely to the warm white chocolate popcorn as you stir them into mixture.

6. Line 2 cookie sheets with wax paper.  Divide popcorn between the two sheets and allow the chocolate to set onto popcorn (about 30 minutes).  Break popcorn into chunks and package up into pretty bags or tins.  SUPER yum!


Happy White Chocolate Popcorn Making!!!


Saturday, December 18, 2010

A Dessert Dip and a Special Cookie GIVEAWAY


Yahoo!!! - another giveaway!  And what a perfect giveaway for the last week of the 12 Weeks of Christmas Cookies because it involves COOKIES!!!  A couple of weeks ago I was sent a lovely box full of treats from Tate's Bake Shop located in the Hampton's, NY.  THREE boxes of cookies and a fabulous cookbook from Tate's was included in that box....everything that you will receive if you WIN!  Yes, a package of 3 boxes of scrumptious kinds of cookies  (Oatmeal Raisin, White Chocolate Chip Macadamia Nut and  Chocolate Chip) AND a cookbook from Tate's Bake Shop in The Hampton's, NY  goes to the lucky winner of this giveaway.


The cookies were delicious!  The White Chocolate chip Macadamia and Chocolate Chip cookies are tender and sweet with a lovely crispness while the Oatmeal Raisin cookies just melted in my mouth with a softness that can not be resisted.


  And the cookbook is fabulous!  I can not wait to dive into the ear-tagged pages of recipes.  I want to make the White Chocolate Brownies, Raspberry Squares, Hermits, Double Peanut Chocolate Brownies and Toffee Pecan Cookies.....to name a few. ;-) Keep your eyes open for some of these recipes coming your way on my blog in the future.

Here are the rules....

1. All you have to do to enter to win this giveaway is leave a comment at the end of this post.  Tell me anything....what you did this morning, what your plans are for the holidays or even what your most favorite kind of holiday treat there is out there (whether it be a sweet baked goodie or something savory).

2. For an extra entry become a "fan" of Tate's Bakery page on Facebook - just be sure to leave another comment to let me know you have done so.

3. This giveaway is only open to U.S. residents...I'm so sorry to all the foreigners!

4. A 15% off discount at Tate's online store is available up until the 31st of December.  Just enter "cookie" at the end of your purchase.

5. All entries will be accepted up until 12 midnight of Tuesday 12/21/10.  Winner will chosen with the help of random.org.
Now onto my last recipe for the 12 Weeks of Christmas Cookies 2010....

Goodness it is the LAST week of the 12 Weeks of Christmas Cookies!  How in the world did that happen so quickly?  Wowsers....time flies!  I have had so much fun with this baking group.  I have made many, many new friends, gained access to tons of fabulous blogs and recipes and I seriously can  not wait until next year to participate again!  Many, many thanks to April of Abby Sweets for organizing such a great baking group!


In honor of the last week of this fabulous baking group I would like to share with you a simple and oh-so-d'lish dessert dip called, Chocolate Chip Cookie Dough Dip.  I had seen this recipe floating around blog land recently and decided to try my hand at it when I came upon it at one of my very favorite food blogs, Brown Eyed Baker.

Brace yourself for this treat now.  It is super, super easy to whip together and will be a HUGE hit to everyone that dips into it.  They will be begging you for the recipe...yes, begging you. 

Chocolate Chip Cookie Dough Dip
(recipe from the very talented, Brown Eyed Baker)


Ingredients:

1 stick butter (I used unsalted)

1/3 cup brown sugar

1 tsp vanilla extract

1 (80z.) package of cream cheese

1/2 cup powdered sugar

3/4 cup mini chocolate chips

Directions:

1. In a small saucepan over medium heat melt butter with brown sugar.  Stir constantly until the brown sugar has dissolved.   Remove from heat and then whisk in vanilla extract.  Set saucepan aside and cool.

2. Beat together cream cheese and powdered sugar while butter/brown sugar mixture is cooling. 

3. Slowly beat in cooled butter/brown sugar mixture into the cream cheese mixture.  Beat for a full minute on medium speed then with a wooden spoon or plastic spatula gently stir in mini chocolate chips.

4. Pour dip into a serving bowl and refrigerate.  Garnish with more mini chips before serving if you wish.  Serve dip with cookies of your choice - graham cracker sticks or vanilla wafers go great with this dip!

YUM!  Enjoy to the fullest!


Happy Chocolate Chip Cookie Dough Dip Making!

Week 12 Twelve Weeks of Christmas:

Wednesday, December 15, 2010

An Eggnog Quickie


I (HEART) Eggnog!  - I love the taste and I especially LOVE what it represents...the holidays. Thanksgiving through New Year's the yumminess of eggnog can be easily found in the grocery stores.   I also (HEART) this wonderfully quick recipe I came upon a couple of days ago.....Quick Eggnog Bread.  Not only is this bread super easy to throw together but the flavors are wonderful!  I made a double batch of this recipe - which gave me 3 mini loaves and 1 BIG loaf - and then gave away almost all of it within just a few days as early Christmas presents.  Everyone gave me RAVE reviews on the bread.  That being said I have to share the recipe for all of you that love eggnog too (or know someone that enjoys it).


Quick Eggnog Bread
(recipe adapted and found on allrecipes)

Ingredients:


2 eggs

1 cup eggnog

2 tsp rum flavored extract (or REAL rum....which is what I used)


1 cup sugar

1 tsp REAL vanilla extract

1/2 cup butter,  softened

2 1/4 cups AP flour

2 tsp baking powder

1/2 tsp salt

1/4 tsp ground nutmeg or cinnamon

Directions:

1. Preheat oven to 350 degrees F.  Grease bottom only of a 9x5 loaf pan or 3 mini loaf pans.

2. Beat together sugar and softened butter until light and fluffy.  Then add eggs...


.... and vanilla and rum extract.  Then add in eggnog...


3. Sift together flour, baking powder, salt and spices.  Add to eggnog mixture and stir just until combined.  Pour into prepared pan/pans.

4. Bake bread 40-60 for large loaf and 35-40 minutes for mini loaves.  Loaf will be done when toothpick inserted in center comes out clean.  Cool bread for 10 minutes and then remove from pan.  Cool completely then wrap tightly and store in refrigerator.

Share and ENJOY!


Happy Quick Eggnog Bread Baking!


Saturday, June 5, 2010

A RED, WHITE AND BLUE Flag Cake


Simple.  Amazing.  Magic this cake is!  And soooooo VERY patriotic indeed.  How can you go wrong making a cake that when cut into comes out looking like the American flag?!?  I knew I couldn't when I first discovered this cake on 17 and Baking - a lovely lovely blog by an amazing young woman.  You will simply be blown away when you visit this blog.  I couldn't wait to find an excuse to challenge myself with such a cake.  This past weekend I was able to give myself the "challenge" - and you know I was a success!  

This cake does involve a little tiny bit of work for the final out-come but really it's NOT that bad.  All it takes is making your favorite yellow or white cake (you can even use a box mix!) - I made the Traditional Vanilla Birthday Cake recipe from the lovely Magnolia Bakery Cookbook.... I will share the recipe with you on this post.  After you have made your cake batter then you need to become friends with RED and BLUE dye.  You are going to divide your cake batter into 3 portions and dye one portion RED and another BLUE while keeping the last remaining portion as is (WHITE).  Bake your 3 portions of cake batter in a round 9" cake pan.  Now you will need to make a white frosting - I made a delicious cream cheese frosting (no worries, recipe will be shared) from The Joy of Cooking.  Of course you could make a yummy white chocolate frosting or even a light and fluffy butter cream frosting if you wish instead of the cream cheese frosting.  The sky is the limit! - just make sure it is a WHITE frosting.


Okay, let's get down to business....first the recipes that I used and then all the dets on how I assembled the cake to make all the magic happen.

Traditional Vanilla Birthday Cake
*Makes 1 three-layer 9" cake or 24 cupcakes*
(recipe from The Magnolia Bakery Cookbook)

Ingredients:

1 cup (2 sticks) unsalted butter, softened

2 cups sugar

4 large eggs, at room temperature

1 1/2 cups self-rising flour (It makes me HAPPY HAPPY to use self-rising flour in any recipe...it's kinda a magic flour! - I know, a little weird but it's one of my "things").

1 1/4 cups all-purpose flour

1 cup milk (I used 2%)

1 tsp vanilla extract

Cake Directions:

1. Preheat oven to 350 degrees F.  Grease and lightly flour three 9" round cake pans - line with parchment paper if you wish to be extra cautious.

2. In a large bowl cream butter on medium speed until nice and smooth.  Add in sugar gradually and beat until fluffy - a good 3 minutes.

3. Add eggs one at a time, beating well after each addition.

4. Combine flours and add in four parts, alternating with the milk and the vanilla extract - beat well after each addition.  You will have a beautiful vanilla cake batter.....


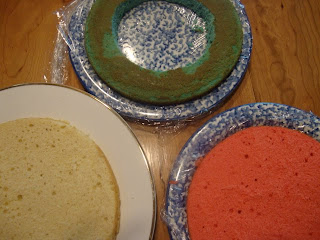
5. Now comes the fun part!  Get out your food coloring.....


and  divide batter into 3 bowls.  Color one of the portions of batter with BLUE dye and a 2nd portion with RED dye (I used about a 1/4 of a bottle for each color)....


....the 3rd portion of batter will remain WHITE.

6. Pour your 3 portions of batter into prepared cake pans....


....and bake for 20-25 minutes.  Cool your cakes completely.  Frosting time!

Fluffy Cream Cheese Frosting
(The Joy of Cooking is the source of this recipe)

Ingredients:

2 (8 oz.) packages of cream cheese

10 tbsp of butter, softened

4 tsp vanilla extract

4 cups powdered sugar, sifted

Directions:

1. Beat together cream cheese, butter and vanilla extract until well combined - about 2-3 minutes.

2. Gradually add in sifted powdered sugar.  Beat until light and fluffy.


Assembly of the Cake

1. Prepare your cake layers.

a. Cut your WHITE and RED cake in 1/2 horizontally.....a serrated knife works best.  You will now have 2 WHITE layers and 2 RED layers of cake.

b. DO NOT CUT  THE BLUE CAKE LAYER IN 1/2 like you did for the RED layer and the WHITE layer.  Instead you are going to cut a circle out of the middle of the BLUE cake.  I used a bowl as a guide to do so.....


You will do the same with 1 of the 1/2 WHITE layers and 1 of the 1/2 RED layers.  Set these circles aside.  You will now have extra cake to eat/do as you please - the middle of the BLUE layer and the outside circles of 1 of the WHITE layers and 1 of the RED circles.


2. Place the WHITE (whole cake without the circle cut out of it) on the bottom of your platter you wish to serve your cake on.  Frost the top of the cake....


Place the RED layer on top and frost.....


....and now your BLUE ring layer.....


....frost the top and inside of the ring of the BLUE layer.

3. Take the WHITE small circle cake (that you cut from 1 of the WHITE layer cakes) and gently place inside the BLUE layer cake......


....and now frost the top of the WHITE circle.....


....and place the RED small circle cake ontop of that and frost....


4. Frost the sides of the whole cake with a thin layer of frosting = your "crumb frosting" layer. 


 Set cake aside (in refrig is best if you have room) to allow frosting to harden a bit on cake.  A good hour is all it takes.


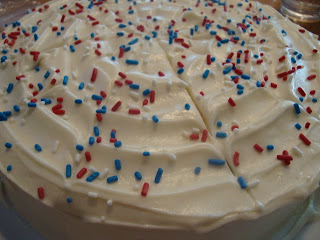
5. Once the "crumb frosting" layer has slightly hardened you can go over the cake again with the remaining frosting and give it a nice fluffy appearance.  On 17 and Baking she demonstrates how to give a fun "fireworks" effect on top of the cake with the frosting.  First make circles all around the top of your cake either with a butter knife or an off-set spatula.....


...then starting from the center of the cake out, drag a toothpick through the frosting to the edge of the cake...


Leave as is or decorate with sprinkles....


Voila!!!  Your RED, WHITE and BLUE Flag Cake is completed!


Such HAPPY HAPPY fun!

Enjoy!!!  I know you will as so many others will too! :-)


Happy RED, WHITE and BLUE Flag Cake Baking!

This post has been linked to....

  Tuesday Tastes on Crazy Daisy

Tuesday's at the Table 

Foodie Tots

LinkWithin

Related Posts with Thumbnails

ShareThis