Image Map
Showing posts with label PW Recipe. Show all posts

Monday, November 29, 2010

A RED Cake with Butter Cream Frosting for Week #9 of 12 Weeks of Christmas Cookies


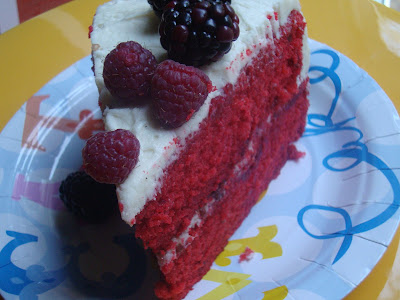
Sometimes it is fun to have a special cake for the Christmas season.  Yes, cookies are important and so are bars and candy but a good and GORGEOUSLY d'lish cake is just as important (...to me at least!).  So today in honor of the 9th Week of the 12 Weeks of Christmas Cookies I will share with you such a cake.  I call it Raspberry RED Velvet Cake with (luscious) Butter Cream Frosting - divine, simply divine.  I made this cake for my precious sister (love and treasure her SO much is hurts!).  Here she is blowing out her candles on her cake (with the help of some little adorable friends)...


This cake's creation actually came from my sister's head...yup, it was her suggestion that I add raspberries to the batter of a RED VELVET Cake and frost it with Butter Cream Frosting.  Brilliant!

Raspberry Red Velvet Cake with Butter Cream Frosting
(cake recipe adapted from The Pioneer Woman and frosting recipe from Hoosier Homemade)

Ingredients:

1 cup shortening

1 3/4 cup sugar

2 1/2 cups cake flour

1 1/4 tsp salt

2 large eggs

1 cup buttermilk

1 tsp vanilla extract

1 tsp baking soda

1 1/2 tsp vinegar

1 oz  RED food coloring (use 2 oz. if you wish to have a darker RED color to your cake...which is what I did)

1 1/2 tsp cocoa powder
1 heaping cup of frozen (or fresh)  raspberries

1 Tbsp flour

1/4  cup raspberry preserves

Directions:

1. Preheat oven to 350 degrees F.  Spray 2 round 9" cake pans with non-stick baking spray.

2. Blend together the shortening and sugar in a mixing bowl, using an electric mixer until well blended together and fluffy.  Set bowl aside.

3. Sift together flour and salt...


....and then set aside.

4. Mix eggs, buttermilk, vanilla extract, baking soda and vinegar all together in a medium bowl.

5. Alternate adding the flour mixture and the egg/buttermilk mixture to the fluffy shortening/sugar mixture.  Please mix after each addition.

6. In a small bowl combine cocoa powder and red food coloring....


  Stir together and then add to batter in mixing bowl...


  Mix all together just until well combined - do not over beat.

7. In a small bowl gently toss 1 Tbsp of flour into raspberries....


  Gently fold raspberries into cake batter....


8.  Pour batter into prepared cake pans....


 and bake for 25 minutes, or until toothpick comes out clean.  Cool cakes for 20 minutes before removing from pans.  Cool completely before frosting.

9. Make frosting...I used this lovely recipe here.  Place 1st layer of cake on desired cake stand/plate and then frost and spread with of raspberry jam leaving about a 1" surrounding  border so that the jam doesn't spill out onto the side of the cake....


 and then place 2nd cake on top....


  and continue to frost the rest of the cake. Decorate as you please.  I found some lovely berries at the store that I placed ontop and around the cake...yum!


(So sad that the above pic didn't come out as vibrant as it should've of...hopefully you get the idea of what a gorgeous cake this recipe creates!)

Here is a peak inside the cake....


....and an other peek....


A lovely cake to make for the holidays, special birthday or "just because". 

Happy Raspberry RED Velvet Cake with Butter Cream Frosting Baking!

Week 9 Twelve Weeks of Christmas:

Saturday, August 21, 2010

Blueberry Sour Cream Pancakes


Once again I am honoring my good friends of the Summer.... Blueberries!!!


This time I will be sharing with you one of my all time favorite pancake recipes....Sour Cream Pancakes with Blueberries - deeeeeelish!  The pancakes are light and fluffy and FULL of flavor.  The sour cream really does wonders to the batter....it's like the secret ingredient to the batter. :-)

 The beauty of this recipe is that you can easy switch up the blueberries for other berries or fruit or just make the pancakes plain without any extra add-ins.

Blueberry Sour Cream Pancakes
(recipe from Ree Drummond's cookbook, The Pioneer Woman Cooks)
*makes twelve 4" pancakes*

Ingredients:


1 cup sour cream

7 Tbsp flour (yes, only 7 Tbsp's!!)

1 Tbsp sugar

1 tsp baking soda

1/2 tsp salt

2 large eggs

1/2 tsp vanilla extract

1 cup blueberries - fresh or frozen

Butter and Maple Syrup

Directions:

1. In a medium bowl scoop in sour cream then add in flour, sugar, baking soda and salt....


....Mix to combine - very gently.  Stop short of mixing the batter together completely....you want the pancakes to have some interesting texture.

2. Beat the eggs in a separate bowl...


....then add the vanilla extract...


...and stir to combine.

3. Pour egg/vanilla extract mixture into the sour cream/flour mixture...


...Once again gently mix just until combined.  A little white and yellow swirling is great!

4.  Fold in blueberries....


5. Heat up iron skillet or griddle over medium-low heat with a pat of butter or cooking spray (I prefer butter in this case for the yummy flavor).  You want the skillet to get nice and hot before you pour the batter into the pan....about a 1/4 cup at a time.   Cook for 1 - 1 1/2 minutes, then flip the pancakes over.  Cook for another 45 seconds....


.....then remove to plate and embellish with butter and warm maple syrup....


....Continue with remaining batter - adding butter to skillet when needed before adding in more pancake batter.  Be careful not to burn the butter!!


Happy Blueberry Sour Cream Pancakes Making!

This post has been linked to...

Mommy's Kitchen - Pot Luck Sunday


Monday, August 16, 2010

Cheesecake with Blueberry Topping


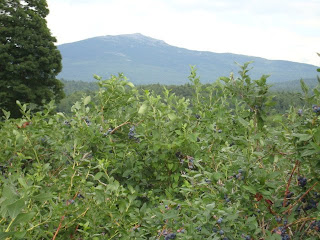
This is the beautiful view (@ Monadnock Berries in Troy, NH) that I had while picking blueberries.  It was in this very spot that I decided that I would make a cheesecake with blueberry topping from the blueberries that I so carefully picked from these bushes.  It was a happy moment! - not only because I finalized a special treat to make with the blueberries I was harvesting but also because picking blueberries is seriously one of my most favorite things in life to do....just after baking of course!  Blueberry picking is a peaceful and magical activity for me....it's calming and represents so many happy happy memories for me - I've picked by myself, I've picked with dear friends, I've picked with family (from far and near), I've even picked with a baby attached to my front sleeping soundly.  I LOVE BLUEBERRY PICKING!!!!

And I LOVE this simple and oh-so-yummy recipe I am about to share with you.  I found it from one of my favorites, The Pioneer Woman.  Ree made her cheesecake with a blackberry topping but because I blueberries are so close to my heart I decided to switch up the blackberries for blueberries as the topping.  It worked out beautifully!

Cheesecake with Blueberry Topping
(Recipe from The Pioneer Woman - LOVE her!!!)

First let's make the crust for this yummy cheesecake....and let me tell you this is one of the BEST cheesecake crusts I've come upon - delish!!!


Crust Ingredients:


1 (12oz.) box Vanilla Wafers

1/2 cup pecans

1 stick unsalted butter, melted

1 1/2 tsp vanilla


Cheesecake Filling Ingredients:


3 (8oz.) packages of cream cheese

1 1/2 cups sugar

4 eggs

1/2 cup sour cream

1 tsp vanilla extract


Blueberry Topping Ingredients:


2 cups blueberries (blackberries can be easily substituted)

1/2 cup sugar

2 Tbsp water

Directions for the Crust:

1. Get out your 10" spring-form pan....


....found this one at my lovely local TJ Maxx!  Isn't it cool?! - it even has a glass bottom!  Peek A Boo Jolie!....


2. Place vanilla wafers and pecans into the bowl of a food processor....


...pulse until mixture becomes crumbs...


....then add in melted butter....


 and vanilla....


 and pulse again until combined...


3. Pour into your spring-form pan...


 and press crumbs into the bottom and up sides of pan. I used a measuring cup to do the work of the "pressing" - this worked great!


Set pan aside as you make the cheesecake filling.

Directions for Filling:

1. Combine cream cheese and sugar...


....and beat until smooth. Beat on low for 1 minute and then increase speed to medium speed for 2-3 minutes - scraping down bowl occasionally.

2. Add eggs to the cream cheese/sugar mixture one at a time....


....beating very well after each addition.

3. Add in sour cream...


....and then vanilla....


...mix again until well combined.

4. Pour mixture into crust....


...and smooth the top....


5. Bake for 1 hour and 10 minutes then turn off oven and open door slightly.  Allow cheesecake to sit in the oven with the door open for 15-20 minutes.  Remove from oven and cool....


...unfortunately my cheesecake has plenty of cracks to give it character - next time I make this cheesecake I will bake it in a water bath to avoid getting so many cracks.  Please excuse all the cracks...I'm slightly embarrassed by them.

  Refrigerate once cooled down enough to handle pan.

Time to make the blueberry topping...

Directions for Blueberry Topping:

1. Place blueberries, sugar and water in a medium saucepan...


2. Bring to a boil over medium-high heat and cook for 4-5 minutes...


...stirring occasionally.  Berries will pop and bubble a little bit as the mixture boils.  Such yumminess!

3. Turn off heat and allow to cool slightly.

4. Pour berry topping over cheesecake...


 ...and refrigerate to cool for at least 2 hours - the longer the better.

5. When ready to serve remove rim around spring-form pan and slice into 16 pieces with a long serrated knife.  Enjoy!!!


Happy Cheesecake with Blueberry Topping Baking!

This post has been linked to...

Pot Luck Sunday @ Mommy's Kitchen

Saturday, July 10, 2010

Sensational Strawberry Recipes - Part 3....Strawberry Shortcake CAKE


Man this cake GOOD!  Once again the lovely, ever-so-creative Pioneer Woman has provided me with an amazing recipe.....Strawberry Shortcake Cake.  It's literally just like a tender but dense biscuit with strawberries and fluffy cream all over it except in a beautiful cake form.  A wonderful cake to make for a birthday and oh so easy to make!

Strawberry Shortcake Cake
(created by the fabulous Ree Drummond, The Pioneer Woman)

Cake Ingredients:

1 1/2 cups flour

3 Tbsp corn starch

1/2 tsp salt

1 tsp baking soda

9 Tbsp unsalted butter, softened

1 1/2 cups sugar

3 whole large eggs

1/2 cup sour cream, at room temperature (I used strawberry yogurt b/c I didn't have any sour cream on hand)

1 tsp vanilla extract

Icing Ingredients:


1 (8 oz.) package of cream cheese

2 sticks unsalted butter

4 cups powdered sugar, sifted

1 tsp vanilla extract

dash of salt

1 lb strawberries

6 Tbsp sugar

Directions:

1. Make the cake....sift together flour, salt, baking soda and corn starch - set aside.

2. Cream together the 9 tablespoons of butter with the sugar until light and fluffy - at medium speed for about 2-3 minutes.  Add in eggs one at a time, mixing well after each egg.

3. Add in sour cream and vanilla extract to the butter/sugar/egg mixture - mix until combined.  Slowly add in the sifted dry ingredients just until combined - DO NOT OVER MIX.

4. Pour the cake into 2 greased 8" round cake pans.  Bake @ 350 degrees F for 25-30 minutes or until cakes are lightly browned and begins to pull away from sides of pan.  Cool for a couple of minutes then remove from pans and cool completely.  Set cakes aside.

5. Clean, stem and slice in half the strawberries - place into a bowl and sprinkle with 3 tablespoons sugar.  Stir together and let sit for 30 minutes.  After 30 minutes, mash the strawberries....


and sprinkle with the remaining 3 tablespoons of sugar.  Allow mashed strawberries and sugar to sit for another 30 minutes.  Now it's time to make the frosting and assemble the cake!

Frosting  and Cake Assembly Directions:

1. Combine cream cheese, 2 sticks of butter, sifted powdered sugar, vanilla extract and a dash of salt,  Beat all together until light and fluffy - a good 2-3 minutes. Set aside.

2. Now let's assemble the cake...take both layers of cake and carefully spread the mashed sugar strawberries over them - juices and all!


....and then place layers on top of one another.  To make it a bit easier for me to frost the whole cake I placed it in the freezer for about 10 minutes....


3. Let's frost the cake.  Start with the top...


 and then spread all over the sides.......


No worries if some of the strawberries come peeking through the frosting...it just adds to the beauty of such a cake.  Decorate the top as you wish....of course I just continued on with strawberries and put a couple whole beautiful ones on top. 

This cake is pretty easy to transport but should be should be refrigerated until served.  I brought this cake to our favorite Chinese restaurant for my beloved God-Sister's BDay celebration.....


It went great with the fortune cookies, pineapple chunks and oranges and pina colada's too! :-)

Happy Birthday Ami!


Thank you so much for joining me in my series of Strawberry Recipes!  If you haven't had a chance to check out a couple of other strawberry recipes on my blog you might want to see the post on

Happy Strawberry Shortcake CAKE Baking!


LinkWithin

Related Posts with Thumbnails

ShareThis