Image Map
Showing posts with label Cake mix. Show all posts

Sunday, April 3, 2011

A Springtime CAKE (make this cake while you are Spring cleaning)


Oh, Springtime I do so adore thee!  I love the fact that soon outside we will have fresh green grass, little baby leaves starting to show their faces on the trees along with bright colored tulips and sunny daffodils. Springtime is full of freshness and new growth that brings me such happiness.  It's funny how all of a sudden a new sense of "getting things done" also known as Spring Cleaning gets sparked for me when I feel the reality of all the new growth of life starting to bloom outside. 

As I was buzzing around cleaning and tidying up my house the other day I decided to try out a cake recipe that a good friend of mine (Hey, sweet Diane!) had passed along to me last year.  It is called Key Lime Cake.  A perfect cake that comes together in a jiffy and brings along with it a taste of fresh lime, sweetness and a tender crumb texture.  Yum! The perfect Springtime cake. :-)


Key Lime Cake
(recipe can be found on the allrecipes website)

Cake Ingredients:

1 (18.25 oz) package of LEMON cake mix

1 (3 oz) package of instant LEMON pudding mix

3/4 cup water

1/2 cup canola oil

4 eggs

5 Tbsp LIME juice

Glaze Ingredients:

1 1/2 cups powdered sugar

3 Tbsp LIME juice

LIME zest for garnish (if you wish)

Directions:

1. Preheat oven to 350 degrees F. Lightly grease a 9x13 pan or a 10" bundt pan.

2. In a large bowl combine cake mix, pudding mix, water, oil, eggs and 5 Tbsp of LIME juice.  Mix well all together.  Pour batter into your prepared cake pan.

3. Bake for 45 minutes.  As cake is baking mix together powdered sugar and 3 Tbsp of LIME juice for your glaze.  Pour glaze over still warm cake. Garnish with freshly grated LIME zest.

This cake is lovely served with fresh berries.....ENJOY!


Happy Key Lime Cake Baking!

Friday, December 31, 2010

WINNER of Tate's Cookies Giveaway and The FASTEST Cookies EVER

Drum roll PLEASE! - In honor of the New Year I'd like to announce the winner of the Tate's Cookies and Cookbook Giveaway! I punched in the appropriate numbers (1-42) into random.org and the lucky number that was chosen was......

#5!!!  Yes,  the WINNER is Laurie!  The wonderful Laurie from cookin' up north.  Congrats Laurie!!!


Along with the above happiness of announcing the winner of Tate's Giveaway I want to share a lovely cookie recipe.  One of the very FASTEST cookie recipes ever.....and yummy too! - full of cinnamon-y flavor, studded with oatmeal and plump raisins.  Yes, Oatmeal Raisin Cookies is what I'm about to share with you made and baked in a flash.


All you have to do is blink because once you do this recipe is mixed together and ready to be scooped into little balls onto cookie sheets and thrown placed into the hot oven.

Here we go....


Fastest EVER Oatmeal Raisin Cookies
(recipe discovered on TK and slightly altered from TK member carolinacollegcook)

Ingredients:

2 eggs

1/2 cups veggie or canola oil (I used canola)

1 box (18oz) Yellow Cake Mix (moist variations work best)

1 1/2 Tbsp cream - 1/2 and 1/2, light or heavy will all work well (I used heavy)

1 tsp ground cinnamon

3/4 cup raisins

3/4 cup oatmeal

Directions:

1. Preheat oven to 350 degrees F.

2. Beat eggs in a large bowl.  Add in oil then cake mix and cinnamon and stir/beat until thoroughly incorporated.

3. Add in cream and then raisins and oats.  Make sure everything is incorporated fully.

4. Place scoops of cookie dough on lightly greased or parchment lined cookie sheets.  Bake for 8-10 minutes or until edges are lightly browned.   Cool cookies for a couple minutes on cookie sheets and then remove to cooling racks.

Enjoy with a nice cold glass of milk!


Happy FASTEST Ever Oatmeal Raisin Cookie Baking!


Sunday, October 3, 2010

Caramel Apple Upside Down Cake


The season of Fall can be such a gorgeous time of the year! - especially when the sun shines, the leaves have turned colors and there is a certain crispness in the air.....and of course when there are goreous FRESH apples to be picked.  :-)  There is simply nothing better than FRESH apples!  FRESH apples to eat in your hand, FRESH apples to have in a large bowl as a decoration and of course FRESH apples to bake with all make me so very happy!

I am sure I will be sharing with you lots of apple recipes in the next couple of months as I enjoy apples in this season of Fall.  The first apple recipe that I'd like to share with you is called Caramel Apple Upside Down Cake.  What a gem of a recipe! As soon as I saw it on SnoWhite's blog Finding Joy in My Kitchen I knew I had to make it ASAP! - just the idea of baking a cake that has a topping of caramel and apples and that it is "upside down" made me melt.....d'lish!  I thank SnoWhite over and over again for offering such lovely recipes.  She is truly a talented woman in the kitchen! - as is her hubby too! Take a moment and go check out Finding Joy in My Kitchen  if you have yet to do so already.

Caramel Apple Upside Down Cake
(recipe adapted from SnoWhite @ Finding Joy in My Kitchen which was adapted from Betty Crocker)

Ingredients:


1/4 cup butter

1/8 cup heavy cream or whipping cream

1/2 cup packed brown sugar

4 medium apples - peeled, cored and sliced

1 box white or yellow cake mix

1 1/4 cup water

1/3 cup oil or applesauce (I used canola oil)

2 eggs

1/2 tsp cinnamon

1/2 tsp nutmeg

Directions:

1. Preheat oven to 350 degrees F. Melt butter in a large sauce pan.  Add in cream and brown sugar as butter melts.....stir and heat until butter is completely melted and sugar and cream are well incorporated.


2. Grease a 9x13 pan and then carefully pour caramel mixture into prepared pan...


.....Use a rubber spatula to spread all over base of baking pan....


3. Prepare apples by peeling, coring and cutting. I cut my apples into quarters and then into 4th's - next time I think I will cut my apples thicker (only into 3rds from the quarter size pieces of apples)....cut thinner or thicker as you wish.


4. Layer your apple slices all over caramel layer...


5. Prepare cake mix with water, oil (or applesauce), eggs and spices.  Mix well all together and then gently pour over apple layer...


6. Bake in preheated oven (350) for 40-45 minutes, or until toothpick inserted in the middle comes out clean. 


 Cool cake for 10 minutes and then loosen sides of the cake before carefully flipping cake over onto a serving platter. I used a tin foil wrapped cookie sheet as a platter since I don't have a platter big enough for a 9x13 cake - (Note to self....keep eyes open for such a platter).  Keep cake pan upside down for a good minute before removing so as to allow all the caramel juices to have plenty of time to come off the bottom of the pan.


Gorgeous!  Gorgeous! Gorgeous!

Serve warm with cinnamon whipped cream or vanilla ice cream.....Dee'LISH!


Happy Caramel Apple Upside Down Cake Baking!

This post has been linked to...


Monday, September 6, 2010

Peachy Bundt Cake


Here I am with the second yummy "peach" recipe which I made with the peaches harvested from my parent's peach tree.  The first recipe you may recall was Peach Bars.  So yummy!

  Because I had such an abundance of peaches on my hands I had to be creative fast.  So I took a bundt cake recipe that called for blueberries and vanilla extract and switched it up with cut up peaches and a dash of almond extract.  Yummy-in-my-tummy creativity on my part I have to say! :-)

Peachy Bundt Cake

Ingredients:

1 box Yellow Cake Mix

3 eggs

1 cup milk

1 stick butter, melted

1-2 tsp almond extract (I used 2 tsp but if you'd like a more sutale taste of almond extract only use 1 tsp

1 1/2 cups peaches, diced and peeled - about 4 medium peaches (canned peaches could be used here too if FRESH peaches are not easily available)

Directions:

1. Preheat oven to 350 degrees F. Grease bundt pan well.

2. Mix cake mix, eggs, milk,  melted butter and desired amount of almond extract all together at low speed for 1 minute and then increase speed to medium-high for another 1-2 minutes.  The batter will be thick and have a nice light color.

3. Pour 1/3 of batter into your prepared bundt pan and then layer with 1/2 of the diced and peeled peaches....


....Pour another 1/3 of batter over the peach layer and then the remaining peaches.   Ending with the remaining batter....


4. Place in oven and bake for 50-55 minutes or until cake is a beautiful light brown and a tooth pick stuck in the middle of the cake comes out clean.


Cool cake in pan for at least 15 minutes and then invert to serving platter to cool completely before frosting with a simple glaze or your favorite frosting.  I used some remaining Cream Cheese frosting that I had on hand.  If you need a good Cream Cheese frosting recipe try this one that I used on my


Happy Peachy Bundt Cake Baking!

This post has been linked to...


Thursday, August 5, 2010

Ice Cream Sundae Chocolate Layer Cake


Want a fast and easy cake to make?  All you have to do is have your favorite kind of ice cream (YES, ice cream is in the batter of this cake!! - just like the Ice Cream Chocolate Chip cookies I make), chocolate sauce, box of Devil's Food Cake mix, chocolate pudding mix, water, eggs and oil on hand and there you have it...all the ingredients to make a chocolate-y, dense and yummy layered cake. Then just frost with your favorite chocolate frosting - homemade or store bought.

And the beauty of this cake is you can design it to be the cake of your dreams just by the kind of ice cream you choose to mix into the cake.  I choose....


and then added Heath Bar Crunch candies on top of the cake as decoration.  So much fun! You could add  Cherry Garcia ice cream to the batter and then layer with chocolate frosting and cherry preserves with bits of chocolate on top OR you could add Oreo ice cream and go crazy with crushed up Oreo's in the middle and top of the cake OR you could add Mint Chocolate Chip ice cream with broken up Andies Mints sprinkled on top of the cake.....the options/ideas are endless!!!!

Ice Cream Sundae Chocolate Layer Cake
(recipe adapted from Picky Palate)


Ingredients:

1 box Devil's Food Cake mix

1 small box of instant chocolate pudding

4 eggs

1/2 cup water

1/2 cup canola or veggie oil - I used canola

1 heaping cup of ice cream - the sky is the limit, choose your flavor

1/4 cup Hot Fudge Sauce - yeah baby!!! :-)

Chocolate Frosting of your choice - homemade or store bought

Directions:

1. Preheat oven to 350 degrees F.  Place cake mix, pudding mix, eggs, water, oil, ice cream and hot fudge sauce in a large bowl....


....beat on medium - low for  2 minutes or until well combined and thick (don't be afraid to scrap down bowl with a plastic spatula every now and then) ...


2. Pour into three to four 9" round cake pans (well greased) - I used three 9" cake pans....


....pop in the oven and bake for 15-20 minutes or until toothpick comes out mostly clean from center of cakes.

3. Cool completely, loosen sides with a plastic spatula then remove from pans.  Once completely cool frost and decorate as you please!


Enjoy!


Happy Ice Cream Sundae Chocolate Layer Cake Baking!

p.s. I am off for a lovely family vacation on Cape Cod this next week or so - thus I maybe away from blog land for awhile if I can't access the internet.....but no worries I will be back soon!!! :-)


Wednesday, July 14, 2010

It's a....Honey (of a) Cake!


Want a recipe for an ooey gooey yummy in the tummy cake that can be served morning, noon or night?  Well, here you go! You are going to love it!  The cake is a lovely light yellow cake that has a such of cinnamon, nutmeg and brown sugar running through the center of it and then topped off with a thin layer of glaze that just soaks right into the cake.  Delicious.

Honey Cake
(recipe discovered from the cookbook - Sweets - Boy, those Southerner's know how to bake!)


Cake Ingredients:

1 (18.5 oz) box yellow cake mix

3/4 cup vegetable oil

4 eggs

1 cup sour cream

1/4 cup *honey

1 cup firmly packed brown sugar

1 Tbsp ground cinnamon

1/4 tsp ground nutmeg

1/8 tsp ground cloves

Vanilla Glaze Ingredients:


2 cups confectioners sugar, sifted

4 Tbsp milk, or more as needed

1 Tbsp vanilla extract

Cake Directions:

1. Preheat oven to 325 degrees F.  Combine cake mix, vegetable oil, eggs and sour cream in a large mixing bowl....


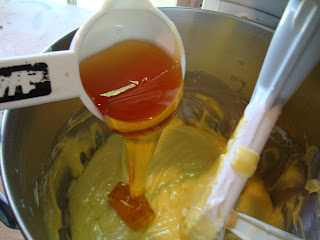
....mix until majority of large lumps in the batter are gone. And then gently stir in the honey...


*I found that by using the 1/4 cup that I had previously measured out my veggie oil in was perfect for measuring out my 1/4 cup worth of honey - it just slid on out of the cup with no mess or extra help from a spatula.

2. Pour half of the batter into an un-greased (YES, I said un-greased) 9x13 glass cake pan and set aside....

3. In a medium bowl combine brown sugar, cinnamon, nutmeg and cloves and blend well.  Sprinkle onto the cake batter in pan....


 and then spoon or pour remaining batter on top of brown sugar/spice mixture....


4. Bake for 50 minutes, or until a toothpick inserted in the middle comes out clean and the cake is golden brown.  Cool cake on a wire rack.  Let the cake stand for 10 minutes while you make the Vanilla Glaze.

Vanilla Glaze Directions:

1. Sift confectioner's sugar....


 then combine with milk and vanilla extract in a large bowl.  Whisk the ingredients until smooth - glaze should be thin enough to drizzle from a spoon....if not thin enough add another tablespoon or two of milk to get the correct consistency.

2. Drizzle all over warm cake.  Make sure you get the edges too!


Serve warm or at room temperature.

Once you cut into the cake you will see the lovely yumminess of the brown sugar, cinnamon, nutmeg and cloves mixture in between the soft layers of cake.....Heaven.  Pure, yummy Heaven.


Happy Honey Cake Baking!


Monday, July 5, 2010

Sensational Strawberry Recipes...Part 1 - Easy Strawberry Cake


Welcome to my THREE Part Series on recipes that feature strawberries.

The first recipe I will be sharing with you is a lovely cake that show-cases fresh strawberries that sit just on top of a moist yellow cake.  The strawberries are coated with a yummy strawberry glaze made with strawberry gelatin, a bit of cornstarch, lemon juice, sugar and water....simple ingredients for a stunning dessert. 

The hardest part of this recipe is to have the cake pan used to bake the cake in....a Tiara cake pan.  When I first discovered this recipe on Mommy's Kitchen I jumped for joy for not only did the recipe sound sooooo soooo yummy but I realized I had the very pan needed to make it!  Of course you can make this cake in a regular 9" round cake pan and just carefully lay your strawberries on top of the cake. The beauty of a cake baked in a tiara pan is that it allows the strawberries to sit just a little bit indented into the top of the cake. 

Please don't let the "kind" of cake pan suggested for this cake scare you away from this recipe - no matter which kind of pan you use to bake it in you will fall over backwards with happiness as you bite into it.


Easy Strawberry Cake
**makes 2 cakes**
(recipe adapted from Mommy's Kitchen)

Ingredients:

1 package yellow or butter recipe cake mix
(prepare according to package directions)

2 lbs fresh strawberries

1 8oz. container of Cool Whip or freshly sweetened whipped cream

Strawberry Glaze Ingredients:

1 cup sugar

1/4 cup cornstarch

1.4 oz box - strawberry gelatin

1 1/2 cups water

1 Tbsp lemon juice

1/2 tsp strawberry extract (optional)

1. Preheat oven to 350 degrees F. Mix the cake mix according to package directions.  Spray cake pans - because I only had one tiara cake pan I used half the cake batter for the cake and the other half of the batter for cupcakes. Bake for about 20-30 minutes or until golden brown and a toothpick inserted in the center comes out clean. Cool completely.


2. While the cake is cooling prepare the Strawberry Glaze....combine the sugar, cornstarch, gelatin, lemon juice, strawberry extract and water in a medium size pot.....


....Bring mixture to a boil, then reduce heat to medium and cook until the mixture thickens, whisking often - it thickens quite quickly...so be careful!


3. Remove glaze from heat and let mixture cool to room temperature.

4. Place strawberries (and other berries too if you wish) into the center of fully cooled cake....


....and then drizzle glaze over fruit....


5. Oh H-E-A-V-E-N!!! Serve with Cool Whip or freshly whipped cream (sweetened to your preference).


Life can't any better with such a strawberry cake to enjoy!

Happy Easy Strawberry Cake Baking!

Wednesday, April 14, 2010

Chocolate Caramel Bars


Ahhhhh it's a sea of chocolate, caramel and pecans.....YUM-O!!! (as Rachel Ray would say) - :-)

Just wait, it only gets better.....another layer of chocolate melts into all the yumminess of the first layer of chocolate, caramel and pecans.


 It's all baked together to make a happy ooey-gooey delight. 
 Below this picture almost looks like a puffy layer of "chocolate clouds" nestled against all the delicious yumminess of chocolate, caramel and pecans......H-E-A-V-E-N.  Heaven.  Pure heaven at that!


Chocolate Caramel Bars
(recipe was discovered on the blog Bake or Break Recipes)

Ingredients:

1 box German Chocolate cake mix

3/4 cup butter, melted

2/3 cup (from a 5 oz. can) evaporated milk, divided into 1/3 cup portions

1 (14 oz.) bag caramels (I used Brach's Milk Maid caramels)

1 cup chopped pecans

1 cup semisweet chocolate chips

Directions:

1. Preheat oven to 350 degrees F. Grease a 9x13 baking pan.

2. In a large bowl combine cake mix, melted butter and 1/3 cup evaporated milk. Beat at medium speed  until smooth. 

3. Spread 1/2 the mixture in the prepared pan. Set aside the other 1/2.

4. Unwrap ALL of the caramels (it's a pain but some has got to do it....and believe me it is well worth all the work) and place in a heavy medium size sauce pan.  Add to the caramels the other 1/3 cup of evaporated milk. (Patiently) cook over medium-low heat stirring constantly with a wooden spoon until the caramels are completely melted.

5. Pour caramel/evaporated milk mixture over chocolate layer in pan.

6. Sprinkle with chopped pecans and chocolate chips.

7. Drop remaining chocolate mixture over nuts, caramel and chocolate chips. *It will now look like the 2nd picture posted above.

8. Bake for 20-25 minutes.  Cool in pan as long as you can handle doing so.  The cooler the bars are the easier they are to cut and remove from pan.

Enjoy!


Happy Chocolate Caramel Bar Baking!
~avril :-)

This recipe has been linked up to the blog Stop and Smell the Chocolates :-)

LinkWithin

Related Posts with Thumbnails

ShareThis