Image Map

Friday, October 15, 2010

Mini Pecan Muffin Cutie Pies - Week #3 of 12 Weeks of Christmas Cookies

Happy 3rd Week of Christmas Cookies!!!

This recipe is dedicated to all of you that love pecans and anything "mini" - you are going to LOVE this gem of a recipe! 


Okay, so technically these little Cutie Pies are not cookies, bars or candies but they are seriously a scrumptious little treat and absolutely perfect for a holiday treat platter. And, they are super super easy to make! 

After seeing this recipe on Lick the Bowl Good (Hey, Monica!) I knew as soon as I promised my Dad that I would help provide refreshments for his art show this past weekend that these little gems would be perfect.  Perfectly delicious and perfect for people to just grab as they were looking around at all my Dad's beautiful photographs.   And I have to say, I was soooo right!  They disappeared just like that!


Mini Pecan Muffin Cutie Pies

Ingredients:


*1 cup chopped pecans - don't be afraid to add in an additional 1/4 cup if you'd like your Cutie Pies to be even more pecan-y

*1/2 cup flour

*1 cup packed brown sugar

*2/3 cup butter, melted (10 1/4 Tbsp = 2/3 cup butter)

*2 eggs

Directions:

1. Preheat oven to 350 degrees F.

2. Combine all ingredients in bowl....


.... and mix until well combined.

3. Spray mini muffin tins (24-28) and fill 3/4 of the way full....


....pop in oven for about 18 minutes.

4. Cool for 5 minutes then remove cutie pies from pans onto a wire rack to continue cooling comopletely.  Do not let them sit too long or else you are going to have to put in some extra muscle power to get them out of the pans.

Hello there Cutie Pie!


Enjoy!

Happy Mini Pecan Muffin Cutie Pie Baking!


Week 3 Twelve Weeks of Christmas:

Wednesday, October 13, 2010

A Giveaway (yahoo!!) AND a Halloween Treaty

Do you ever set goals for yourself?  Well, sometimes I do.  I like making goals because when they are accomplished I feel successful which then makes me feel happy! - it is a win win situation in my mind...especially if my "goal" has been reached. :-)

One of my "goal setting" moments recently has been with my blog and being part of the food blogging world.  When I first started to build my blog I did a lot of browsing through other food blogs and picked out what I really liked about them.  From there I formed a list as to what I wanted to include in my blog.  Such things as having a "print friendly" button was important along with making labels of the kinds of foods I blogged about so that recipes could be easily searched and found.  I also wanted to increase the traffic/visits to my blog.  I am still learning the best way to do this but with time and more experience I think I will learn the ins and outs of what attracts people to my blog and then make it happen!

I have recently won two (yes, TWO) separate giveaways on other food blogs (Thanks Monica and Ingrid...hugs and gratitude to the both of you for your lovely giveaways).  Can I tell you that everyone around me would think that I had just won the lottery each time I discovered I had won one of these giveaways.....I was out of my skin with excitement!!! And yes, winning a giveaway has also been on my "goal list" - yahoooie I have been able to cross off that one (twice!!!).  So that being said, it is time for me to make someone else just as happy (I hope) as I was when I won my giveaways and give away a little somethin'
somethin' on my blog.

Here you go.....some food tattoos (don't they look fun!?!) and a cutie patootie dish brush (that is actually named "Baker"....such a perfect name in my eyes coming from a woman that LOVES to bake herself!).


How do you win these two little treasures?  All you have to do is leave a comment telling me what you have to celebrate today (one or two simple things is great) here on my blog or on my Baking and Creating with Avril facebook page (don't forget to become a fan on FB if you have yet to do so)...and yes, you can comment in both places to increase your chances of winning.   I will start first....

*Today I am celebrating the fact I had energy to clean my kitchen (see, something small is fine).

* I am also celebrating the reality that it was a beautifully sunny Fall day outside.  Happy Fall Y'all!

*Oh, and one more thing I am celebrating today is that the Keene PD is giving out FREE pumpkins!!!! Fun and just in time for the Pumpkin Festival this coming weekend. :-)

*Lastly (but oh so gratefully) I am celebrating the fact that I have 70 followers now on my blog!!!!!  Thank you, thank you one and all for following my blog!

I will announce the winner of my giveaway Saturday a.m. Last entrance will be excepted no later than Friday @ 12 midnight.  All entrants will be placed in a hat and picked at random.

Now to move onto my Halloween Treaty.....super easy to make and VERY fun to involve kiddos in the making of it.  I first saw a version of this treat from my friend Astrid.  She makes huge batches of these fun treats at Christmas time.  I thought it would be fun to make them for Halloween by just switching up the kind of candy I used geared for Halloween.


Sweet and Salty Halloween Treats

Ingredients:


*Pretzels

*Hershey Kisses (I used the striped white and milk chocolate kind)

*Candy Corn


Directions:

1. Preheat oven to 350 degrees F.  Line a cookie sheet with parchment paper.  Place pretzels on cookie sheet....


2. Unwrap Hershey's Kisses....


...can you tell how happy Jo was to be soooo up close and personal with the HK's??? :-)

3. Place HK's on top of pretzels....


 ....and then place filled cookie sheet in oven.  Bake for 4-5 minutes but no longer - just until HK's start to get shiny.  Take out of oven and place candy corn on top of HK's....


....gently pushing CC's into chocolate.

4. Cool and then transfer to serving platter or wrap up in cute packages to give away.


Happy Sweet and Salty Halloween Treats Making and good luck on the giveaway!


Monday, October 11, 2010

Homemade Bread made with Cottage Cheese


Is there seriously anything better than homemade bread?!  Well, for the moment homemade bread is one item of food (of many) that is on the top of my "favorite food" list.  To me the fact that I am able to actually make bread means that I have the time and energy to do so....which is precious these days as I am in the tail end of my 2nd trimester of pregnancy.  I usually make bread when it is sunny outside....something about having it sunny outside is always inviting for me to make bread...who knows why.  Maybe because when it is sunny outside it allows the "rising" process of the bread to be more successful in my eyes?? Could be. 

I am always looking for new and different recipes so when I came across this recipe for homemade bread that included cottage cheese in the ingredients list I was very intrigued.  Especially when Rhonda from
Our Treasured Home expressed that the cottage cheese gave the bread a special moistness and a wonderful flavor.  I was immediately hooked and printed out the recipe to make ASAP. For those of you that have a bread maker Rhonda also shares this recipe to make in the bread maker along with by hand.

I was not disappointed by this recipe.  You will not be disappointed either!  This bread is VERY easy to make and sooooo yummy and yes, moist!  Go ahead, pick a sunny day and make this bread. 

Homemade Bread made with Cottage Cheese

(recipe discovered on Our Treasured Home)

Ingredients:

1 package Dry Yeast

1/4 cup warm water

1 cup cottage cheese

2 Tbsp sugar

1 tsp salt

1/4 tsp baking soda

1 whole egg, slightly beaten

2 1/2 cups flour

Directions:

1. Dissolve yeast in warm water.  Heat butter and cottage cheese until warm and butter is completely melted. Remove from heat.

2. Add in sugar, salt, baking soda and beaten egg.  Mix well and blend in yeast mixture.

3. Pour mixture into bowl of Kitchen Aid and then add flour.  Mix using dough hook or by hand until dough is completely mixed together. 

4. Place dough on a floured surface.  Fold dough over several times.  Cover dough (leaving on floured surface) with a clean dish towel and let rise until doubled in size....at least 45-60 minutes.

Look how beautiful it will look once it has doubled in size....


5.  Fold over again a couple of times and then place in a well greased 9x5x3 loaf pan.....


....let rise again until doubled....


....preheat oven to 350 degrees F and then bake for 30-35 minutes or until lightly golden brown.  Cool for a couple of minutes before removing from pan.

Homemade bread....it is such a beautiful creation!!!


Enjoy!

Happy Homemade Bread made with Cottage Cheese Baking!


Friday, October 8, 2010

Toll House Pie Bars - Week #2 of 12 Weeks of Christmas Cookies


Certain foods remind me of special moments, memories or adventures in my life.  When I think of Toll House Pie I think of my freshman year in college.  My room-mate and I would order up a whole Toll House Pie from a local diner and share it together (no worries, we wouldn't eat the whole pie  in one sitting but rather over a couple of days).  Sometimes we would splurg even further and get a good vanilla ice cream to serve it along side a warm piece of the pie.  HEAVEN!!!! :-)

Immediately when I saw this recipe for Toll House Pie Bars on Crazy Daisy's blog I thought back to those yummy happy memories of sharing this kind of pie with my dear college room-mate, Shannon.  I couldn't wait to make these bars!  Well, it only took 3 months later when I finally did end up making this d'lish recipe.  I needed to find a recipe for the 12 Weeks of Christmas Cookies group I am part of.  So viola! - no better excuse than to make this yummy and festive recipe!


I am so glad I made it!  Perfectly easy to make and EXTREMELY scrumptious!  The original recipe called for chopped walnuts but since I didn't have any I used chopped pecans and I actually think that by using the pecans instead of the walnuts my bars turned out much more "Christmas-y" than if I had used walnuts.  But that's just my opinion...use which ever nuts you like. :-)


Toll House Pie Bars
(recipe from Crazy Daisy- thanks for such a great recipe!!!)

Ingredients:


1 1/2 cups flour

1 stick butter, unsalted - softened

1/4 cup packed brown sugar

3 large eggs

3/4 cup light corn syrup

3/4 cup sugar

2 Tbsp butter, melted

1 tsp butter

1 (12oz.) bag of semi-sweet or milk chocolate chips

1 3/4 cups chopped nuts - walnuts or pecans

Directions:

1. Preheat oven to 350 degrees F. Grease a 9x13 pan and set aside.

2. Beat together flour, softened butter and brown sugar until crumbly.  Pour into prepared pan...


....and then press down all over the bottom of the pan....


3. Bake in preheated oven for 12-15 minutes until lightly browned.  While baking making the filling.

4. Combine eggs, white sugar, corn syrup, melted butter and vanilla extract....


....beat well all together.   Add in chocolate chips and chopped nuts....


....and stir well.

5. Pour filling batter over baked layer when fresh out of oven and still hot....


....spread over completely with a rubber spatula...


6. Pop in oven for 25-30 minutes or until center is set.  Cool completely (if you can wait that long!) on a wire rack and then cut into squares.  I found that smaller rather than bigger squares were best....these little treasures of  bars are sweet!


Savor, share and enjoy! 


Don't forget to go check out all the other delicious cookies/bars/candy creations from the rest of the members of the 12 Weeks of Christmas Cookies group with the links below.

Happy Toll House Pie Bars Baking!

This post has been linked up to Mommy's Kitchen for Pot Luck Sunday

                                                     Week 2 Twelve Weeks of Christmas:


Wednesday, October 6, 2010

Veggie Ramen Noodle Stir Fry


Here is a tasty, economical and quick meal - your kiddos will even like it!   Pick up a bag of your favorite frozen veggies, two packages of Ramen Noodles (discard the spice packs) and pull out of your frig some sauce of your choice and magically you will have a lovely and healthy week night meal. Of course you can jazz up this meal by adding in cooked chicken or shrimp for some extra flar and protein.

Here we go.....

Veggie Ramen Noodle Stir Fry
(recipe discovered on From My Tiny Kitchen blog)

Ingredients:

2 packs of Ramen Noodles (any flavor is fine - the spice packages are not needed)
1 bag of frozen veggies
1/4 cup sauce of your choice
1 Tbsp soy sauce - more if needed depending on what kind of sauce you use
a dash of ground pepper

Directions:

1. Bring 3 cups of water to a boil.  Add in Ramen Noddles  and cook for 3 minutes or just until soft.  Drain noodles -reserving 1/4 of the noodle water.

2. Spray a medium skillet or sauce pan with non-stick spray and put on medium heat.  Add in frozen veggies and cook until cooked through - about 3-5 minutes.....


  Be careful, you don't want to over cook your veggies (like I did!).

3. Add in sauce and reserved noodle water....


....add in soy sauce and pepper and cook for a couple of minutes to introduce all the flavors nicely.

4. Remove from heat and add in noodles....


....toss all together gently and serve....


YUM!

Happy Veggie Ramen Noodle Stir Fry Cooking!


Sunday, October 3, 2010

Caramel Apple Upside Down Cake


The season of Fall can be such a gorgeous time of the year! - especially when the sun shines, the leaves have turned colors and there is a certain crispness in the air.....and of course when there are goreous FRESH apples to be picked.  :-)  There is simply nothing better than FRESH apples!  FRESH apples to eat in your hand, FRESH apples to have in a large bowl as a decoration and of course FRESH apples to bake with all make me so very happy!

I am sure I will be sharing with you lots of apple recipes in the next couple of months as I enjoy apples in this season of Fall.  The first apple recipe that I'd like to share with you is called Caramel Apple Upside Down Cake.  What a gem of a recipe! As soon as I saw it on SnoWhite's blog Finding Joy in My Kitchen I knew I had to make it ASAP! - just the idea of baking a cake that has a topping of caramel and apples and that it is "upside down" made me melt.....d'lish!  I thank SnoWhite over and over again for offering such lovely recipes.  She is truly a talented woman in the kitchen! - as is her hubby too! Take a moment and go check out Finding Joy in My Kitchen  if you have yet to do so already.

Caramel Apple Upside Down Cake
(recipe adapted from SnoWhite @ Finding Joy in My Kitchen which was adapted from Betty Crocker)

Ingredients:


1/4 cup butter

1/8 cup heavy cream or whipping cream

1/2 cup packed brown sugar

4 medium apples - peeled, cored and sliced

1 box white or yellow cake mix

1 1/4 cup water

1/3 cup oil or applesauce (I used canola oil)

2 eggs

1/2 tsp cinnamon

1/2 tsp nutmeg

Directions:

1. Preheat oven to 350 degrees F. Melt butter in a large sauce pan.  Add in cream and brown sugar as butter melts.....stir and heat until butter is completely melted and sugar and cream are well incorporated.


2. Grease a 9x13 pan and then carefully pour caramel mixture into prepared pan...


.....Use a rubber spatula to spread all over base of baking pan....


3. Prepare apples by peeling, coring and cutting. I cut my apples into quarters and then into 4th's - next time I think I will cut my apples thicker (only into 3rds from the quarter size pieces of apples)....cut thinner or thicker as you wish.


4. Layer your apple slices all over caramel layer...


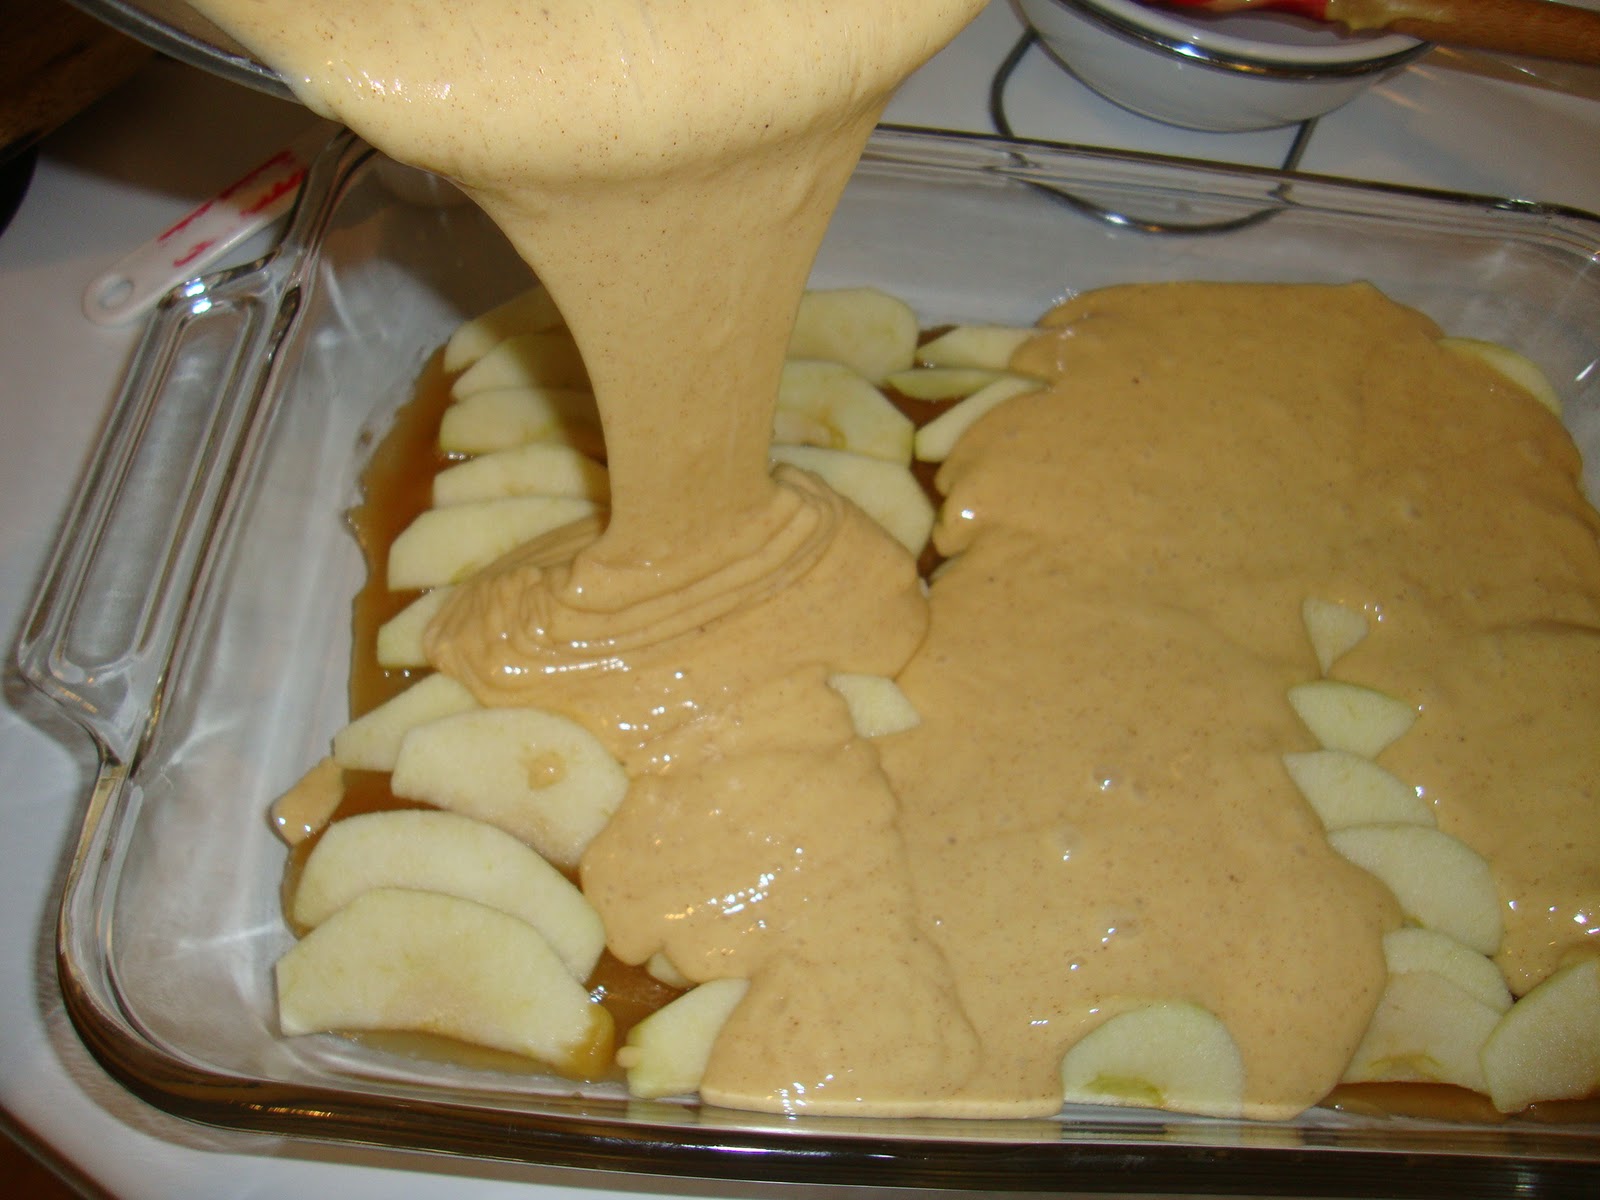
5. Prepare cake mix with water, oil (or applesauce), eggs and spices.  Mix well all together and then gently pour over apple layer...


6. Bake in preheated oven (350) for 40-45 minutes, or until toothpick inserted in the middle comes out clean. 


 Cool cake for 10 minutes and then loosen sides of the cake before carefully flipping cake over onto a serving platter. I used a tin foil wrapped cookie sheet as a platter since I don't have a platter big enough for a 9x13 cake - (Note to self....keep eyes open for such a platter).  Keep cake pan upside down for a good minute before removing so as to allow all the caramel juices to have plenty of time to come off the bottom of the pan.


Gorgeous!  Gorgeous! Gorgeous!

Serve warm with cinnamon whipped cream or vanilla ice cream.....Dee'LISH!


Happy Caramel Apple Upside Down Cake Baking!

This post has been linked to...


Friday, October 1, 2010

Week 1 of Twelve Weeks of Christmas Cookies - Molasses Cookies (Just like Starbucks!!!)


I am delighted and so very excited to post my first cookie recipe for the 12 Weeks of Christmas Cookies baking group that I have joined.    Every Friday for the next 12 weeks (yes, we have 12 weeks until Christmas) I will post a cookie recipe that can easily be made for the holidays.  Be sure to check out the other lovely ladies blogs that are also part of this group.....you will be sure to find an abundance of amazing cookie (bars and candy too) recipes from all of these blogs!


The first of 12 cookie recipes that I will be sharing is the lovely recipe for Molasses Cookies - and yes, they are just like Starbucks.....so so good! These cookies are full of flavor, soft and chewy and give you a warm sense of the holidays to come.

 I did find that the bigger the cookie the softer and chewy the cookie came out.  I first tried the small cookie scoop from Pampered Chef and then switched over to the medium size cookie scoop with much better success of a consistency that I was really  hoping for - soft and chewy!   These cookies are definitely worthy of "double batching" the recipe.

Be sure to store the cookies in an air-tight container or a sealed bag to keep them fresh and soft.  Enjoy!


Molasses Cookies (Just like Starbuck's)

Ingredients:

3/4 cup unsalted butter, softened

1 cup brown sugar

1 egg

1/2 cup molasses

2 1/2 cups flour

2 tsp baking soda

1 tsp cinnamon

1/2 tsp salt

1/2 tsp nutmeg

1 tsp ground ginger

1/2 cup white sugar (for rolling the cookies in)

Directions:

1. Cream together butter and brown sugar until light and fluffy.  Add in the egg and molasses and beat for an additional minute.

2. In a small bowl, combine all the dry ingredients (except the 1/2 cup white sugar) and whisk or stir with a fork for 30 seconds.

3. Add dry ingredients to the wet ingredients and mis until well combined.  Cover dough and refrigerate for 1-2 hours - until dough is firm.

4. Preheat oven to 350 degrees F. Roll heaping tablespoons (I used a small and medium scoop from Pampered Chef - I liked the medium size scoop the best for this cookie recipe) of dough into a ball, then roll through the white sugar....


....and then place rolled cookies on a lightly greased cookie sheet or cookie sheet lined with parchment paper or a Silapat...


5. Bake @ 350 degrees for 10-15 minutes - don't over bake for you will end up with hard rather than soft cookies.


                                                                  Aren't they perrrrty! :-)


Really yummy cookies to have with a glass of milk.....


Happy Molasses Cookies (Just like Starbucks) Baking!

Be sure to check out all the other amazing blogs that are part of this fabulous 12 Weeks of Christmas Cookies group!
Week 1 Twelve Weeks of Christmast:


LinkWithin

Related Posts with Thumbnails

ShareThis