Image Map

Monday, April 12, 2010

PW's Restaurant Style Salsa


Yummy Yummy Yummieeeeee!!!!!  Check out all these delicious "characters" who are part of Restaurant Style Salsa....aren't they just adorable! 

Discovering how to make homemade FRESH salsa has been on my list of "recipe to-do's".   Lucky for me I was actually able to check it off - now I just have to continue down the list (I am hoping to learn how to make crossiants, elcairs, ICE CREAM and master chocolate ganche to name a few).  What is on your list of "recipe to-do's"?

Now since I've checked off "salsa" on my list I just can't seem to stop making it! LOL =)  

And the fun part about this recipe - which I found from my Goddess The Pioneer Woman - is that it makes a TON.  Enough for a large crowd AND to give away to others.  

As you can see in the picture below this recipe that I am about to share with you practically fills a 2 qt. container.


Restaurant Style Salsa
(adapted from The Pioneer Woman)


Ingredients:

1 (28oz) can whole tomatoes with juice

2 (10 oz.) cans Rotel tomatoes (flavor of your choice)

1/4 cup chopped yellow onion

1/4 cup chopped red onion

1 clove garlic, minced (use more if you wish)

1 whole jalapeno pepper, quarted and sliced thin (I didn't use this in my recipe...I'm too much of a wimp)

1 tsp sugar

1 tsp garlic salt (LOVE this stuff!!)

1/4 tsp ground cumin (more if you wish)

1/2 cup cilantro (LOVE this stuff too!!! - use more if you wish...I did).

1/2 whole lime, juiced

Directions:

1. Get out your food processor or blender.  Set it all up so it works properly (You don't want to add all the ingredients to it and then find out that you haven't lined up the machine properly for it to work, which then means you have to dump out all the ingredients and start all over....this has happened to me more then once. LOL =)

2. Combine the tomatoes, Rotels, onions, jalapeno pepper (if you choose to use it), garlic, garlic salt, sugar, cumin, lime juice and cilantro in the bowl of the food processor or blender.

3. PULSE until you get the salsa to the consistency you'd like - I did about 10-15 pulses (as does The Pioneer Woman).

4. Test with a tortilla chip for taste/seasoning and adjust as needed.

5. Refrigerate salsa for at least an hour before serving.

6. Serve with your favorite chips or cheese nachos......soooo YUMMY!


Happy Restaurant Style Salsa making!

~avril :-)


Wednesday, April 7, 2010

Southern Style Strawberry Cake


Oh my.  Oh my. Oh my.  I just don't know what else to say. 

Not only is this cake amazingly yummy BUT it is also amazingly beautiful (if I do say so myself!).  The lovely part about it is that it is VERY easy to make (yummy and beautiful...amazingly)..... :-)

I was browsing through one of my favorite blogs - Joy the Baker (not only is she a beauty but man o man does she make some lovely treats - GO check her out!!!) - looking for a dessert to make for Easter dinner and I came across a recipe that she called "Southern Style Strawberry Cake".  Oh yeah, yours truly didn't have to think twice! - that was going to be the cake I would make for Easter. Without a doubt.  It was a gorgeous cake AND it had strawberries in it......I was sold.  As I read through the remaining of Joy's post on "Southern Style Strawberry Cake" I discovered that she had found the recipe in a delightful cook-book titled Sweets - Soul food desserts & memories (which again made your's truly almost fall over backwards with happiness....what a title!).  Needless to say I quickly allowed my finger tips to bring me to amazon.com and I purchased the cook-book with out even thinking twice.  It was a good choice I made.  I now have Sweets the cook-book in my hands.  I am so happy to have it with me.  VERY  VERY happy.


Southern Style Strawberry Cake

Ingredients:

1 (18.5 oz.) box WHITE cake mix (without pudding)

1 (3oz.) package strawberry jello

1 tbsp self-rising flour

4 tsp granulated sugar

3/4 cup oil (I used canola)

4 eggs

1/2 cup water

1/3 cup fresh strawberries, finely diced

Directions:

1. Preheat oven to 350 degrees F.

2. Mix together cake mix, jello, flour and sugar in a large bowl.  Mix well.  Add in oil.  Now add in eggs, one at a time until well blended.

3. Add water and diced strawberries - mix well.

4. Divide batter evenly into three 8" round baking pans that have been well greased.  Because I don't have 8" baking pans (I know...it's a crime!) I used two 9" round pans.

5. Bake for 25-35 minutes - you will see that the cake has pulled away from the sides of the pan...this means it is done.

6. Cool for 10 minutes and then gently remove cakes from pan.

Cream Cheese Frosting

1 (8oz.) package of cream cheese, softened

2 sticks unsalted butter, softened

2 (1lb) boxes of powdered sugar

pinch of salt

1 tsp vanilla extract

1 cup sweetened coconut

pink/red food coloring - optional

strawberries to decorate finished cake


1. Combine softened cream cheese and butter - beat until soft and pliable and no lumps remain.

2. Add one box of powdered sugar, salt and vanilla extract - beat until incorporated.  Add remaining box of powdered sugar until you achieve the consistency of frosting that you desire.  If it gets too thick add a splash of milk.  Mix well...it should be very light and fluffy.

3. Frost your layers of cake.

4. *Gently pat and sprinkle on the coconut to the cake (as seen in below picture). 
*If you wish to add a pink/red color to your coconut add a couple drops ontop of the coconut in a bowl and combine before applying to cake.


5. Now comes the fun part.....decorate with fresh stawberries to your heart's content.
Such a pretty pretty cake!!!!


Slice and enjoy!


Happy Southern Style Strawberry Cake Baking!
~avril :-)

Monday, April 5, 2010

Spring Asparagus, Parmesan and GruyereTart


Asparagus is yet another "food" that I consider related to the season of Spring (along with strawberries and rhubarb of course).  I came across this recipe last week and I literally jumped for joy for it was delightfully easy to make and extremely delicious!!!!  I made it for lunch paired with a fresh green salad.  It could also be made as an appetizer cut up in small pieces.

Perfect.  Statisfying. Simple. Delish.


Spring Asparagus, Parmesan and Gruyere Tart
(recipe originated from What's Gabby Cooking blog)

Ingredients:

1 sheet of Puff Pastry (I used Pepperidge Farm)

1/2 cup Gruyere cheese, shredded

1/4 cup Parmesan cheese, shredded

salt and pepper

2 tbsp olive oil


Directions:

1. Preheat oven to 350 degrees F.

2. Thaw out 1 sheet of puff pastry (p.p.) - this took me about 40 minutes....I just left the p.p. on the counter top and I grated the cheeses and prepped the asparagus.

3. Place puff pastry on a baking sheet that is lightly greased or lined with parchement paper.  Gently pinch the scored lines of the p.p. so that no serations remain.

4. Sprinkle half the cheeses onto the p.p. leaving about an inch of a border all around the sheet.

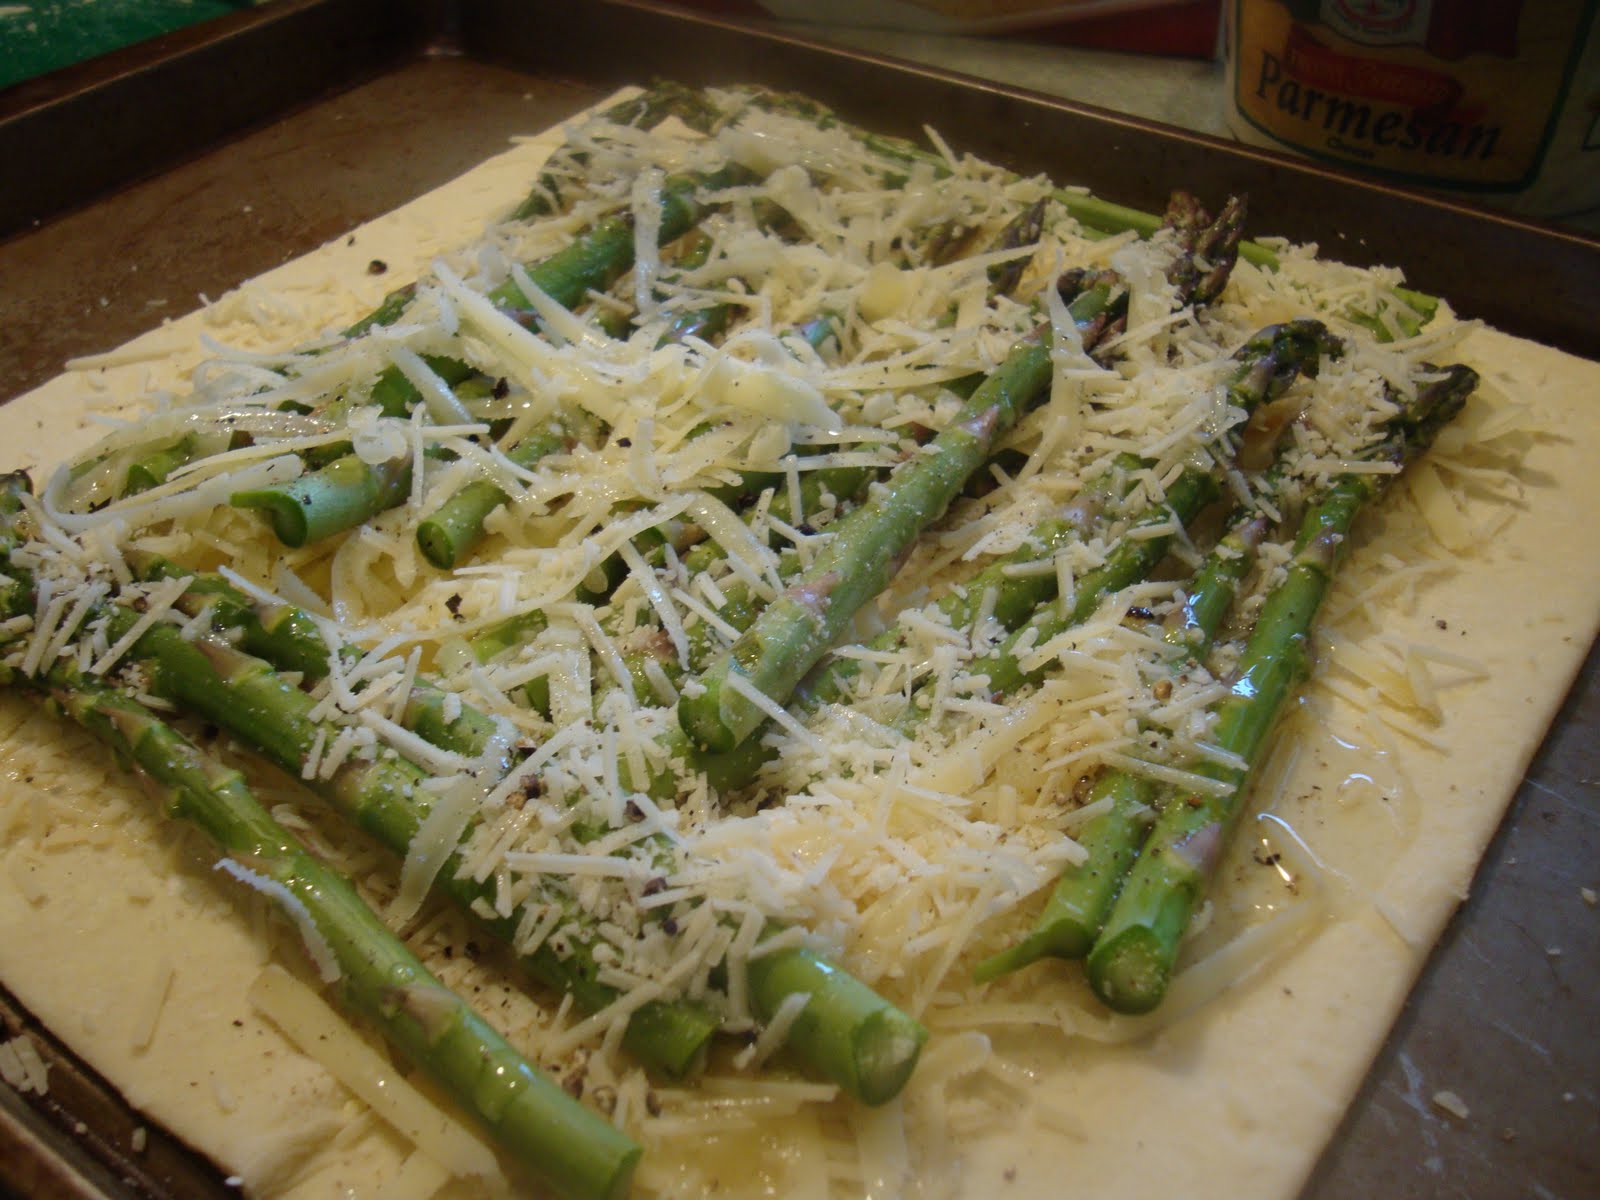
5. Line with asparagus on top of the cheese.  Scatter the rest of the cheese on top of the asparagus and drizzle with olive oil and salt and pepper.
(see picture below)


6. Bake for 20 minuted or until the p.p. has puffed and the asparagus is roasted and cooked through.

7. Cool for a couple minutes and then cut into desired pieces.


Enjoy!

 The best part of this tart is that is can be altered into many different kinds of savory/SIMPLE tarts. You could do a fresh tomato,basil and mozzarella tart for example or a mushroom, onion and cheddar tart. Puff pastry is so versatile and "user friendly".

Happy Spring Asparagus, Parmesan and Gruyere Tart making!
~avril :-)


Wednesday, March 31, 2010

Liza's Mini Cherry Cheesecakes


I just LOVE anything miniature!!!  It makes my happy.  It makes me smile.  It gives me a warm feeling inside.  "Mini" anything is delightful to me....and these mini cheesecakes are soooo yummy.  You can simply pop them right in your mouth and instantly be over come with a big ole warm and happy smile. :-)

My dear friend Liza passed this recipe onto me just after Jolie was born.  She and my sister (yes, Colline actually baked!!!) made a whole bunch of these little cuties for my Baby Shower - a precious precious day that I will never forget (love you ALL who worked so hard and with so much love to put on that Shower for me).  That being said I pass this recipe onto all of you  in hopes that you can make and share this recipe with those that you care about and wish to give a happy (and yummy) memory to.  In other words I am "paying it forward" by passing on this recipe....may you do the same.


Liza's Mini Cheese Cakes
(a version of this recipe can also be found at allrecipes.com)

Ingredients:

1 box of vanilla wafers (warning...you won't need the whole box for this recipe to plan on indulging in a couple as you make this recipe)

2 (8oz.) packages of cream cheese, softened

3/4 cup sugar

2 eggs

1 tsp. vanilla extract

1 tsp. almond extract (I adore almond flavor paired with cherries....but feel free to omit this flavoring if you wish)

1 (21 oz.) can cherry pie filling


Directions:

1. Preheat oven to 350 degrees F. Line muffin tins with miniature paper liners (I used the regular size muffin tins for the mini liners didn't fit very well in my mini muffin pan for some reason....this worked out just fine).

2. Place a whole vanilla wafer inside each paper liner.  As you see in the picture below.


3. In a mixing bowl  beat together cream cheese and sugar until light and fluffy.  Add in eggs one at a time until they are well combined.  Add in extracts. 

4. Fill in each muffin liner almost to the top with the cream cheese mixture.  I used a medium size scoop (from Pampered Chef) that worked great for this purpose.  It took about 1 1/2 scoops to fill up each liner.

5. Bake for 15 minutes or until lightly browned. Cool completely.  Top with a 2-3 cherries of the cherry pie filling.


Enjoy!

Happy Mini Cherry Cheesecake Baking!
~avril :-)

**This post has been linked to Mommy's Kitchen for "Pot Luck Sunday"

Saturday, March 27, 2010

Jazzed Up PW's Pizza Dough


Pizza....pizza....pizza.  Who doesn't enjoy a good slice of pizza?!?!  To me a slice of pizza means happiness, simplicity and yumminess all wrapped up in one moment of life.  Like a good cup of coffee (or even tea) I often associate pizza shared with others.  Pizza is just so GOOD!!! 

In the past year or so I have discovered that making your own pizza dough is really NOT that hard.  Its quite easy in fact.  It does take a little patience (to let the dough rise and such) but otherwise it is really quite easy to create and master.

As many of you may know the Pioneer Woman (also known as Ree Dummond) is one of my idols/my Queens' in the cooking/baking/bloggin world.  I have been going through her lovely cook-book - The Pioneer Woman Cooks -  one recipe at a time making her delicious food.  One of her recipes that she offers in this book is none other than pizza dough.  I have taken this recipe and added a few extra ingredients of my own to "jazz" it up.


Jazzed Up PW's Pizza Dough
(adapted from the Pioneer Woman)

Ingredients:

1 tsp active dry yeast (make sure it is fresh and NOT outdated)

4 cups all purpose flour

1 tsp kosher salt

1 tsp garlic powder (more if you wish)

1 tbsp fresh or dry parsley

1/3 cup extra virgin olive oil, plus more for drizzling

Directions:

1. Pour 1 1/2  cups warm water into a bowl.  Sprinkle yeast over the water.  Set aside.

2. Combine flour, salt, garlic powder and parsley in a mixing bowl.  With electric mixer on low speed, drizzle in the olive oil until just incorporated.

4. Go back to your bowl of warm water and yeast....gently stir this mixture and then drizzle over the flour/oil mixture.  Mix until dough forms a ball (you can also mix by hand until dough comes together).

5. Drizzle a little olive oil into a clean bowl.  Roll the ball of dough in the bowl to coat with oil.  Cover bowl with a clean/moist kitchen towel.  Set in a warm place for 1-2 hours until doubled in size (You can also cover the dough with plastic wrap and store in a fridge for up to 2 days at).

6. Preheat oven to 500 degrees F.

7. Lightly drizzle olive oil on pizza pan or rimmed baking sheet. Depending on what size thickness and pizza you wish to make you can either divide the dough in 1/2 for two medium pies or use all the dough for 1 large pie.

8. Using your hands, stretch the dough to the desired shape, pressing dough into the pan with your fingers.  Making finger marks in the dough allows for a lovely surface for the toppings be received upon.

9.Top with your favorite toppings and bake for 8-10 minutes, until the edges of the crust are golden brown.


Yummy in my tum-tum-tummy!!!

Happy Jazzed Up PW's Pizza Dough Making!
~avril :-)

Wednesday, March 24, 2010

S'mores Brownies


Oh yes, it's that time of year again....BBQ time!!!  The weather is getting nicer, the sun is getting warmer and yes, the days are getting LONGER which all leads to cook-outs with friends and family! :-)

This past weekend we went to our first BBQ and I thought it would be appropriate to bring along a batch of  S'mores Brownies for this special event.  Boy, was I right!  These brownies were scummmmmmptiously delish...no doubt about it.  Easy, quick and fun to make with kiddos too.  Jolie almost feel over backwards with happiness as she helped me plop on the BIG puffy marshmallows on top of the brownie batter.  Crushed graham crackers are mixed into the batter to really make it a "S'more" kind of brownie. 


S'mores Brownies
(recipe has been adapted from one of my favs, Joy the Baker)

Ingredients:

1 1/2 cups flour

2 tsp baking powder

1 tsp salt

1 cup (2 sticks) butter

6 oz. unsweetened chocolate 

5 large eggs

1 1/4 cups brown sugar

1 cup granulated sugar

2 tsp vanilla

1 cup graham crackers, roughly crushed with your hands

12 (or so) BIG marshmallows (*I also cut up a few additional marshmallows and stirred them into the batter at the very end)


Directions:

1. Preheat oven to 350 degrees F.  Butter a 9x13 baking pan.  

2. Combine first 3 ingredients in a small bowl and set aside.

3. Place butter and chocolate in a bowl that can be set over simmering water in a heavy saucepan.  Stir chocolate and butter in this "double boiler" until melted and smooth. Remove from heat.

4. Beat eggs, sugars and vanilla in a large bowl to blend.  Stir in melted chocolate/butter mixture, then the dry ingredients. Gently fold in crushed graham crackers. *If you wish to add in extra cut up marshmallows now is the time.  Pour batter into prepared pan.  Dot batter with LARGE marshmallows (I kind of gently pushed the m's down into the batter so that they couldn't escape during baking - :-)

5. Bake for 30-40 minutes.  You do NOT want to over-bake these brownies.  Only bake until batter comes away from the sides of pan and a toothpick inserted into the center comes out with moist crumbs attached.

6. Cool at least 20 minutes before you cut into squares and serve.

Enjoy!


Look at the yumminess of these brownies just after they come out of the oven.....marshmallows will be browned and puffy. Unfortunately the marshmallows deflate as the brownies cool.

A scoop of good vanilla ice cream served on the side is just perfect with this sweet.

Store any left-over brownies in an air tight container.


Here is cutie-pie Liza taking a bite of the brownie....see how it just ooooozies with yumminess?!?!


Happy S'mores Brownies Baking!
~avril :-)

**This post has been linked to I Heart Naptime with Chocolate Sundaes blog - a super cute blog!!!

Monday, March 22, 2010

Spring Salsa


Happy Happy Spring!!!

I just love Spring-time!  It makes me so happy to see all the new little leaves on the trees and flowers on the ground starting to pop out!

This past Saturday was just gorgeous (sunny 70 degree weather here in NH) and we were invited to our first BBQ of the season at the Rice's house (love those guys!).  I offered to bring Spring Salsa and S'mores Brownies (no worries, this recipe will be posted soon).

Spring Salsa is super easy to make and VERY yummy yummy.

Spring Salsa

Ingredients:

1 large can of SWEET corn

2-3 plum tomatoes, chopped (or a couple handfuls of cherry tomatoes, chopped)

1 ripe avocado, peeled and chopped

1/4 cup red onion, finely chopped

juice of 1 lemon

salt and pepper to taste

1/4 cup cilantro, finely chopped

Directions:

Combine all ingredients except cilantro.  Refrigerate at least 1 hour before serving.  Sprinkle with cilantro just before serving.

Serve with yellow or blue corn chips.

Variations:  Black beans, chick peas,  chopped peppers (red, orange, green or yellow) or cucumbers are all great additions to this salsa.

Happy Spring Salsa Making!
~avril :-)


LinkWithin

Related Posts with Thumbnails

ShareThis