Image Map
Showing posts with label Recipe for a crowd. Show all posts

Friday, March 2, 2012

DEEP Dish Cookie Pizza


Pizza is so good.  In our house we have it at least once a week...sometimes twice in a good week. So yes, I have special place in my heart (or should I say tummy?) for pizza.  And as you all know very well by now I have a very special place in my soul for sweet baked treats.  Combine the two together and you have a SWEET pizza pie....HEAVEN.  A DEEP Dish Cookie Pizza - there is nothing wrong with that!  Yup, a lovely sugar cookie crust which is topped with a sweetened cream cheese frosting and fresh colorful fruit for the very top = a cookie pizza.
Not only does this recipe feed a crowd but it is a dessert that is fun.  Kiddos LOVE it and so do the grown-ups. A crowd pleaser of a dessert! :-)
DEEP Dish Cookie Pizza
(recipe from the Pioneer Woman - I am waiting on pins and needles for her NEW cookbook to show up on my front door!! Can't wait!!)
Ingredients:
1 1/2 cups shortening (butter can be substituted...which is what I used - unsalted)
1 1/2 cups sugar
1 tsp orange zest
1 tsp vanilla extract
2 eggs
8 tsp whole milk (I used 2%)
4 cups flour
3 tsp baking powder
1/2 tsp salt
*2 jars (13 oz. each) marshmallow creme (I only used 1 jar)
*2 packages (8 oz each) cream cheese - at room temperature (I only used 1 package)
A variety of FRESH fruit of your choice - berries, kiwi, pears, peaches, bananas
Directions:
1. Cream together shortening (or butter) with sugar, orange zest, and vanilla extract for a couple of minutes until mixture is light and fluffy.   Add in eggs and beat again until light and fluffy.  Add in milk and mix.
2. Sift together dry ingredients - flour, baking powder and salt. Add to the creamed mixture. 
3. Remove cookie dough from bowl and slightly flatten between two sheets of waxed paper.  Refrigerate for 1 hour or freeze for 20 minutes.
4. Press dough into cookie sheet that has a 2" deep rim. Or you can divide dough into 2 pieces and roll out into large circles and place in a pizza pan (I used one cookie sheet).
5. Bake for 12-15 minutes until cookie dough is cooked and is lightly browned but not overly crisp.  Remove from oven and cool completely.
6. Make frosting while cookie sheet cools. *Combine marshmallow creme and softened cream cheese - beat until light and fluffy. I only used 1 jar of marshmallow creme and 1 package of cream cheese for my frosting - which gave me plenty to cover my cookie crust with some left over.
7. Spread frosting over cookie crust and then generously decorate with sliced fruit of your choice.  Slice into wedges or squares.
Enjoy!

Happy DEEP Dish Cookie Pizza Baking!

Sunday, January 8, 2012

A gift of a soup...Pumpkin and Black Bean Soup

Recently a good friend of mine (Hey, Melissa!) made a big pot of this soup and handed me a lovely container of it for me to enjoy with my family.  What a gift of a soup!  Not only did we enjoy a delicious lunch of hot soup on a damp cold day but I then acquired recipe that I have been able to use over and over again since then to make as gifts for other friends of mine. One of my friends even said that it was the BEST soup she had ever tasted.  Goodness did that make me happy! 

The flavors of pumpkin, curry and cumin all come together to form a delicious party in your mouth.  The texture of the soup is fun too as it has the smoothness of the pumpkin puree but also the perfection of the small black beans along with soft diced tomatoes.  All of the textures and tastes come together to make one delicious soup. 

And the soup is very easy to make!  It would make a lovely week-night dish as it can be made and on the table within 30 minutes.

 
Pumpkin and Black Bean Soup
(recipe from Rachel Ray)

Ingredients:

2 Tbsp olive oil
1 medium onion, chopped
3 cups vegetable or chicken stock
1 (14 oz) can diced tomatoes in juice, undrained
1 (15 oz) can black beans, rinsed
2 cans (15 oz) pumpkin puree
1 cup heavy cream (I used 1/2 and 1/2)
1 heaping Tbsp curry powder
1 1/2 tsp ground cumin
salt to taste
chives, chopped for garnish
Directions:

1.  Heat a large soup pan over medium high heat with 2 Tbsp of olive oil.  Add in chopped onion and cook until translucent and soft.

2. Add in broth, diced tomatoes, black beans and pumpkin puree.  Stir all together and bring soup to a gentle boil.

3. Reduce heat to medium low and stir in cream (or 1/2 and 1/2), curry powder, ground cumin and salt.  Simmer soup for at least 5 minutes.  Taste soup and adjust seasonings if need be.

Sprinkle soup with chopped chives and serve with a lovely hearty bread.  D'lish!


Happy Pumpkin and Black Bean Soup Making!


Sunday, August 21, 2011

Super Yummy Banana Crumble Cake

I know...not another recipe made with bananas! - sorry but I just have to share this one with all of you because it is SUPER yummy and full of delicious and fun ingredients.  White chocolate chips, sour cream, pecans  (or chopped nuts of your choice) and of course, ripe bananas are just a couple of mouth watering characters that come together to make this cake.  And it's not a small cake either. It feeds a crowd. It's a great cake to make to bring to a pot luck or any event that you want to share with others.

Banana Crumb Cake
(recipe from Julie's Eats & Treats...goodness this blog is a gold mine of wonderful recipes!)
Ingredients:
2/3 cup pecans (the original recipe asked for silvered almonds)
1/4 cup brown sugar, packed
2/3 cup butter, softened
1 1/2 cup sugar
2 eggs
3/4 tsp vanilla extract (if you choose to use the silvered almonds you could do almond extract instead of the vanilla)
3 cups AP flour
2 tsp baking soda
1/4 tsp baking powder
2 cups mashed ripe bananas (3-4 bananas)
1 cup sour cream
1 cup vanilla or white chocolate chips (YUMMY!)
Directions:
1. In small bowl, combine pecans and brown sugar for the topping.  Set bowl aside for later.
2. In a large mixing bowl, cream butter and sugar together until light and fluffy.  Add in eggs, one at a time, beating well after each addition.  Add in vanilla extract.
3. In yet another bowl combine flour, baking soda and baking powder.  Add these dry ingredients alternately with the mashed bananas and sour cream to the creamed mixture of butter/sugar/eggs/etc.
4. Fold in the vanilla chocolate chips to the batter.
5. Spread batter into a greased 9x13 pan.  Sprinkle reserved topping mixture over batter.  Pop into a preheated 350 degrees oven for 35-40 minutes or until toothpick inserted in center of cake comes out clean.
Cool slightly and serve.....
 Happy Banana Crumble Cake Baking!

Sunday, October 3, 2010

Caramel Apple Upside Down Cake


The season of Fall can be such a gorgeous time of the year! - especially when the sun shines, the leaves have turned colors and there is a certain crispness in the air.....and of course when there are goreous FRESH apples to be picked.  :-)  There is simply nothing better than FRESH apples!  FRESH apples to eat in your hand, FRESH apples to have in a large bowl as a decoration and of course FRESH apples to bake with all make me so very happy!

I am sure I will be sharing with you lots of apple recipes in the next couple of months as I enjoy apples in this season of Fall.  The first apple recipe that I'd like to share with you is called Caramel Apple Upside Down Cake.  What a gem of a recipe! As soon as I saw it on SnoWhite's blog Finding Joy in My Kitchen I knew I had to make it ASAP! - just the idea of baking a cake that has a topping of caramel and apples and that it is "upside down" made me melt.....d'lish!  I thank SnoWhite over and over again for offering such lovely recipes.  She is truly a talented woman in the kitchen! - as is her hubby too! Take a moment and go check out Finding Joy in My Kitchen  if you have yet to do so already.

Caramel Apple Upside Down Cake
(recipe adapted from SnoWhite @ Finding Joy in My Kitchen which was adapted from Betty Crocker)

Ingredients:


1/4 cup butter

1/8 cup heavy cream or whipping cream

1/2 cup packed brown sugar

4 medium apples - peeled, cored and sliced

1 box white or yellow cake mix

1 1/4 cup water

1/3 cup oil or applesauce (I used canola oil)

2 eggs

1/2 tsp cinnamon

1/2 tsp nutmeg

Directions:

1. Preheat oven to 350 degrees F. Melt butter in a large sauce pan.  Add in cream and brown sugar as butter melts.....stir and heat until butter is completely melted and sugar and cream are well incorporated.


2. Grease a 9x13 pan and then carefully pour caramel mixture into prepared pan...


.....Use a rubber spatula to spread all over base of baking pan....


3. Prepare apples by peeling, coring and cutting. I cut my apples into quarters and then into 4th's - next time I think I will cut my apples thicker (only into 3rds from the quarter size pieces of apples)....cut thinner or thicker as you wish.


4. Layer your apple slices all over caramel layer...


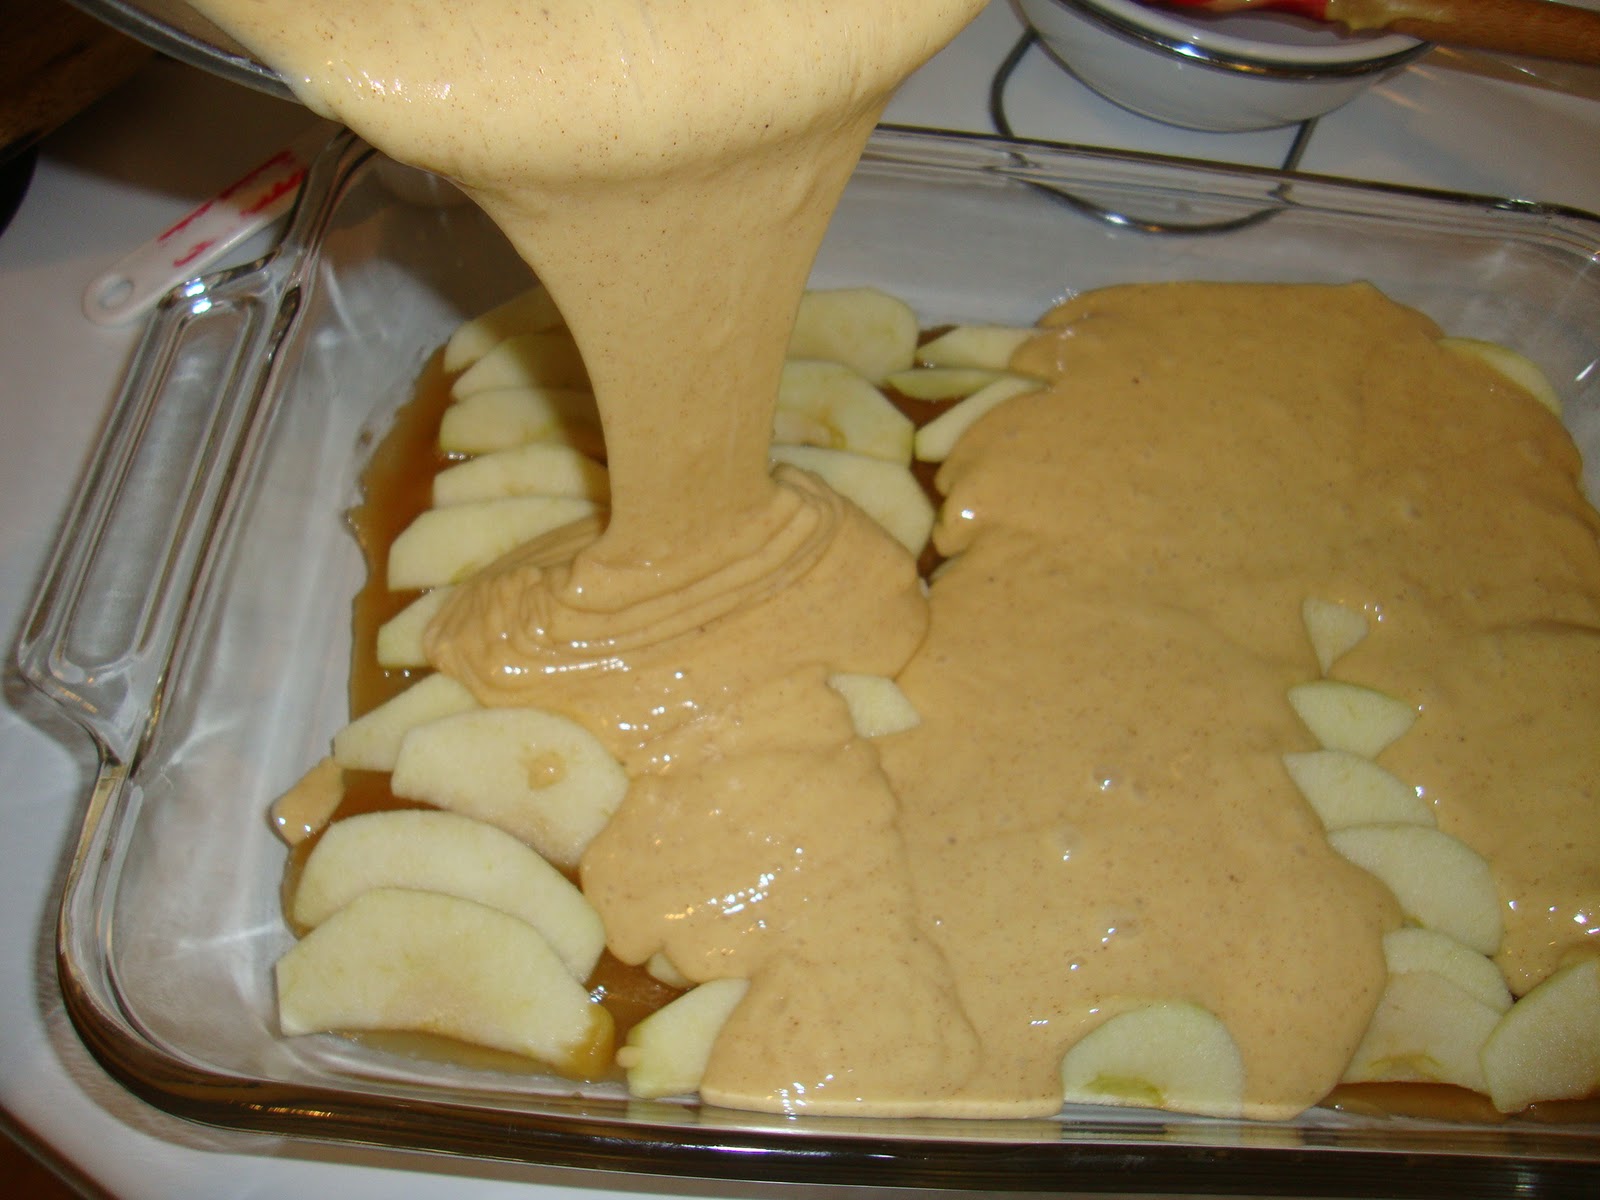
5. Prepare cake mix with water, oil (or applesauce), eggs and spices.  Mix well all together and then gently pour over apple layer...


6. Bake in preheated oven (350) for 40-45 minutes, or until toothpick inserted in the middle comes out clean. 


 Cool cake for 10 minutes and then loosen sides of the cake before carefully flipping cake over onto a serving platter. I used a tin foil wrapped cookie sheet as a platter since I don't have a platter big enough for a 9x13 cake - (Note to self....keep eyes open for such a platter).  Keep cake pan upside down for a good minute before removing so as to allow all the caramel juices to have plenty of time to come off the bottom of the pan.


Gorgeous!  Gorgeous! Gorgeous!

Serve warm with cinnamon whipped cream or vanilla ice cream.....Dee'LISH!


Happy Caramel Apple Upside Down Cake Baking!

This post has been linked to...


Thursday, September 9, 2010

Cheesy Beef Mac


Once again my girl, Siggy has provided me with a yummy and quick week night meal for the Fam (meaning EVERYONE - young and old - loved this meal in my household). AND this recipe makes a ton! - hooray for left-overs for the next day! - OR sharing with others.


Siggy makes this recipe with ground turkey which allows it to be lower in fat but I made mine with 85% lean ground beef.  Choose your ground meat and go for it!

Cheesy Beef Mac
(recipe adapted from Siggy Spice)

Ingredients:


1 lb box elbow macaroni

4 Tbsp EVOO (extra virgin olive oil)

1 large green pepper, chopped

1 large onion, chopped

2 cloves garlic, crushed

1 1/2 - 2 1/2 lbs ground beef (or turkey or chicken....you choose) - I used 1 1/2 lbs of 85% lean ground beef

1 (28 oz) can crushed tomatoes

2 (14.5 oz.) cans tomato sauce

1 can condensed cheddar cheese soup

1-2 tsp dried parsley

1-2 tsp dried basil

salt and pepper to taste

2-3 cups shredded cheddar or colby jack cheese

Directions:

1. Preheat oven to 350 degrees F.  Cook macaroni according to package directions.  Once fully cooked, drain and set aside.

2. In large skillet or dutch oven, heat 2 Tbsp EVOO.  Add ground meat and brown. Drain meat and set aside.

3. Add remaining 2 Tbsp EVOO to skillet or dutch oven, heat over medium heat.  Add in onions and green peppers.  Saute until soft.  Add in crushed garlic.  Cook all together until garlic is nice and fragrant.  Be careful not to burn the garlic!

4. Add in crushed tomatoes, tomato sauce and condensed cheese soup.  Stir to combine well.  Add in spices and allow to simmer over medium low heat for a good 15-20 minutes so as to allow all the yummy flavors to come together.  Taste and add in salt and pepper as needed.

5. Add in reserved browned meat to tomato sauce.

6. In a LARGE bowl combine macaroni and meat/tomato sauce.  Carefully stir to combine well.

7. Pour yummy noodles, sauce and meat into casserole dishes.  As Siggy did, I used a 9x13 and an 8x8.....yup it makes a TON!!! Top with cheese and bake for 20-25 minutes, or until cheese melts into a golden brown happiness and casserole is heated all the way through.

Enjoy with a nice piece of bread and a side of salad! :-)


This post has been linked to....


Sunday, August 29, 2010

Bacon Tomato Pasta


WARNING!!!!! - This lovely pasta dish is FULL of flavor and.....it is NOT low-fat at that.  But man-o-man once you bite into this pasta dish you will not regret the fact that you have saved extra calories throughout the day (or week) to eat this dish.  I can seriously promise you that....you will not regret enjoying every bite of this pasta dish.

I was attracted to it not only because it was a pasta dish (love pasta!!!) but also because it uses lots of fresh ingredients....along with the yumminess of bacon grease.  Yes, bacon grease.  Bacon grease is ingredient that really does not help out with the fat content.  But anyway, let's stop worrying about the "fat" and get to recipe so that you can hurry up and make it for your family ASAP.

Bacon Tomato Pasta
(recipe discovered on Tasty Kitchen blog from the member, PlanoSheila)

Ingredients:


1 package (16 oz.) of bacon, naturally flavored

1/2 cup bacon grease - from the bacon you are cooking

2 cans (14.5 oz. each) diced tomatoes

1/2 cup chopped FRESH basil - extra for garnishing

2 cloves garlic, minced/crushed

1 bunch green onions, chopped

2 tsp salt - if needed

2 small tomatoes, chopped - for garnishing

Grated parm cheese - for garnishing

1 box (16 oz) Capellini or Angel Hair pasta

Directions:

1. Fry bacon in a large frying pan or dutch oven....


....making sure it is cooked thoroughly but not crispy.  Drain cooked bacon on paper towels....


....Do NOT throw away bacon grease!!!! You will need to reserve 1/2 cup of grease.....


....I know, I know...it is a little bit more than 1/2 cup in this picture. :-)  Dump any remaining grease out.  No need to clean pan after cooking all of the bacon for it only adds to the flavor of the dish further.

2. When the bacon is fully cooled break into small pieces with your fingers....


....and set aside.

3. Dump tomatoes from cans into a large bowl.  Throw in chopped fresh basil.....


 and stir.  If you feel like you don't have enough basil feel add more.  Set bowl aside allowing the flavors of the tomatoes and basil to blend together.

4. Crush or dice up your garlic and chop the green onions...


5. Pour your 1/2 cup of bacon grease back into your pan and heat at medium heat for 2 minutes.  Throw in garlic and green onions....


....Cook (stirring occasionally so that the garlic doesn't burn) until onions start to get a nice tan from the bacon grease and then add in bacon....


....Reduce heat to low and allow bacon, garlic and onions to saute for about 10 minutes.

6. Add in bowl of tomatoes and basil....


....Stir together really well.  Bring to a boil and then simmer for a good 20 minutes.  Taste and add salt if needed (I honestly, didn't need any extra salt at this point - the flavors were already perfect thanks to that lovely bacon grease!).

7. Meanwhile in a large pot cook your pasta according to package directions.  Drain and set aside.  Right before serving, in a VERY large bowl, add in bacon/tomato sauce to the pasta.  Many thanks to my strong Dad for doing the pouring of the sauce....


 ....Gently combine well....


8. Garnish with freshly chopped tomatoes, basil and some parm cheese.  Soooooo yummy!!!! And left-overs the next day are super yum too!


Happy Bacon Tomato Pasta Making!

***More yummy recipes can be found at Mommy's Kitchen - Pot Luck Sunday

Monday, August 16, 2010

Cheesecake with Blueberry Topping


This is the beautiful view (@ Monadnock Berries in Troy, NH) that I had while picking blueberries.  It was in this very spot that I decided that I would make a cheesecake with blueberry topping from the blueberries that I so carefully picked from these bushes.  It was a happy moment! - not only because I finalized a special treat to make with the blueberries I was harvesting but also because picking blueberries is seriously one of my most favorite things in life to do....just after baking of course!  Blueberry picking is a peaceful and magical activity for me....it's calming and represents so many happy happy memories for me - I've picked by myself, I've picked with dear friends, I've picked with family (from far and near), I've even picked with a baby attached to my front sleeping soundly.  I LOVE BLUEBERRY PICKING!!!!

And I LOVE this simple and oh-so-yummy recipe I am about to share with you.  I found it from one of my favorites, The Pioneer Woman.  Ree made her cheesecake with a blackberry topping but because I blueberries are so close to my heart I decided to switch up the blackberries for blueberries as the topping.  It worked out beautifully!

Cheesecake with Blueberry Topping
(Recipe from The Pioneer Woman - LOVE her!!!)

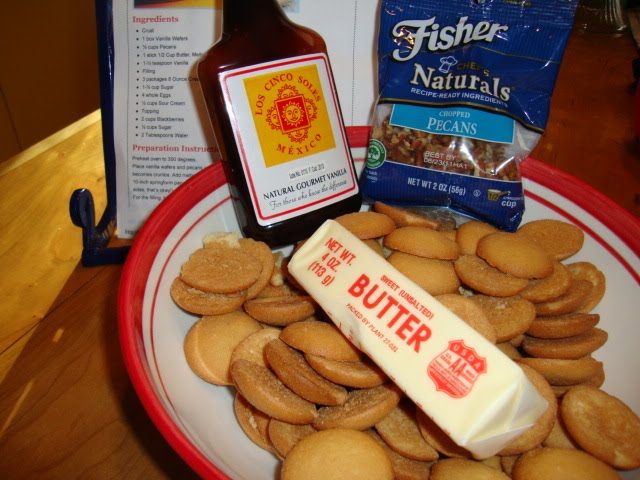
First let's make the crust for this yummy cheesecake....and let me tell you this is one of the BEST cheesecake crusts I've come upon - delish!!!


Crust Ingredients:


1 (12oz.) box Vanilla Wafers

1/2 cup pecans

1 stick unsalted butter, melted

1 1/2 tsp vanilla


Cheesecake Filling Ingredients:


3 (8oz.) packages of cream cheese

1 1/2 cups sugar

4 eggs

1/2 cup sour cream

1 tsp vanilla extract


Blueberry Topping Ingredients:


2 cups blueberries (blackberries can be easily substituted)

1/2 cup sugar

2 Tbsp water

Directions for the Crust:

1. Get out your 10" spring-form pan....


....found this one at my lovely local TJ Maxx!  Isn't it cool?! - it even has a glass bottom!  Peek A Boo Jolie!....


2. Place vanilla wafers and pecans into the bowl of a food processor....


...pulse until mixture becomes crumbs...


....then add in melted butter....


 and vanilla....


 and pulse again until combined...


3. Pour into your spring-form pan...


 and press crumbs into the bottom and up sides of pan. I used a measuring cup to do the work of the "pressing" - this worked great!


Set pan aside as you make the cheesecake filling.

Directions for Filling:

1. Combine cream cheese and sugar...


....and beat until smooth. Beat on low for 1 minute and then increase speed to medium speed for 2-3 minutes - scraping down bowl occasionally.

2. Add eggs to the cream cheese/sugar mixture one at a time....


....beating very well after each addition.

3. Add in sour cream...


....and then vanilla....


...mix again until well combined.

4. Pour mixture into crust....


...and smooth the top....


5. Bake for 1 hour and 10 minutes then turn off oven and open door slightly.  Allow cheesecake to sit in the oven with the door open for 15-20 minutes.  Remove from oven and cool....


...unfortunately my cheesecake has plenty of cracks to give it character - next time I make this cheesecake I will bake it in a water bath to avoid getting so many cracks.  Please excuse all the cracks...I'm slightly embarrassed by them.

  Refrigerate once cooled down enough to handle pan.

Time to make the blueberry topping...

Directions for Blueberry Topping:

1. Place blueberries, sugar and water in a medium saucepan...


2. Bring to a boil over medium-high heat and cook for 4-5 minutes...


...stirring occasionally.  Berries will pop and bubble a little bit as the mixture boils.  Such yumminess!

3. Turn off heat and allow to cool slightly.

4. Pour berry topping over cheesecake...


 ...and refrigerate to cool for at least 2 hours - the longer the better.

5. When ready to serve remove rim around spring-form pan and slice into 16 pieces with a long serrated knife.  Enjoy!!!


Happy Cheesecake with Blueberry Topping Baking!

This post has been linked to...

Pot Luck Sunday @ Mommy's Kitchen

LinkWithin

Related Posts with Thumbnails

ShareThis