Image Map
Showing posts with label Appetizer. Show all posts

Monday, March 2, 2015

(SRC) Chicken Parm Soup


Chicken Parmesan has always been one of my favorites.  I have ordered it many a time as an entree and even as a sandwich. I have also made it quite frequently for my family and friends using this recipe. Up until yesterday I had never made it as a soup.  And since yesterday,  Chicken Parm Soup is ALL I have eaten.  I ate it for dinner, brunch the next day, lunch and yes, now as I type I have a lovely bowl next to me as a snack. It is beyond delicious.  Would you like a taste? How about the recipe?  Well, not to worry as I will share it with you just like the lovely Elizabeth from Food Ramblings shared it with me. 


I recently met Elizabeth through my March assignment for the Secret Recipe Club.  As soon as I clicked onto Food Ramblings I knew I was going to love every minute of my assignment.  Elizabeth has created a beautiful blog that is delicious, welcoming and absolutely appealing to the eye.  She has a fantastic assortment of recipes - all of which are organized with care.  I began my search for a recipe to make this month by clicking on her "DESSERTS" (no surprise there!).  I drooled over her Peanut Butter Whoppie Pies along with her Cookie Butter Banana Bread but then decided it best that I make something with chicken as I had quite a bit of it in the freezer that needed to be used.  With chicken in mind I browsed through Elizabeth's "Chicken" recipes and discovered Chicken Parm Soup. Delighted that I had everything on hand to make this soup, including a slow cooker, I measured, chopped, sprinkled and poured all the ingredients into my crock pot, pushed the necessary buttons and walked away.  4 hours later my house smelled delicious! The soup was ready and so were the tummies of my family.  Dinner was served with happiness! 


In the above three pictures you may have noticed the bread on the side of the plate.  Because I couldn't get the idea of making banana bread with Cookie Butter (from Trader Joe's) I also baked up a couple loaves of Cookie Butter Banana Bread.  If you would like to do the same you can find the 
recipe here.


In the meantime the recipe for Chicken Parm Soup can be found right here....


Chicken Parm Soup
(recipe from Food Ramblings)

Ingredients:
3 cloves garlic, crushed
1 large can crushed tomatoes
2-3 boneless skinless chicken breasts, raw and defrosted
1 onion, chopped
3 cups chicken broth
2 tsp oregano
1 Tbsp chopped basil + more for garnish
1/2 cup Parmesan cheese + more for garnish 
4 oz. pasta or rice of your choice (I used orzo) 
salt and pepper to taste  

Directions:
Place all of the ingredients into a slow cooker except for the pasta.  Cook on high for 3.5 hrs or low for 6 hours. Shred the cooked chicken breasts and put back into soup along with dried pasta or rice.  Cook for another 1/2 hour or until pasta is cooked fully.  Serve garnished with Parmesan cheese and chopped basil if you wish. Enjoy!! 


Happy Chicken Parm Soup Making!


Monday, January 27, 2014

Broccoli Cheese Bites

 
Can you believe it!?!  I am actually blogging about something savory today!  Not sweet but savory! Honestly, I couldn't help myself.  I found the recipe for these little yummy treasure bites on Megan's blog called,  Cooking WhimsCooking Whims was my Secret Recipe Club assignment for this past month.  What fun I have had browsing through Megan's blog!  Megan lives in New England (the Boston area) and it always makes me happy when I find a fellow food blogger from New England.  Megan also has a soft spot for all things sweet.  Hello HAPPINESS!


I almost made her Chocolate Peanut Butter Surprise Cookies but then realized that maybe I should make something with banana in it as I had a lot of VERY ripe bananas that needed to be used.  I looked closely at her recipe for Chocolate Swirled Banana Bread until I realized that I needed something with veggies for dinner that night.  Thus I ended up making these fabulous Broccoli Cheddar Bites.   Everyone loved them!  The kiddos loved dipping them in Honey Mustard sauce and the adults enjoyed just popping them right into their mouth. These bites can easily be served as an appetizer or a side dish.  No matter what they will disappear fast!
 
I thank Megan for all her dedicated work that she has put into her food blog.  I thoroughly enjoyed "visiting her" and discovering lots of new recipes that I can't wait to make in my near future!

 
Broccoli Cheddar Bites
         (recipe found on Cooking Whims)
 
Ingredients:
 
1 (16 oz.) package of frozen broccoli florets, cooked according to package directions (I used 2 cups of fresh broccoli, steamed and cut up)
1 1/2 cups shredded mozzarella cheese (I used 1 cup mozzarella cheese and 1/2 cup cheddar cheese)
3 eggs, beaten
1 cup Italian seasoned breadcrumbs
 
Directions:
 
1. Preheat oven to 375 degrees F.  Line a cookie sheet with foil sprayed with non-stick cooking spray or parchment paper.
 
2. Prepare broccoli - cool and chop up into uniform small pieces.
 
3. In a medium bowl combine beaten eggs, broccoli, cheese and bread crumbs with a wooden spoon until well combined. 
 
4. Scoop batter into balls with a medium size scoop or spoon and place onto prepared cookie sheets.  Flatten slightly with the back of your hand to create a patty or leave as is for a rounder "bite".
 
5. Bake for 15 minutes and then flip bites.  Bake for an additional 5 minutes.  Cool slightly and enjoy!
 
Happy Broccoli Cheese Bites Baking!
 
Enjoy the recipes below that my fellow Secret Recipe Club  members made this past month too!


Sunday, November 21, 2010

My apologies with a Brie-lishious Appetizer

I owe apologies to both of my baking groups.....I couldn't pull it together this past week to bake a cookie recipe for the 12 Weeks of Christmas Cookies nor could I manage baking the Cinnamon Pudding Cake for the Cake Slice Bakers.  I'd like to just blame it on my "lack of energy" @ 32 weeks of pregnancy but the reality was that I just had too many other (unexpected) things on my plate last week.   Thus, I gave myself permission to not over do myself and just skip this past week of baking commitments.  It was NOT an easy decision. But as they say, "C'est la vie" - LIFE HAPPENS!!!

 In an effort to redeem myself I am sharing with all of you lovely people a most scrumptious appetizer.  OMYumminess this is a serious, serious appetizer that will make most (if not all) of you fall over backwards with happiness....as you wipe off the drool from your lips! ;-)

I discovered this recipe from a wonderful cooking class (Simple Holiday Recipes) that I took a few weeks ago at Kristen's Bakery with a couple of my precious girlfriends (Hey, Diane, Bridget and Julie!).  What a delight the class was! - full of fabulous recipes, lots of laughs and new discoveries.  Just priceless in every way possible.


Baked Brie with Pecan, Brown Sugar and Kaluha Glaze

Ingredients:


A wheel of Brie cheese

1/2 cup chopped pecans

1/3 cup packed brown sugar

1/3 cup of Kaluha (I used 2 nips)

Directions:

1. Preheat oven to 350 degrees F. In a medium sauce pan over medium heat, toast pecans for 5 minutes.  Stirring occasionally.

2. Add to toasted pecans, brown sugar and Kahlua - mix well to combine all together.  Lower heat to medium-low and cook for 7-10 minutes....allowing all the flavors to cook together and mixture to thicken.

3. Place wheel of Brie in an oven proof dish and pour glaze over top of cheese.  Place cheese in oven and bake for 10-12 minutes or until cheese has melted and heated through.

4. Serve with your favorite crackers or sliced fresh French Bread.....


Nothing better than a unique and EASY appetizer for the holidays ahead!


Hello yumminess!!!

Happy Baked Brie with Pecans, Brown Sugar and Kaluha Glaze Baking!


Monday, October 18, 2010

Cheesy "Bloomin' Onion" Bread and the WINNER


Remember these two lovely items?  Well, the WINNER of this little duo is....


....is #7, April from Abby Sweets!  Congrats to you April!  I will be contacting you to find out your mailing address so that I can send you your little prize bundle.   I had so much fun with my first giveaway....I can't wait to do another one! :-)

After all that excitement I have a VERY d'lish appetizer recipe to share.   And WOW is it serious YUM!  Easy to make.  Lots of melted cheese.  And it disappears FAST so don't even think of walking away too far once you bring it out of the oven.


Cheesy "Bloomin' Onion" Bread
(recipe discovered on Your Homebased Mom's blog - Thank you Leigh Anne!)

Ingredients:


*Round Sourdough Bread - unsliced with a good hardy crust  (I used 2 small  round sourdough breads from Panera)

*8 oz. Monterey Jack Cheese - thinly sliced (I also added some horseradish cheddar which wonderful addition to the M.J. cheese flavor)

*1/2 cup butter - melted

*1/2 cup finely diced green onions, including the white part

*2-3 tsp Poppy Seeds

Directions:

1. Preheat oven to 350 degrees F.

2. Take your bread and carefully cut into bread (DO NOT CUT ALL THE WAY THROUGH BREAD TO THE BOTTOM CRUST) with a sharp bread knife going in both directions....


...place bread on a foil covered cookie sheet.


3. Place slices of cheese between cuts in bread.  Sprinkle with green onions....


....pour melted butter all over top of bread (I used 1 stick for 2 small breads)....


....and then sprinkle with poppy seeds....


(Leigh Anne suggests wrapping whole bread in tin foil before placing in the oven - I did not do this step (guess I got too excited for the whole recipe that I didn't read the directions very well) - only had tin foil on the bottom of the cookie sheet.  You are welcome to do what feels best to you.)

....pop bread in the oven for 15 minutes - or until cheese is nicely melted.

Take out of oven.....


(Oh HAPPINESS!!!)

 ...and let cool for a couple of minutes (if you can stand it) before you place bread/breads in front of your crowd and it is is devoured!!!


Happy Cheesy "Bloomin' Onion" Bread Making!

This post has been linked up to...


Sunday, May 9, 2010

(Disappearing) Artichoke Dip

I call this delicious appetizer "Disappearing" Artichoke Dip because it is literally sooooo yummy that within a very short amount of time it is quickly consumed by all.  It is served warm usually with corn chips or cut up veggies....delish!

The beauty of this dip is that you can actually use low-fat cream cheese in place of full fat cream cheese and it will taste just as good.  And can you guess where I discovered this recipe?  Three guesses.....nope not PD....not Joy the Baker.....that's right! - The Pioneer Woman!!!!  Her recipes just keep on giving me so much happiness.  She has just a wealth of fabulous recipes.  I tell ya!  I tell ya.

Unfortunately, I do not have a ton of pictures that go along with this recipe.  I was making about 3 things at once on this day thus my brain was a little on over-load and I wasn't as organized as I usually try to be in taking step by step pictures. I apologize for this.  But because this is such a simple recipe to make I'm sure you will all get the idea of what one step is to the next.

OK so let's get down to business.


(Disappearing) Artichoke Dip
(The Pioneer Woman calls it, Hot Artichoke Dip)

Ingredients:

2 (14 oz.) cans artichoke hearts, drained

1 (8 oz.) block cream cheese, full or low-fat (I have used both and flavor/texture is just fine either way)

1 cup real mayo (can't really substitute low-fat mayo here...sorry guys, it's just not the same)

Cayenne pepper (optional)

2 green onions, chopped

1 cup grated Parmesan cheese

Dash of salt (I like to use garlic salt for an extra zing)

Freshly ground black pepper

Paprika (if you wish for little color on top)

Directions:

1. Preheat oven to 350 degrees F. Set up your food processor properly (you don't want to be fooling around with aligning your food processor bowl once you start filling it up.....like I've done and I'm sure will do again in the future - LOL!!)

2. Add 1 can of the drained artichoke hearts, the cream cheese and the mayo to the bowl of the food processor (if you don't have a F.P. you can use a blender or simply chop and stir by hand).  Add the green onions as well and cayenne pepper if you are using it.


3. Pulse the mixture 6 or 7 times.   You don't want to liquefy the mixture.  You just want to combine the ingredients while chopping the artichokes briefly.

4. Mix in Parmesan cheese and salt and pepper to taste....set bowl aside.

5. Take the second can of drained artichoke hearts and roughly chop them up to bite size pieces with a knife.  Add them to the dip and stir together gently.

6. Pour mixture into an oven-safe dish.  Bake for 15-20 minutes - until heated through and bubbly. Sprinkle with paprika and serve with your favorite chip or assortment of veggies.

As you will see in the picture below very little of this dip remains in a short amount of time.  Don't hesitate to hide a little bowl of it for yourself before it does indeed disappear!


Happy (Disappearing) Artichoke Dip Baking!
~avril :-)

This post has been linked to....


Monday, April 12, 2010

PW's Restaurant Style Salsa


Yummy Yummy Yummieeeeee!!!!!  Check out all these delicious "characters" who are part of Restaurant Style Salsa....aren't they just adorable! 

Discovering how to make homemade FRESH salsa has been on my list of "recipe to-do's".   Lucky for me I was actually able to check it off - now I just have to continue down the list (I am hoping to learn how to make crossiants, elcairs, ICE CREAM and master chocolate ganche to name a few).  What is on your list of "recipe to-do's"?

Now since I've checked off "salsa" on my list I just can't seem to stop making it! LOL =)  

And the fun part about this recipe - which I found from my Goddess The Pioneer Woman - is that it makes a TON.  Enough for a large crowd AND to give away to others.  

As you can see in the picture below this recipe that I am about to share with you practically fills a 2 qt. container.


Restaurant Style Salsa
(adapted from The Pioneer Woman)


Ingredients:

1 (28oz) can whole tomatoes with juice

2 (10 oz.) cans Rotel tomatoes (flavor of your choice)

1/4 cup chopped yellow onion

1/4 cup chopped red onion

1 clove garlic, minced (use more if you wish)

1 whole jalapeno pepper, quarted and sliced thin (I didn't use this in my recipe...I'm too much of a wimp)

1 tsp sugar

1 tsp garlic salt (LOVE this stuff!!)

1/4 tsp ground cumin (more if you wish)

1/2 cup cilantro (LOVE this stuff too!!! - use more if you wish...I did).

1/2 whole lime, juiced

Directions:

1. Get out your food processor or blender.  Set it all up so it works properly (You don't want to add all the ingredients to it and then find out that you haven't lined up the machine properly for it to work, which then means you have to dump out all the ingredients and start all over....this has happened to me more then once. LOL =)

2. Combine the tomatoes, Rotels, onions, jalapeno pepper (if you choose to use it), garlic, garlic salt, sugar, cumin, lime juice and cilantro in the bowl of the food processor or blender.

3. PULSE until you get the salsa to the consistency you'd like - I did about 10-15 pulses (as does The Pioneer Woman).

4. Test with a tortilla chip for taste/seasoning and adjust as needed.

5. Refrigerate salsa for at least an hour before serving.

6. Serve with your favorite chips or cheese nachos......soooo YUMMY!


Happy Restaurant Style Salsa making!

~avril :-)


Monday, April 5, 2010

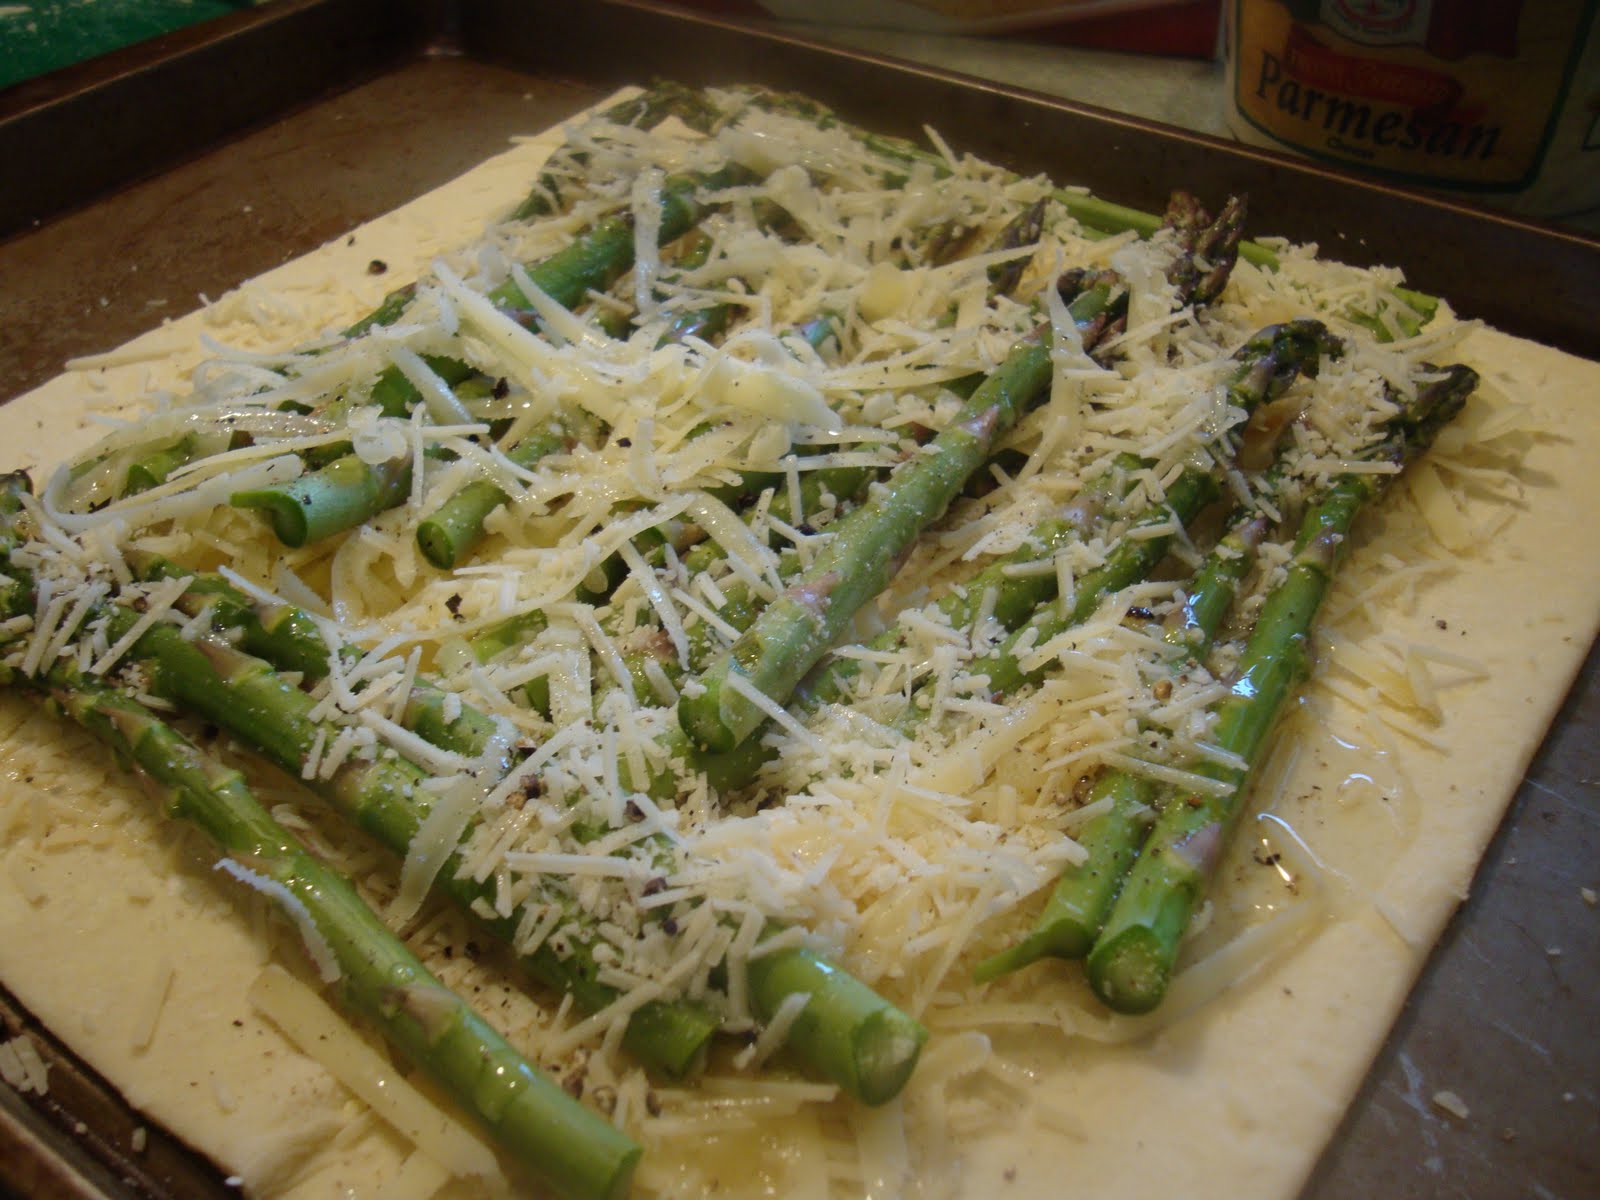
Spring Asparagus, Parmesan and GruyereTart


Asparagus is yet another "food" that I consider related to the season of Spring (along with strawberries and rhubarb of course).  I came across this recipe last week and I literally jumped for joy for it was delightfully easy to make and extremely delicious!!!!  I made it for lunch paired with a fresh green salad.  It could also be made as an appetizer cut up in small pieces.

Perfect.  Statisfying. Simple. Delish.


Spring Asparagus, Parmesan and Gruyere Tart
(recipe originated from What's Gabby Cooking blog)

Ingredients:

1 sheet of Puff Pastry (I used Pepperidge Farm)

1/2 cup Gruyere cheese, shredded

1/4 cup Parmesan cheese, shredded

salt and pepper

2 tbsp olive oil


Directions:

1. Preheat oven to 350 degrees F.

2. Thaw out 1 sheet of puff pastry (p.p.) - this took me about 40 minutes....I just left the p.p. on the counter top and I grated the cheeses and prepped the asparagus.

3. Place puff pastry on a baking sheet that is lightly greased or lined with parchement paper.  Gently pinch the scored lines of the p.p. so that no serations remain.

4. Sprinkle half the cheeses onto the p.p. leaving about an inch of a border all around the sheet.

5. Line with asparagus on top of the cheese.  Scatter the rest of the cheese on top of the asparagus and drizzle with olive oil and salt and pepper.
(see picture below)


6. Bake for 20 minuted or until the p.p. has puffed and the asparagus is roasted and cooked through.

7. Cool for a couple minutes and then cut into desired pieces.


Enjoy!

 The best part of this tart is that is can be altered into many different kinds of savory/SIMPLE tarts. You could do a fresh tomato,basil and mozzarella tart for example or a mushroom, onion and cheddar tart. Puff pastry is so versatile and "user friendly".

Happy Spring Asparagus, Parmesan and Gruyere Tart making!
~avril :-)


Monday, March 22, 2010

Spring Salsa


Happy Happy Spring!!!

I just love Spring-time!  It makes me so happy to see all the new little leaves on the trees and flowers on the ground starting to pop out!

This past Saturday was just gorgeous (sunny 70 degree weather here in NH) and we were invited to our first BBQ of the season at the Rice's house (love those guys!).  I offered to bring Spring Salsa and S'mores Brownies (no worries, this recipe will be posted soon).

Spring Salsa is super easy to make and VERY yummy yummy.

Spring Salsa

Ingredients:

1 large can of SWEET corn

2-3 plum tomatoes, chopped (or a couple handfuls of cherry tomatoes, chopped)

1 ripe avocado, peeled and chopped

1/4 cup red onion, finely chopped

juice of 1 lemon

salt and pepper to taste

1/4 cup cilantro, finely chopped

Directions:

Combine all ingredients except cilantro.  Refrigerate at least 1 hour before serving.  Sprinkle with cilantro just before serving.

Serve with yellow or blue corn chips.

Variations:  Black beans, chick peas,  chopped peppers (red, orange, green or yellow) or cucumbers are all great additions to this salsa.

Happy Spring Salsa Making!
~avril :-)


LinkWithin

Related Posts with Thumbnails

ShareThis