Image Map
Showing posts with label Week Night Meal. Show all posts

Monday, June 1, 2015

(SRC) Taco Pizza


We eat a lot of pizza in our house.  At least once a week we are throwing a pizza in the oven or ordering one up from one of our local pizza joints.   It's a meal that everyone enjoys and will eat. 

 As I searched for my recipe pick for this month's  Secret Recipe Club assignment I immediately settled on this fantastic pizza recipe.  I knew my family would eat it and I would enjoy making it.  I thank you, Anna of Cheese with Noodles  for sharing this recipe with me!  


Just as I suspected it was so much fun to make this pizza!  It came together quickly and with simple, pantry ready ingredients.  One of the best parts of this recipe is that the pizza dough is homemade AND the technique for allowing the dough to rise is done in the oven as it bakes.  Completely brilliant!  The dough is mixed up and then patted/rolled onto the prepared pizza pan and then placed into a cold oven which is only then turned on to 375 degrees F.  As the oven heats up, the dough gently rises.  Simple as that!


As you can see from the picture above instead of using the traditional pizza sauce, refried beans are used in it's place.  Thus the foundation for this Mexican flavored pizza.  I sprinkled a Mexican blend of cheese and then some chopped cherry tomatoes and sliced black olives.  Once the pizza was baked to melt the cheese I then placed some avocado slices and chopped up cilantro for additional "taco" ingredients and color.  This recipe is perfect for all taco toppings.  It all depends on what you like and what you have on hand.   I envisioned adding some lovely red onions, dollops of sour cream and a side of salsa on my next Taco Pizza.  Yum!!


Definitely try out this Taco Pizza.  It won't disappoint!!   I was completely delighted with it and send Anna of Cheese with Noodles big hugs of gratitude for this recipe.  I can't wait to make it again along with some of her other mouth watering recipes (I have my eye on her recipe for Triple Peanut Butter Cookies). 


Taco Pizza 
(recipe from Cheese with Noodles)

Pizza Dough Ingredients:
3 cups flour
1 Tbsp taco seasoning (my addition) 
1 TBSP sugar
1 tsp salt
1 packet yeast (2 1/4 tsp)
1 cup water
2 TBSP olive oil

Pizza Toppings 
1 can refried beans
2 cups shredded cheese (I used a Mexican blend) 
A variety of toppings from below.....
sliced black olives
cherry or plum tomatoes, cut into quarters or small pieces
red onions, chopped into small pieces
avocado slices
ground beef, cooked and seasoned with taco seasoning
dollops of sour cream
salsa
cilantro, chopped 

Directions:

In a large bowl fitted for a mixer prepare pizza dough by whisking together flour, taco seasoning, sugar, salt and yeast.  Add in water and oil and with your dough hook mix well all together. Dough should resemble a soft gum.  Add in water or flour if need to be to obtain such a consistency.  

Grease pizza pan and then gently pat dough out onto the sheet.  Make sure there is rim of dough higher on the edges than in the inside.  Place into a cold oven and heat to 375.  Bake for 15 minutes - starting timer when you place the pizza in the oven. Remove from oven and then spread refried beans over the dough and sprinkle with cheese.  Evenly scatter toppings that you wish to be baked such as tomatoes pieces and black olives.  Bake for an additional 15 minutes or until cheese is fully melted.  Top pizza with remaining desired toppings, slice and enjoy!! 


Happy Taco Pizza Baking!


Saturday, April 4, 2015

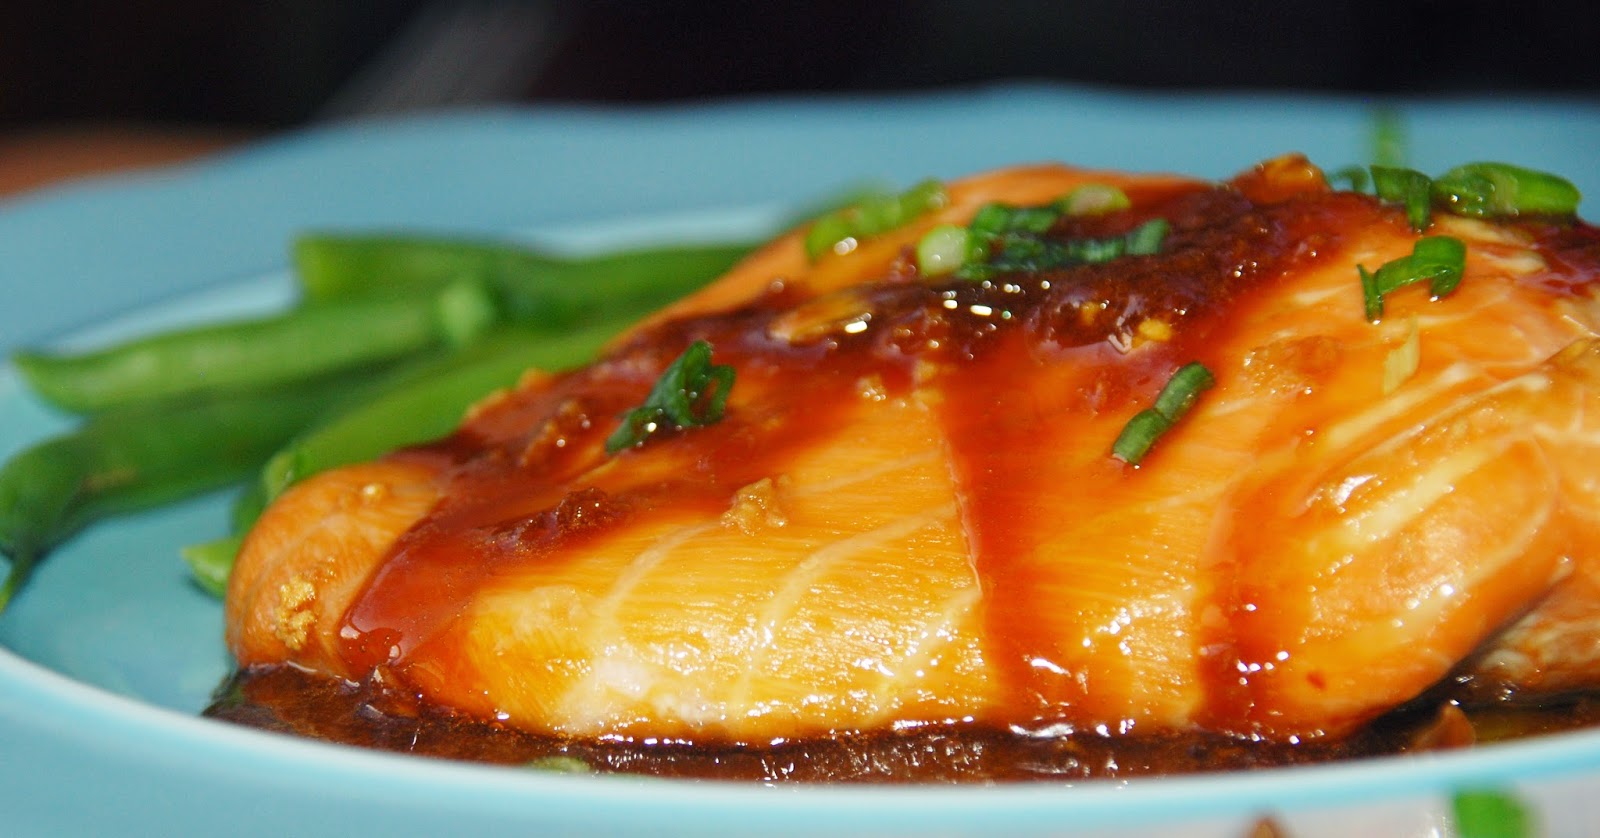
Maple Marinated Salmon


This past winter here in Southern NH has been down right rotten.  Its been cold. Its been grey. Freezing COLD temperatures for days and days in a row.  A s$#@-ton of snow + ice.  And REALLY, really COLD temperatures....opps, I guess I already said that.  But the good news is that now we have entered into the month of April so fingers crossed, the warmer weather is not too far away.  The other good news is that maple sugaring is in full swing right now in these parts of the woods.  The sap is running in our beautiful maple trees and loads of sugar houses have that lovely, fluffy steam coming out of it as the sap boils down into syrup.  In an effort to celebrate warmer temps ahead of us, I recently whipped up a delicious, simple and full of flavor salmon dinner.  And not just in ordinary salmon dinner at that.  Salmon that was marinated in a wonderful sauce of the sweetness of maple syrup, the saltiness of soy sauce and the awesomeness of crushed garlic.  A fantastic trio of flavors! 


Believe it or not I don't have much experience preparing fish.  It has only been in the past few years that I have been really making an effort to cook fish more often.  I was on top of the world with happiness when this salmon recipe came out so good.  In all honesty I was extremely proud of myself because of my lack of experience in the kitchen with fish.  I now have a new found confidence with making fish and I can't wait to make this recipe again!   I know that you will enjoy this treasure of a salmon recipe as much as my family and I did. 

You will need to marinate the fish in a mixture of maple syrup, soy sauce and crushed garlic for about 30-45 minutes before you bake it.  So just keep this time frame in mind when you plan to make this recipe.  For a perfect spring-time meal serve this fish along side some tender green beans and brown rice. You may actually think you are in a gourmet restaurant when you bit into the fish.  It's that good!

And if you are in need of some maple syrup I highly recommend you purchase it from my dear friends at Woodard's Sugar House - Mark and Katie's syrup is the BEST! And Katie even has a fabulous blog called, Maple Mama. So many great sources in one spot!! :-)

Maple Marinated Salmon 
 (recipe discovered on Cooking Classy)

Ingredients -
2 (4-6 oz) skinless salmon fillets 
1/3 cup pure maple syrup
3 Tbsp soy sauce
2 cloves of garlic, crushed
green onions and freshly ground pepper, for garnish 

Directions

In a medium bowl, whisk together maple syrup, soy sauce and crushed garlic.  Place salmon fillets into a baking dish and then pour marinate over the fillets - coating them well before covering them with plastic wrap and refrigerating.  Allow to marinate for 30-45 minutes - turning fish at least once as it marinates.  

Preheat oven to 400 degrees F.  Being careful to save the marinade, place the fish into a greased 9x13 pan and bake in preheated oven until fish is baked through - about 15 minutes.  

While fish is baking pour remaining marinade into a small sauce pan and heat over medium heat.  Bring to a boil stirring frequently.  When it boils reduce heat and cook for another minute or two.  Pour sauce over baked fish before serving. Sprinkle with sliced green onions and freshly ground pepper. Serve and enjoy! :-) 


Happy Maple Marinated Salmon Baking!


Friday, February 27, 2015

(EASY) Hearty Split Pea and Ham Soup


  Winter is really giving us something to talk about this year here in lovely New Hampshire.  It is COLD outside. There is a @#%^ ton of SNOW every where you look. And there is even icicles hanging from any possible place they can hang from. It is just hard core Winter time.  That is that.  All we can do it complain, pretend to like it, bundle up, lather on lots of lotion to remedy our dry skin, crank up the humidifiers and eat LOTS of soup.  We have to survive it some how! 


 Split Pea and Ham Soup has always been a favorite of mine.  It is delicious, filling and plain old comforting. Believe it or not this was the first time I ever made it.  I have made many a soup in my adventures in the kitchen but not a split pea soup.  I was delighted with this recipe as it is super simple,  foul proof (especially if you follow the directions) and can easily be adjusted to your liking.  If you don't like carrots go ahead an omit them - just add in more of another veggie.  If you wish to keep the soup vegetarian no worries - use vegetable bouillon instead of chicken and replace the ham meat with more vegetables.   I chose to make my broth with a nice big meaty ham bone.  I placed the ham bone in a large pot and covered it with good water (such as filtered or spring water).  I then brought the water to a nice gentle boil and then simmered it for about an hour to get all the flavor possible out of the bone.  Bones truly do give off the best flavor for a broth in my opinion. If you would like to keep things super simple for this soup go ahead and skip the ham bone and toss in some nice bouillon cubes of your choice into good water. 

So please,  join me in warming your bones and embracing the rest of this looooong WINTER to the fullest and make a pot of this soup.  Your bones will be happy as will your tummy.

Hearty Split Pea and Ham Soup
(recipe slightly adapted from Taste of Home)

Ingredients:
*1 large meaty ham bone
good water (spring or filtered) - enough to cover bone completely plus more to make 8 full cups
1 16oz. bag or 2 cups dried split peas
2 medium onions - chopped
2-3 carrots, chopped
2 large potatoes, peeled and cubed
1/2 cup sliced celery
2 cups chopped ham
1 tsp poultry seasoning
1 tsp dried marjoram
3 chicken bouillon cubes (6 cubes if you don't use a ham bone to make the broth)
1/2 tsp ground pepper
1/2 tsp salt 
Freshly grated Parmesan cheese for garnish/topping

Directions:

*If want to make your broth with the ham bone* - place ham bone in a large pot and cover with good water. Bring to a gentle boil and then lower heat to simmer for another 30-60 minutes.  Remove bone from water and set aside to cool. Once bone is cool enough to handle cut off any meat that is not too fatty and add to soup.  Measure broth and then add in additional water to make 8 cups of liquid. ~ If you chose not to make your broth with a bone just add in 8 cups of water and 6 bouillon cubes along with the rest of the ingredients of the soup ~

Pour the 8 cups of liquid back into your large pot along with all the remaining ingredients.  Stir well and bring to boil.  Lower heat to a simmer and cook soup for at least 1 hour or until all veggies are tender and soup is thick. Adjust seasoning if you wish and serve with freshly grated Parmesan cheese and a piece of yummy bread on the side.  Enjoy! 


 Happy Hearty Split Pea and Ham Soup Making!

Saturday, January 24, 2015

EASY Sesame Chicken


I cook a lot of chicken for my family.  That's no lie.  Everyone in my house likes chicken and well yes, it's good for you.   I will often buy at least 4 lbs of boneless skinless chicken breasts at a time and divide and freeze it up.   I can then just grab a bag of frozen chicken in the morning out of the freezer to defrost in the sink during the day and when it is time for dinner prep the breasts are ready to go. 


Of course the hard part comes when I have to figure out HOW to cook or bake the chicken.  Do I make a simple stir fry (for the 3rd time this month) or cube into pieces for breaded chicken nuggets or do I bake it in the oven, seasoned well along with a dash of prayer for it to remain moist?  So yes, I do often lack in creativity with all my stock in chicken breasts.  I find myself radiating often to the "chicken boards" on Pinterest in desperation for a new, fantastically DELICIOUS and SIMPLE recipe that will make my kiddos and my darling Jeff swoon with happiness over their dinner plates.


Believe it or not "swooning" did happen just the other night when I made this very dish that you see above.  Yes, purely simple and lovely, lovely praise over the delicious taste of Sesame Chicken that I, myself made with my own two hands came from the mouths of my family.  Honestly, I couldn't blame them!  This recipe for Sesame Chicken is perfection!  It tastes just like the Sesame Chicken we order from Lee Mt. Fuji (our favorite Chinese restaurant). All the flavors of tangy sweetness along with the hint of salt surrounding the tender chicken tenders is there.  And the best part is that YOU can make this very dish yourself and have the pleasure of having all your dinner companions "swoon" with happiness and admiration for YOU over the dinner you just prepared.  Just follow the recipe below.   


EASY Sesame Chicken
(recipe slightly adapted from Cinnamon Spice and Everything Nice)

Ingredients :
3-4 chicken breasts - boneless and skinless, cut into 2" cubes
salt and pepper to taste
2 whole eggs or 3 egg whites 
1/3 cup cornstarch
4 tablespoons olive oil or canola oil
2-3 green onions - sliced thin
 

Sauce Ingredients:
1/3 cup soy sauce
1/4 cup honey
2 garlic cloves, minced
fresh ginger - 1/2" grated or minced 
3 tablespoons sesame seeds

Directions:

In a large bowl whisk together eggs and cornstarch until they are well incorporated.  Toss in chicken cubes to coat.  

Heat a large frying pan with oil.  Once oil is hot add in egg coated chicken.  Cook chicken until golden brown on all sides and fully cooked - about 5-7 minutes. 

While chicken is cooking make sauce - whisk all together in a medium size bowl soy sauce, honey, minced garlic, freshly grated ginger and sesame seeds.

When chicken in fully cooked add in prepared sauce. Toss chicken with sauce to fully coat.   Sauce will thicken as it simmers with the chicken.  Take pan off of heat and serve chicken over rice along with steamed broccoli.  Sprinkle sliced greens onions over chicken to garnish if desired.  ENJOY!


Happy Sesame Chicken Cooking!


Sunday, March 3, 2013

Cheesy Ham, Broccoli and Rice Skillet

Have you noticed a change around these parts? That's right there is some serious new cuteness on my blog!  I am just giddy with excitement over my look here at Baking and Creating with Avril!!! The fabulous Ashton from Something Swanky is the master mind behind my new look.  I can't thank her enough for all her help and talent that she has provided me.  I highly, highly recommend her services.  And to boot she is an AMAAAAZING baker too! Please do go check out her yummies and then you must check out her artistic creations too!
 
 
Speaking of changes, today instead of a recipe that is sweet and requires baking I've got a savory recipe for you.  That's right nothing baked.  No sugar or flour involved.  Not even a tiny bit of vanilla extract.  Just a simple, delicious and savory dish that will knock your socks off.


All this dish requires is a large skillet with a lid that can contain all the ingredients.  And then of course some rice (white or brown is just fine), a couple of cooked ham steaks and a couple small heads of broccoli.  All of the other ingredients can most likely be found in your pantry and fridge such as chicken broth and some grated cheese.


Now Easter is just around the corner - the end of this month in fact - and most likely there will be LOTS of good deals out there for ham.  Make sure you grab some or save some from your left-overs and make this recipe.  It's super easy and SUPER yummy!!
 
Cheesy Ham, Broccoli and Rice Skillet
(recipe from the fabulous Karly from Buns In My Oven)
 
Ingredients:
 
1 Tbsp olive oil
1 cup long-grain rice
2 1/4 cups chicken broth
2 small heads fresh broccoli, cut into bite size pieces
2 Tbsp butter
3 cups cooked and diced ham, hot (warm up in microwave before adding into skillet)
1 cup sharp cheddar cheese (or a mixture of cheese of your liking...I used 1/2 parm cheese and 1/2 cheddar cheese)
1/2 tsp garlic powder
salt and pepper,  to taste
splash of milk, if needed
 
 
Directions:
 
1. Place large skillet over medium heat.  Drizzle olive oil into pan and then pour in rice.  Stir to coat.  Cook rice until toasted and light brown, stirring often so that the rice doesn't burn.
 
2. Pour in chicken broth and bring to a boil.  Lower heat to low and cover.  Cook covered for 10 minutes.  Add in cut up broccoli and cook covered for an additional 5-10 minutes or until liquid has been cooked down.
 
3. Take skillet off of heat and add in butter, ham, cheese and garlic powder. Stir well to combine and then cover for 5 minutes more.  Add in S and P to taste just before serving.
 
Serve, enjoy and rejoice over a simple and delicious meal!
 
Happy Cheesy Ham, Broccoli and Rice Skillet Making!


Thursday, April 5, 2012

Kielbasa Pasta Casserole


As a full-time working mom I always rejoice when I have a recipe that is comforting and delicious up my sleeve.  Something that comes together easily and that everyone (hopefully) will eat in the family.   If I am lucky there will be left-overs for the following day as a snack, lunch or even another dinner - I am NOT afraid of left-overs!!!

I hope your family enjoys this delicious casserole as much as mine did.  Simple ingredients of sauce (homemade or from a jar...your choice), diced tomatoes, pasta, cheese, spices, a little seasoned bread crumbs and kielbasa are the characters that make up this dish. Of course adding mushrooms, black olives, green peppers or even some nicely sauteed onions would be lovely additions to this dish.  Go ahead and make it as simple or as colorful as you wish.

Kielbasa Pasta Casserole

Ingredients:

16 oz dry ziti pasta (I used gremelli)
1 lb kielbasa, sliced in 1 inch pieces
1 Tbsp oil
2-3 (14.5 oz) cans diced or stewed tomatoes
1 large jar tomatoe sauce
1 tsp oregano, dried
1/4 cup parsley, fresh ( I used 2 Tbsp dried)
1/2 tsp ground pepper
1/4 cup italian bread crumbs
8 - 12 oz. shredded cheese (I used a mixture of mozzerella and parm)

Directions:

1. Preheat oven to 350 degrees F.  Boil large pot of salted water and cook pasta for 8-10 minutes until al dente.  Drain pasta.

2. Cook sliced kielbasa over medium heat in oil until lightly browned - about 5 minutes.

3. In a large bowl combine pasta, cooked sausage, tomatoes, sauce and spices.  Mix well all together.  Pour into a 9x13 baking dish. 

4. Sprinkle bread crumbs over pasta mixture and then top with cheese.  Cover with foil and bake for 30 minutes.  Remove foil and bake for 10-15 minutes longer until cheese has melted and golden.

Yum! 


Serve with warm crusty bread, a salad and a smile on your face...all will be happy!

Happy Kielbasa Pasta Casserole Making!


Sunday, January 8, 2012

A gift of a soup...Pumpkin and Black Bean Soup

Recently a good friend of mine (Hey, Melissa!) made a big pot of this soup and handed me a lovely container of it for me to enjoy with my family.  What a gift of a soup!  Not only did we enjoy a delicious lunch of hot soup on a damp cold day but I then acquired recipe that I have been able to use over and over again since then to make as gifts for other friends of mine. One of my friends even said that it was the BEST soup she had ever tasted.  Goodness did that make me happy! 

The flavors of pumpkin, curry and cumin all come together to form a delicious party in your mouth.  The texture of the soup is fun too as it has the smoothness of the pumpkin puree but also the perfection of the small black beans along with soft diced tomatoes.  All of the textures and tastes come together to make one delicious soup. 

And the soup is very easy to make!  It would make a lovely week-night dish as it can be made and on the table within 30 minutes.

 
Pumpkin and Black Bean Soup
(recipe from Rachel Ray)

Ingredients:

2 Tbsp olive oil
1 medium onion, chopped
3 cups vegetable or chicken stock
1 (14 oz) can diced tomatoes in juice, undrained
1 (15 oz) can black beans, rinsed
2 cans (15 oz) pumpkin puree
1 cup heavy cream (I used 1/2 and 1/2)
1 heaping Tbsp curry powder
1 1/2 tsp ground cumin
salt to taste
chives, chopped for garnish
Directions:

1.  Heat a large soup pan over medium high heat with 2 Tbsp of olive oil.  Add in chopped onion and cook until translucent and soft.

2. Add in broth, diced tomatoes, black beans and pumpkin puree.  Stir all together and bring soup to a gentle boil.

3. Reduce heat to medium low and stir in cream (or 1/2 and 1/2), curry powder, ground cumin and salt.  Simmer soup for at least 5 minutes.  Taste soup and adjust seasonings if need be.

Sprinkle soup with chopped chives and serve with a lovely hearty bread.  D'lish!


Happy Pumpkin and Black Bean Soup Making!


Tuesday, December 6, 2011

Shrimp Fried Rice

It is essential to have a quick, super yummy, stress free and healthy dinner recipe up your sleeve for this time of year. I am sure many of you are starting to get that heavy almost dizzy feeling of holiday craziness swirling around in your head by now.  Goodness it is almost 2 1/2 weeks until Christmas (yes, I said 2 1/2 weeks!) by golly!  Don't panic.  It will ALL get done some how or another.  And if it doesn't....well, there is always next year.  Can you tell how I calm myself down when I start to panic about not being able to fit it all in or complete all those last minute "most make" or "must bake" or "must finish" projects?  I reason with myself.  That's all there is to it.  And then I eat something delicious and all my stress disappears just like that!  Magic. Simple and pure magic. 

 Today I want to share with you a little magical recipe for dinner time (or lunch if you are so inclined).  It is simple.  It is quick. It is even flexible as far as ingredients are concerned.  And yes, it is SUPER good!  Shrimp Fried Rice.  And, if you really want you could add cooked beef or chicken to the rice instead of shrimp.  Or you could just load it up with lots of veggies and call it a Veggie Fried Rice.  Go nuts with this recipe.  Make it your own variation of fried rice with what you choose to add in to it.  No matter what it will be magically d'lish!


Shrimp Fried Rice
(recipe found on my go-to recipe source, Tasty Kitchen - I just LOVE this site!!)
Ingredients:

1 cup rice (white or brown)
4-6 Tbsp butter (you choose how crazy you want to get with your butta...I used 4 Tbsp and it was plenty)
1 lb shrimp,  washed, shelled and deveined
1 cup frozen peas
1/2 onion, chopped
1/3 cup soy sauce (more or less depending on your taste)
3-4 green onions, chopped

Directions:

1. Cook rice in 2 cups water until done.  Add in butter and toss around a bit so that it melts into rice nicely.

2.  Saute chopped onions until soft and translucent.  Add to rice along with soy sauce, peas and shrimp.   Cook all together for a good 5-7 minutes making sure peas are no longer frozen and shrimp is not over cooked.

3. Just before serving toss in chopped green onions and then sprinkle some on top of dish just for good measure (and to make it pretty).


Enjoy!

Happy Shrimp Fried Rice Making!

Wednesday, October 5, 2011

Super EASY and Super YUMMY Chicken Chili

Recently as I was browsing through one of my favorite food sites, Tasty Kitchen, I came up upon a lovely recipe for Chicken Chili.  The list of ingredients were very simple (all of which I had on hand) and it was put together in a crock pot. I was sold!  Simple ingredients, easy prep and slow cooker friendly - I couldn't ask for anything better. 


I altered the original recipe from TK member, forevernowandthen, in a couple of places. The original recipe called for a large (16 oz.) jar of salsa of which I didn't have so I used a small jar of salsa and a can of Rotel tomatoes.  The original recipe also called for 2 cans of white beans - I only had 1 can of white beans so I added a can of light kidney beans.  I have to say my alterations resulted in a very yummy meal.

Chicken Chili
(recipe altered from Forever Now and Then )

Ingredients:

1 1/2 lbs boneless and skinless chicken, diced and cooked
1 jar (16 oz.) salsa  (I used a small jar of salsa and 1 can Rotel tomatoes)
1 1/2 lbs Monterey Jack Cheese, shredded (you could easily use a combo of Monterey and Cheddar cheese instead of all Monterey)
2 cans (15 oz. each) white beans (I used 1 can white beans and 1 can light kidney beans)

Directions:

1.  Place all ingredients (cooked chicken, salsa, cheese, beans) in crock pot and stir well to combine.

2. Cook on low for 2-3 hours.  Stir one about half way through the cooking period.

Serve with  tortilla chips and a dollop of sour cream (if you wish).  Enjoy!

Happy Chicken Chili Making!

Saturday, February 5, 2011

The Fastest (and YUMMIEST) Chicken Parmesan


One of my most favorite meals to eat is Chicken Parmesan.  Yum....I love the combo of chicken, sauce and cheese - and of course all served on a lovely bed of pasta.  Yup, I am now drooling just thinking of this delightful meal.  :-)

Recently I discovered a fabulous recipe for Chicken Parm.  It is not only fabulous in taste, flavor and yumminess but also in the amount of time it takes to make it.  Hands on time is literally minutes...and not a lot of minutes at that!  And then you just walk away and let the magic of the crock pot do it's work.  Within a couple hours your house is filled with the aroma of comfort and deliciousness that comes from your crock pot. 

Honestly, I don't always have good luck with crockpot recipes.  Either the dish turns out too dry, too soggy or just tastes terrible over all.  Well, believe me this crockpot recipe that I am about to share with you is GREAT!  It was a HUGE success and I seriously encourage you to put aside 5 minutes and make it.

Crock Pot Chicken Parmesan
(recipe from A Year of SlowCooking)

Ingredients:

2-4 boneless, skinless chicken breast halves

1/2 cup plain bread crumbs (or you can use Italian seasoned bread crumbs and then don't add the Italian seasoning below)

1/2 cup grated parmesan cheese

1 tsp Italian seasoning

1/4 tsp ground black pepper

1/4 tsp kosher salt

1 Tbsp olive oil

1 egg, beaten

sliced mozzarella cheese (4-6 slices depending on how much you choose to use)

1 jar of your favorite marinara sauce

Directions:

1.  Drizzle 1 Tbsp olive oil over the bottom of crockpot stoneware.

2. Beat egg and place in a medium bowl.  In a second medium bowl mix the bread crumbs, spices, and grated parmesan cheese all together.

3. Dip chicken in beaten egg and then toss into bread crumb mixture to coat completely on both sides.  Place chicken breasts on the bottom of crockpot.

4. Place a layer of mozzarella slices on top of breaded chicken breasts.  Cover cheese layered chicken with jar of sauce.

5. Place lid of crockpot securely on and turn heat onto LOW for 6-7 hours or HIGH for 3-4 hours.  Walk away and let the crockpot do its magic.

Serve over cooked pasta of your choice.  D'lish!


Happy Chicken Parmesan Making (in your crockpot)!

Friday, January 7, 2011

Simple Pasta Happiness - Pasta Carbonara

There are lots of SIMPLE things in life that make me happy.  Getting a smile from a stranger, seeing the first green leaves of Spring show their faces on the trees and bushes, the smell of coffee, babies hands and feet, hearing a song that reminds me of a special moment/experience/adventure along with knowing what I am going to make for dinner (I hate that struggle of figuring out what's for dinner!!!) are ALL examples of SIMPLE things that make me happy.  What SIMPLE things make you happy?

On the subject of SIMPLE and DINNER I have a wonderfully EASY pasta dish that I'd like to share with you.  I have been seeing this meal on many of my blogger friends "Monthly Menus" (if only I could get my act together to do such a "Monthly Menu"!) and I took it as a sign that I just had to make it.  Yes, I had to try out Pasta Carbonara.....and boy, was I NOT disappointed!  Soooo yummy and soooo easy to put together!  When you throw pasta, cheese and bacon all in one dish how can it NOT be good! ;-)


Pasta Carbonara
(recipe can also be found on Mommy's Kitchen )

Ingredients:

1 (16oz) box spaghetti of your choice (regular, thin or angel are all great)

2 Tbsp olive oil, separated

8 slices bacon, chopped

1/2 medium onion, chopped

1 clove garlic, crushed or minced

1/8-1/4 cup white wine (optional)

2 eggs, beaten

2 Tbsp's heavy cream or milk

1/2 cup grated parm cheese

1/2 cup pasta water

salt and pepper to taste

2 Tbsp's chopped parsley (fresh or dry)

extra parm cheese for garnish

Directions:

1. Cook pasta in a large pot of salted water.  Cook until pasta is al dente.  Reserve 1/2 cup of pasta water and then drain pasta.  Set aside after you toss with 1 Tbsp of olive oil.

2. Cook chopped bacon in a large skillet or dutch oven until slightly crisp.  Remove bacon onto paper towels.  Set cooked bacon aside.  Reserve 2 Tbsp's bacon fat.  Add remaining 1 Tbsp olive oil to bacon fat and cook chopped onion.

3. Add minced/chopped garlic to onion once onion is translucent.  Cook for 1 minute together then add wine if desired.  Cook an additional 1 minute with wine.

4. Return bacon to pan and cooked spaghetti.  Toss to coat and heat through.  Add in reserved pasta water if need be.  Additional olive oil can also be added if pasta seems to stick together too much.

5. Mix together beaten eggs, cream and parm cheese and then add to pasta/bacon mixture. Take pasta dish off of heat.

6. Season with salt and pepper to taste.  Serve immediately with chopped parsley and grated parm cheese.  Yum!!


Happy Pasta Carbonara Making!


Thursday, November 11, 2010

It's good for you!!! - Spinach, Cheese and Pasta Dish


Not only is this dish good for you, it is an easy "Week Night Meal" too!  Good for you and easy peasy to make........Wonderful!  And the fun part about this dish is that there are crispy French Fried Onions it in!- SUPER YUM!  It is so much fun for me to find a recipe that has an unexpected ingredient mixed into it.  Who would've guessed that French Fried Onions would be part of this recipe??  Yes, to the spinach, pasta and cheese (the title kind of gives it away....) but French Fried Onions?!?  Okay, enough of my own personal happiness with this recipe. Time for ME to share the recipe and for YOU to be the judge if this pasta dish makes YOU happy! :-)

Baked Spaghetti with Spinach and Cheese
(recipe from a delicious blog....Cassie Craves)

Ingredients:


4 oz. thin spaghetti or angel hair - broken into 2-inch pieces

1 egg

2 cups (16 oz.) sour cream

1/4 cup grated parmesan cheese

1/4 tsp garlic powder

salt and pepper to taste

2 cups shredded monterey jack cheese (or cheese of choice)

1 package (10 oz.) frozen chopped spinach, thawed and well drained

1 can (2.8 oz.) french-fried onions, divided

Directions:

1. Preheat oven to 350 degrees F.   Cook spaghetti in salted water according to package directions.   Drain.

2. While pasta cooks, beat egg (as you can see I got so excited for this recipe that I just combined all ingredients instead of beating egg before adding in the other ingredients....worked out fine) in a medium bowl.  Add sour cream, parm cheese, garlic powder and salt and pepper to taste.....


3.  Add cooked and drained noodles to sour cream/egg mixture along with cheese, spinach and 1/2 of the fried onions....


  Stir well all together.  Pour mixture into a well greased 2 quart baking dish.

4. Sprinkle remaining fried onions on top of noodles....


 ....and then cover with tin foil. Bake for 30 minutes then removed tin foil and continue baking for another 5-6 minutes or until onions are nice and golden brown.

For those of you that like/need to have a meat included on your dinner menu just add a nice grilled piece of chicken along side this dish and viola you've got your *protein, veggie and starch all at once! *Call me crazy but when I serve a dish for dinner if it has cheese in it of some form or another I consider it the "protein" of the dinner.

Enjoy!


Happy Baked Spaghetti with Spinach and Cheese Baking!


LinkWithin

Related Posts with Thumbnails

ShareThis